Introduction
Coolify is a free and open source tool that allows you to easily host your own applications, databases or services (such as WordPress, Formbricks and Grafana) without having to manage servers.
In this tutorial, you will learn how to install and set up Coolify on a Linux server.
We will be using Debian 12 (Bookworm) in this tutorial, but these steps should also work on other Linux distributions supported by Coolify.
Prerequisites
- A cloud server (a new, fresh server is recommended)
- An operating system supported by Coolify. You can find the list of supported operating systems in the Official Coolify Documentation
- Server architecture (either AMD64 or Arm64)
- Coolify minimum specs: 2 vCPUs, 2GB RAM, and 30+GB storage. These are the minimum requirements, so choose a server with higher specs based on your needs.
- Root user access
- An SSH key for authentication (recommended)
Step 1 – Configure your server
First, connect to your server using SSH. If you are not logged in as the root user, use the following command to access the root shell:
sudo -i
Step 1.1 – Update your server and install the required packages
Start by updating your server:
apt update && apt dist-upgrade -y
Next, install curl, which is required for the Coolify installation script:
apt install curl -y
Step 2 – Install Coolify
Run the installation script to install Coolify:
curl -fsSL https://cdn.coollabs.io/coolify/install.sh | bash
After the installation is complete, you will see the following message:
Congratulations, Your Coolify instance is ready to use.
Please visit http://203.0.113.1:8000 to get started.
Step 3 – Create a new account on Coolify
After installing Coolify, visit the link provided in the terminal.
You will be prompted to create an account. Enter your details and set up your account.
Step 4 – Configure the domain for Coolify
After creating your account on Coolify, the first thing you need to do is set up a domain. Accessing Coolify via http://203.0.113.1:8000 (your server IP and port) is insecure because it uses HTTP.
After connecting a domain, Coolify automatically generates and configures proxy and SSL certificates.
Go to the DNS management page in your domain provider dashboard (like GoDaddy, Namecheap, etc.) and add two new A records like the image below:
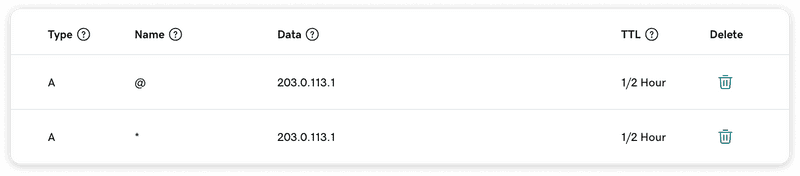
Note: If you don't see the Auto option under TTL, select the lowest available value.
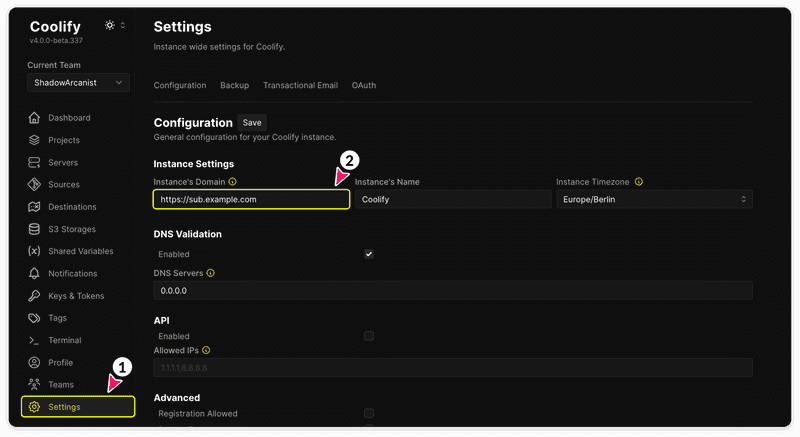
Next, go to the settings page in Coolify and add the domain you want to use to access Coolify in the “Instance domain” field:
Finally, visit your sample domain in your browser. You should be able to access Coolify over HTTPS (it may take a minute or two for the website to be available for the first time).
Step 5 – Set up the firewall
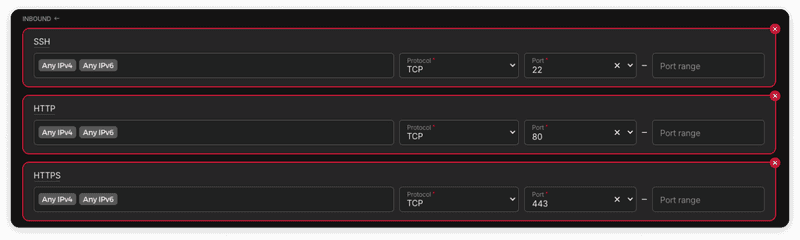
In the Hetzner dashboard, go to the Firewalls section and create three new inbound rules as shown below:
Once you enable the firewall, you will not be able to access Coolify via http://203.0.113.1:8000 (your server IP and port). You will only be able to access Coolify via the sample domain you set up in the previous step (Step 4).
All applications deployed on Coolify use HTTPS, as Coolify automatically handles reverse proxy and SSL certificates.
Result
We installed Coolify and set up a custom domain for it on our server. Additionally, we configured firewall rules to restrict access to the server and Coolify from the server IP address, allowing access only through our custom domain.