Introduction
Modern web applications can be taken to the next level by integrating artificial intelligence. This course focuses on the advanced development of multi-faceted bots that use natural language processing, image generation, and speech recognition. These bots provide a unique user experience and engage users through multiple modes of interaction.
This tutorial develops a multi-faceted bot using the Django Big Language Model and OpenAI for conversational AI, Whisper for accurate speech transcription, and DALL-E for image generation. It describes building a web application that generates stories with accompanying images. Users can specify the topic of the story with voice or text, and the application responds with a generated story decorated with visuals.
By the end of this tutorial, you will have created an application that can understand and respond to user input in various forms, including text, audio, and images. This significantly increases user interaction with the application, making it more intuitive and accessible.
Prerequisites
- Basic understanding of Python and Django
- An OpenAI API key: This tutorial requires you to interact with OpenAI's GPT-4 and DALL-E models, which require an API key from OpenAI.
- Whisper
- OpenAI Python package
Once your environment is active, run the following to install the OpenAI Python package:
(env)sammy@ubuntu:$ pip install openaiStep 1 – Integrate OpenAI Whisper for Speech Recognition
In this step, you will set up OpenAI Whisper in your Django application to allow it to transcribe speech to text. Whisper is a robust speech recognition model that can provide accurate transcriptions, an important feature for our multi-faceted bot. By integrating Whisper, our application will be able to understand user input provided via voice.
First, make sure you are working in the Django project directory. After the prerequisite tutorials, you will need to prepare a Django project for this integration. Open your terminal, navigate to the Django project directory, and make sure your virtual environment is active:
sammy@ubuntu:$ cd path_to_your_django_project
sammy@ubuntu:$ source env/bin/activate
Setting up Whisper in your Django application
What needs to be done now is to create a function that uses Whisper to transcribe audio files into text. Create a new Python file called whisper_transcribe.py.
(env)sammy@ubuntu:$ touch whisper_transcribe.pyOpen whisper_transcribe.py in your text editor and type Whisper. Next, let's define a function that takes the path to an audio file as input, uses Whisper to process the file, and then returns the transcription:
import whisper
model = whisper.load_model("base")


def transcribe_audio(audio_path):
result = model.transcribe(audio_path)
return result["text"]
In this code snippet, you are using the “base” model for transcription. Whisper offers different models to suit different accuracy and performance needs. You can easily experiment with other models based on your needs.
Transcription test
To test transcription, save an audio file to your Django project directory. Make sure the file is in a format that Whisper supports (such as MP3, WAV). Now, modify whisper_transcribe.py by adding the following lines at the bottom:
# For testing purposes
if __name__ == "__main__":
print(transcribe_audio("path_to_your_audio_file"))
Run whisper_transcribe.py with Python to see the transcription of your audio file in your terminal:
(env)sammy@ubuntu:$ python whisper_transcribe.pyIf everything is set up correctly, you should see the transcribed text output in the terminal. This functionality serves as the basis for voice-based interactions in our bot.
Step 2 – Creating text responses with GPT-4
In this step, you use GPT-4 LLM to generate text responses based on user input or the speech transcription obtained in the previous step. GPT-4, with its large language model, can generate coherent and context-relevant responses, making it an ideal choice for our multi-modal bot application.
Before proceeding, make sure that the OpenAI Python package is installed in your virtual environment as described in the prerequisites. The GPT-4 model requires an API key to access it, so make sure you have it ready. You can add the OpenAI API key to your environment variables instead of adding it directly to the Python file:
(env)sammy@ubuntu:$ export OPENAI_KEY="your-api-key"Setting up chat completion
Go to your Django application directory and create a new Python file called chat_completion.py. This script will communicate with the GPT-4 model to generate responses based on the input text.
import os
from openai import OpenAI
client = OpenAI(api_key=os.environ["OPENAI_KEY"])

def generate_story(input_text):
# Call the OpenAI API to generate the story
response = get_story(input_text)
# Format and return the response
return format_response(response)
This code snippet first sets up the API key required to authenticate with OpenAI services. It then calls a separate function, get_story , to call the API with OpenAI for the story, and then another function, format_response , to format the API response.
Now let's focus on the get_story function. Add the following to the bottom of your chat_completion.py file:
def get_story(input_text):
# Construct the system prompt. Feel free to experiment with different prompts.
system_prompt = f"""You are a story generator.
You will be provided with a description of the story the user wants.
Write a story using the description provided."""
# Make the API call
response = client.chat.completions.create(
model="gpt-4",
messages=[
{"role": "system", "content": system_prompt},
{"role": "user", "content": input_text},
],
temperature=0.8
)

# Return the API response
return response
In this function, you first set the system command, which informs the model about the task it needs to perform, and then you request the ChatCompletion API to generate a story using the user's input text.
Finally, you can implement the format_response function. Add the following to the bottom of your chat_completion.py file:
def format_response(response):
# Extract the generated story from the response
story = response.choices[0].message.content
# Remove any unwanted text or formatting
story = story.strip()
# Return the formatted story
return story
Test the generated responses
To test text generation, modify chat_completion.py by adding a few lines at the bottom:
# For testing purposes
if __name__ == "__main__":
user_input = "Tell me a story about a dragon"
print(generate_story(user_input))
To see the generated response in your terminal, run chat_completion.py with Python:
(env)sammy@ubuntu:$ python chat_completion.pyBased on the prompt, you should see a creative response from GPT-4. Experiment with different inputs to see different responses.
In the next step, you add images to the generated stories.
Step 3 – Generate images with DALL-E
Designed to create accurate images from text messages, DALL-E enables your multifaceted robot to enhance stories with visual creativity.
Create a new Python file called image_generation.py in your Django application. This script uses the DALL-E model to generate the image:
(env)sammy@ubuntu:$ touch image_generation.pyLet's create a function in image_generation.py that sends a notification to DALL-E and retrieves the generated image:
import os
from openai import OpenAI
client = OpenAI(api_key=os.environ["OPENAI_KEY"])

def generate_image(text_prompt):
response = client.images.generate(
model="dall-e-3",
prompt=text_prompt,
size="1024x1024",
quality="standard",
n=1,
)
image_url = response.data[0].url
return image_url
This function sends a request to the DALL-E model specifying the text command, the number of images to be generated (n=1), and the size of the images. It then extracts and returns the URL of the generated image.
Script test
To demonstrate the use of this function in a Django project, you can add the following example at the bottom of your image_generation.py file:
# For testing purposes
if __name__ == "__main__":
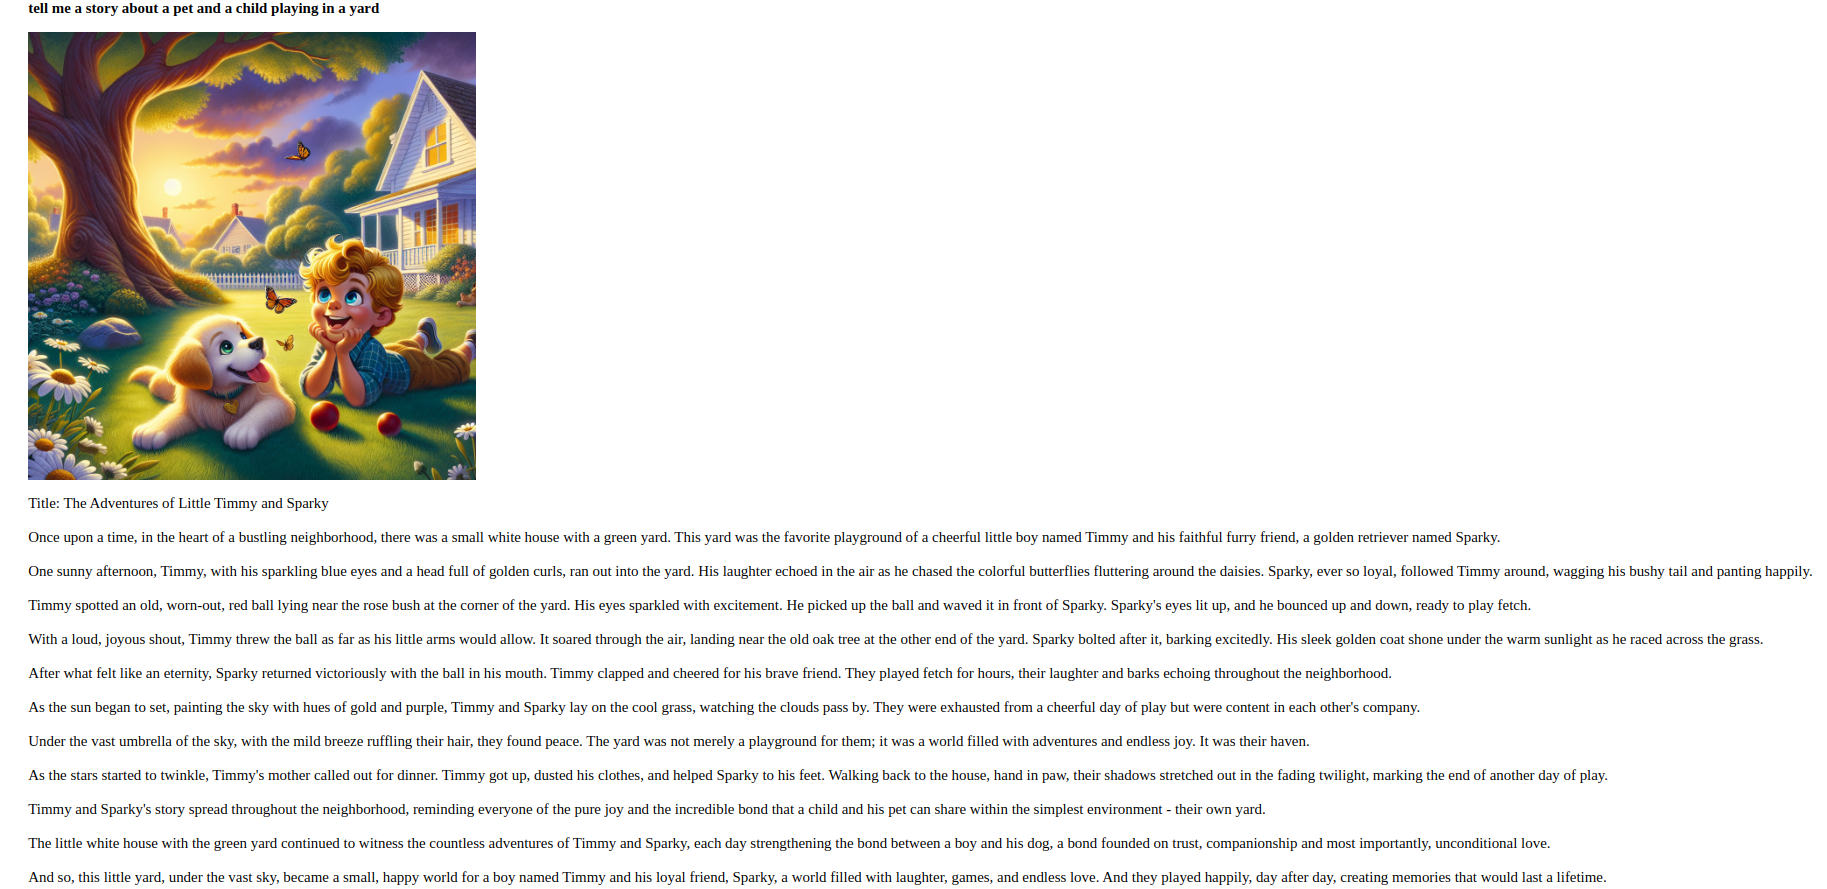
prompt = "Generate an image of a pet and a child playing in a yard."
print(generate_image(prompt))Run image_generation.py with Python to create an image based on the given command:
(env)sammy@ubuntu:$ python image_generation.pyIf the script runs successfully, you will see the generated image URL in the terminal. You can then view the image by navigating to this URL in your web browser.
In the next step, you will bring speech recognition together with text and image generation for a seamless user experience.
Step 4 – Combine methods for a seamless experience
In this phase, you will integrate the capabilities developed in previous phases to provide a seamless user experience.
Your web application will be able to process text and voice input from users, generate stories, and complement them with relevant images.
Create a unified view
First, make sure your Django project is organized and that you have whisper_transcribe.py, chat_completion.py, and image_generation.py in your Django app directory. Now you will create a view that combines these components.
Open your views.py file and import the necessary modules and functions. Then create a new view called get_story_from_description:
import uuid
from django.core.files.storage import FileSystemStorage
from django.shortcuts import render
from .whisper_transcribe import transcribe_audio
from .chat_completion import generate_story
from .image_generation import generate_image

# other views

def get_story_from_description(request):
context = {}
user_input = ""
if request.method == "GET":
return render(request, "story_template.html")
else:
if "text_input" in request.POST:
user_input += request.POST.get("text_input") + "\n"
if "voice_input" in request.FILES:
audio_file = request.FILES["voice_input"]
file_name = str(uuid.uuid4()) + (audio_file.name or "")
FileSystemStorage(location="/tmp").save(file_name, audio_file)
user_input += transcribe_audio(f"/tmp/{file_name}")

generated_story = generate_story(user_input)
image_prompt = (
f"Generate an image that visually illustrates the essence of the following story: {generated_story}"
)
image_url = generate_image(image_prompt)

context = {
"user_input": user_input,
"generated_story": generated_story.replace("\n", "<br/>"),
"image_url": image_url,
}

return render(request, "story_template.html", context)
This view retrieves text and/or audio input from the user. If an audio file exists, it saves it with a unique name (using the uuid library) and uses the transcribe_audio function to convert the speech to text. It then uses the gene_story function to generate a text response and the gene_image function to generate an associated image. These outputs are sent to the text dictionary, which is then rendered with story_template.html.
Create a template
Then create a file called story_template.html and add the following:
<div style="padding:3em; font-size:14pt;">
<form method="post" enctype="multipart/form-data">
{% csrf_token %}
<textarea name="text_input" placeholder=" Describe the story you would like" style="width:30em;"></textarea>
<br/><br/>
<input type="file" name="voice_input" accept="audio/*" style="width:30em;">
<br/><br/>
<input type="submit" value="Submit" style="width:8em; height:3em;">
</form>

<p>
<strong>{{ user_input }}</strong>
</p>
{% if image_url %}
<p>
<img src="{{ image_url }}" alt="Generated Image" style="max-width:80vw; width:30em; height:30em;">
</p>
{% endif %}
{% if generated_story %}
<p>{{ generated_story | safe }}</p>
{% endif %}
</div>
This simple form allows users to submit their requests via text or by uploading an audio file. It then displays the text and image generated by the app.
Create URL for View
Now that you have the get_story_from_description view ready, you need to make it available by creating a URL configuration.
Open your urls.py file in your Django application and add a template for the get_story_from_description view:
from django.urls import path
from . import views

urlpatterns = [
# other patterns
path('generate-story/', views.get_story_from_description, name='get_story_from_description'),
]
Unified Experience Testing
You can now visit http://your_domain/generate-story/ in your web browser. You should see the form defined in story_template.html. Try submitting a text request via the text input field or uploading an audio file using the file input. Once submitted, your request will process the input(s), generate a story and an accompanying image, and display them on the page.
For example, here is a sample story prompt: “Tell me a story about a pet and a child playing in the yard.”
By completing this step, you have created an application that processes and responds to user input in various forms.
Result
In this tutorial, you have successfully developed a multi-faceted bot using Django, with the integration capabilities of Whisper for speech recognition, GPT-4 for text generation, and DALL-E for image generation. Your program can now understand and react to user input in various formats.
For further development, it is recommended to explore alternative versions of the Whisper, GPT, and DALL-E models, improve the UI/UX design of your app, or extend the bot's functionality to include additional interactive features.