
VPN auto-disconnect software is an advanced security measure that prevents your information from leaking to the web. VPN auto-disconnect software constantly monitors your connection to the VPN server. If the connection is accidentally dropped, it blocks access to the web (or the applications you specify).
5 VPN auto disconnect software
1. VPN Watcher
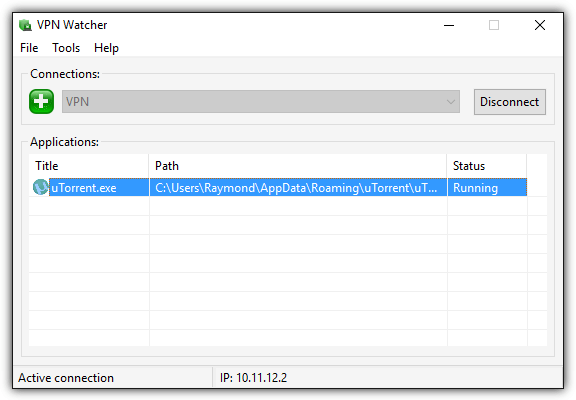
VPN Watcher is a lightweight application that can monitor your VPN connection. Apart from that, VPN Watcher can also automatically terminate or suspend a selected application if it detects that the application is disconnected.
It essentially acts as an automatic kill switch to prevent running applications from being directly disconnected from the internet when the VPN connection drops. Once you have set up a VPN connection, all you have to do is add an application to VPN Watcher. The added application will automatically run when VPN Watcher detects a VPN connection and when it detects an unexpected disconnection.
VPN Watcher comes in both free and paid versions and is available for both Windows and MAC OS X. The free version of VPN Watcher is limited to just 1 monitored application and has a slightly longer check interval at 0.5 seconds compared to 0.1 seconds in the paid version. Although the program constantly monitors the connection, VPN Watcher consumes less than 2 MB of memory and has nothing to do with CPU usage.
2. Lifeguard VPN
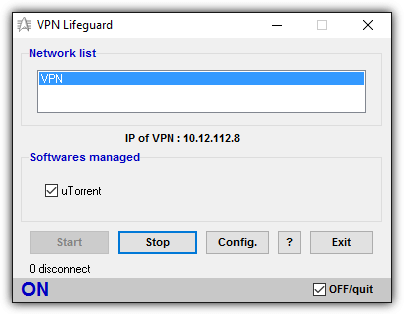
VPN Lifeguard is a free, open source portable application that prevents running applications from being disconnected from an insecure connection when the VPN connection drops.
Essentially, VPN Lifeguard's functionality is quite similar to VPN Watcher, and if the initial setup steps are done correctly, it's very easy to set up.
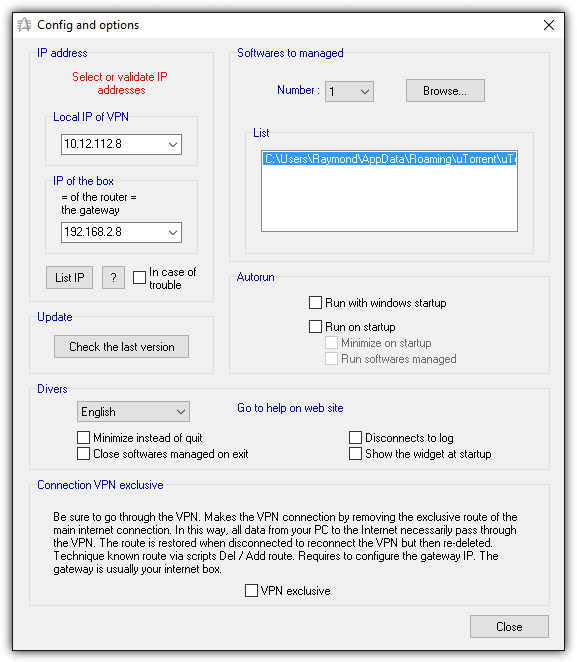
First, you need to connect to your VPN. Once connected, run VPN Lifeguard as an administrator (right-click on the program executable and select “Run as administrator”) and click the Config button.
In the settings and options section of the VPN Lifeguard software, it is possible to automatically detect the VPN gateway IP and local IP.
Click on the drop-down menu and you can select up to 6 apps that you want VPN Lifeguard to manage.
Then click the Browse button and look for the program shortcut or file.
Click the Close button to save the changes.
When you return to the main GUI of the program, click the Start button and VPN Lifeguard will start monitoring your VPN connection and automatically close the managed software once the VPN connection is disconnected.
VPN Lifeguard attempts to reconnect to the VPN connection and reruns the managed software when reconnected.
Lifeguard VPN was last updated in 2013 but worked very well when tested on Windows 10.
The program supports monitoring PPTP and IPSec protocols but does not support OpenVPN.
3. VPNCheck
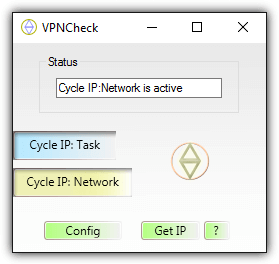
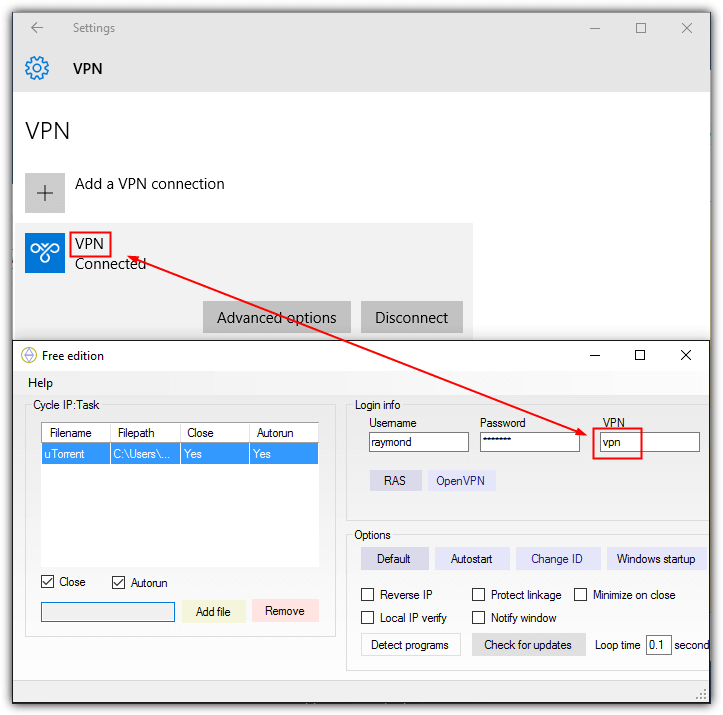
VPNCheck is not just another VPN application monitoring and management tool, but comes with more features in an effort to keep your computer secure when connected to a VPN service.
You will find two versions of VPNCheck, a free version with limited features and a paid PRO version with additional features such as OpenVPN support, DNS leak fixing, unlimited app support, and computer ID protection.
The free version of VPNCheck allows you to monitor PPTP VPN connections, automatically close applications or disable the network when the VPN disconnects unexpectedly, and manage only 3 applications. You also need to perform some initial settings in VPNCheck before you can get started.
Click the Configure button and add the applications you want to manage. The added file can be configured to close automatically or manually from the checkboxes.
The next important thing is to check the VPN login information in the VPN so that it can reconnect automatically. Enter the VPN username and password and the corresponding VPN name in Windows.
After adding the files and setting up the VPN connection in VPNCheck, close the configuration window and you should be back to the main GUI. There are 2 main buttons which are Cycle IP: Task and Cycle IP: Network.
If you want VPNCheck to automatically close added applications on VPN disconnection, click Cycle IP: Task. In the case of Cycle IP: Network, this option will disable all network connections on your computer.
The free version of VPNCheck is available for Windows and Linux (beta) operating systems while the Pro is only for Windows.
4. Simple VPN Kill Switch Batch Script
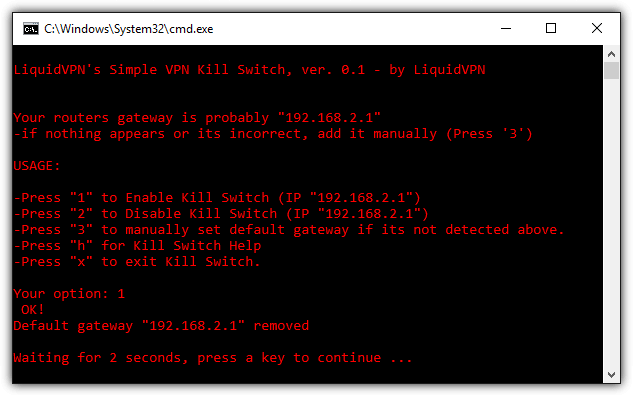
If your network adapter is configured to obtain an IP address automatically from the DHCP service, removing the gateway IP may be a challenge for novice users as it involves using the route.exe command line program. An easier way is to use a ready-made batch file called Simple VPN Kill Switch, created by LiquidVPN, which can execute commands automatically.
All you need to do is connect to the VPN first, then run this batch script and press 1 to activate the kill switch. This will remove the default gateway IP address from your network adapter.
When your VPN connection drops unexpectedly, all running applications are prevented from accessing the internet. To reconnect, you must press 2 in the script to disable the kill switch and then manually reconnect to the VPN.

Instead of offering another complicated method that requires messing with Windows Firewall or Comodo Firewall rules, an easier way is to use the Task Scheduler that is built into Windows.
This method does not involve installing any third-party software and uses the native event review feature in Windows, which is more stable and hardly uses significant CPU or memory.
All you have to do is create a new file that will automatically close your BitTorrent client software when the operating system detects the termination of your VPN connection.
How it works:
1) Press the Start button, type Task Scheduler and run it.
2) Click on Action on the menu and select “Create Task”.
3) Type anything in the “Name” box for the new task you want to create.“Run with highest privileges”Check ".
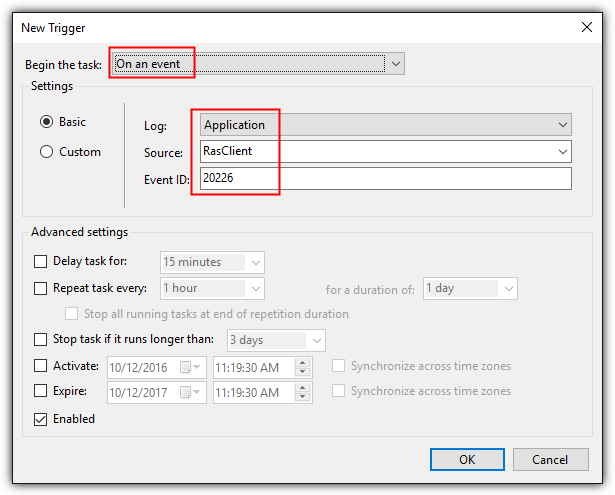
4) Go to the Trigger tab and click the New button.
5) Click on the drop-down menu to start the task and select “At an event”Select ".
6) Select RasClient for Source, enter the Event ID as 20226 and click OK.
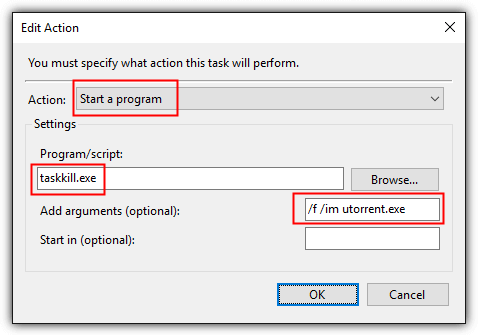
7) Go to the Actions tab and click the New button.
8) Make sure the function “Start a program”"It is.".
9) In the program/script input box, type taskkill.exe and in the add arguments box, type /f/im filename.exe. You need to replace filename.exe with the executable file you want to terminate. For example, uTorrent is utorrent.exe, Deluge is deluge.exe, qBittorrent is qbittorrent.exe, etc. Click OK to confirm the changes.
10) Optionally, go to the Conditions tab and check the Power options. By default, the “Start the task only if the computer is on AC power” option is enabled, and you may want to disable this setting. When your computer is charging, this will not work when your VPN connection drops, causing your BitTorrent client to continue downloading over a direct internet connection that exposes your real IP address.
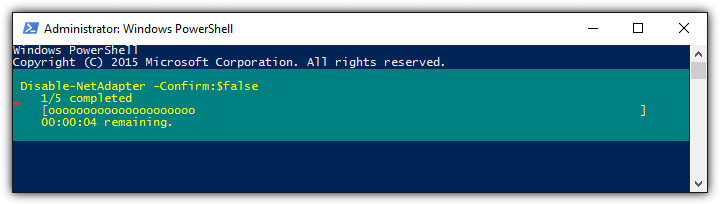
Note: The above idea can be extended to disable all network connections when the VPN connection is lost instead of forcefully terminating running applications. In step (i), replace taskkill.exe with PowerShell.exe. Then in the arguments box, enter Get-NetAdapter | Disable-NetAdapter -Confirm: $ false.
To automatically re-enable all network adapters, you can run the following command line as administrator.
powershell.exe Get-NetAdapter | Enable-NetAdapter -Confirm:$false
There are two types of VPN auto-disconnect protocols.
The Active Kill Switch protocol is designed to know when you have disconnected from the VPN service, send this information to your device, and prevent it from connecting to insecure networks.
The Passive Kill Switch protocol, although it seems simple, is more secure. The VPN app does not wait to receive information from the VPN server. However, the moment it stops receiving a signal from the server, it automatically stops sending traffic to that device.
Binance Virtual Server
Due to the embargo on Iran, you need to purchase a virtual server with secure IPs to operate on Binance.
A VPN can ensure your security on the Binance server.
Installing VPN on Android 8.0 L2TP
Follow these steps to connect your Android device to VPN servers using L2TP:

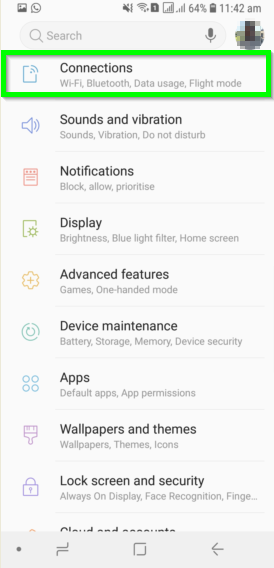
3_ Select the More settings option at the bottom of the page.
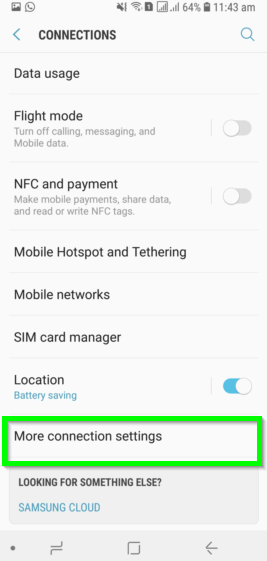
4_ Select VPN on the CONNECTION SETTINGS page
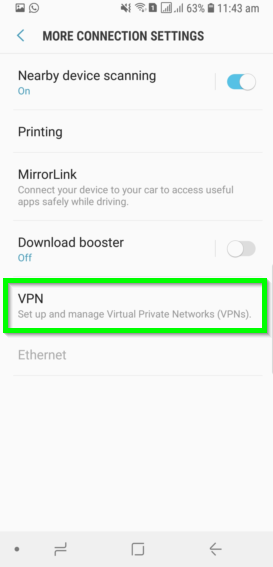
5_ Select the add VPN profile (+) option at the bottom of the page or at the top of the page.

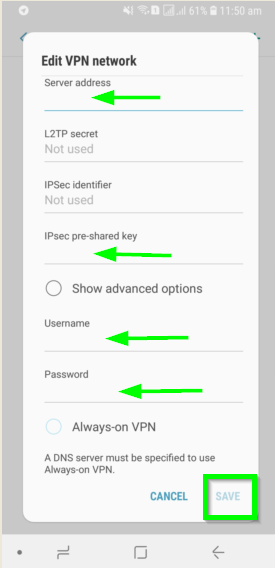
6_ You will be redirected to the Add VPN profile page, here you need to enter the following details.
Name: Choose any name you prefer.
Type: Select L2TP/IPSEC PSK from the drop-down.
Server Address: Select the server you want to connect to.
L2TP Secret: Enter one to six
IPSec ID: Enter your desired name.
IPSec Pre-Shared Key: The name you chose
Username: Type the username you chose.
Password: Type your desired registered password.
To save the profile, tap the save button at the bottom right and proceed to the next step.
Meanwhile, note that recent versions of Android have a built-in feature called Always-on VPN that keeps the VPN on your Android device turned on and connected. To enable the Always-on VPN feature, skip to step 10.
7_ The VPN profile will be created as shown in the image above. Tap the key icon to start using the VPN on your Android device.

8_ A page will appear asking you to type in your VPN username and password. Enter your details and click the CONNECT button.
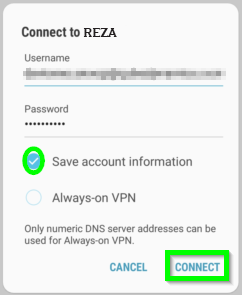
9_ You should now be connected to the VPN. You can confirm this from the connection status displayed under the created VPN profile.

Enable the Always-On VPN feature
The Always-On VPN feature turns on the VPN every time you turn on Wi-Fi. This feature essentially acts as a toggle switch. Once enabled, it ensures that all of your Android device's internet traffic is routed through the VPN.
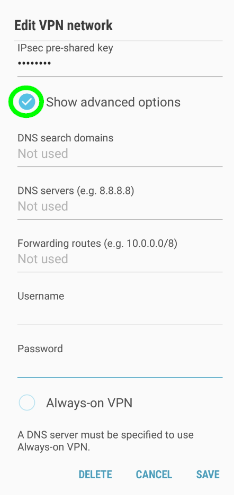
10_ To enable the Always-On VPN feature, you need to specify a DNS server. To do this, tap the Show Advanced option on the VPN network edit page and proceed to the next step.
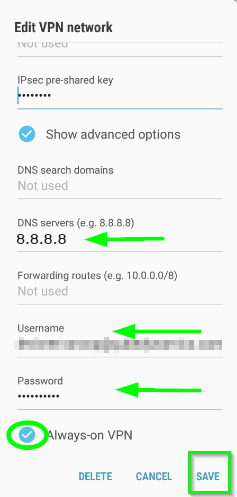
11_ You can enter that section for DNS servers and you can enter any number for DNS, but we suggest using Google's DNS servers such as 8.8.8.8 and 8.8.4.4, and then after that you can enter your username and password in the relevant section and enable the Always on VPN option and save.
12_ Warning message: You need a VPN connection. It will appear that you need to tap the TURN ON button to grant permission. Note that when the VPN is not connected, you will no longer be able to access the internet.

13_ The VPN connection will be established as shown in the figure above. The connected status is always on indicating that you are connected to the VPN and the Always on feature is also enabled to provide an extra layer of security for you while browsing the internet.

Tip : This documentation shows how to set up Always-On VPN so that all traffic to the device goes through this VPN tunnel. Note that enabling Always-On VPN may increase battery consumption and traffic.
MikroTik RouterOS VPS
Mikrotik virtual server
MikroTik virtual servers in the best data centers in Europe, America, and Asia with network infrastructure up to 40 Gigabits will provide you with a new experience of MikroTik virtual servers. MikroTik servers are provided without a license, and the customer is responsible for obtaining a license.