
介绍
Docker 是一款简化容器化应用程序进程管理流程的程序。容器允许您在资源隔离的进程中运行应用程序。它们类似于虚拟机,但容器更具可移植性、资源占用更少,并且对宿主操作系统的依赖性更低。.
要详细了解 Docker 容器的不同组件,请查看《Docker 生态系统:常用组件简介》。.
在本教程中,您将在 Ubuntu 20.04 上安装和使用 Docker 社区版 (CE)。您将安装 Docker 本身,使用容器和镜像,并将镜像推送到 Docker 仓库。.
笔记
本文将指导您在 Ubuntu 服务器上安装 Docker。如果您想要一键将 Docker 应用程序部署到线上服务器,不妨了解一下 DigitalOcean 应用平台。.
先决条件
要学习本教程,您需要以下物品:
- 按照 Ubuntu 20.04 服务器初始设置指南设置了 Ubuntu 20.04 服务器,包括非 root sudo 用户和防火墙。.
- 如步骤 7 和 8 所示,如果您想创建自己的镜像并将其推送到 Docker Hub,则需要拥有一个 Docker Hub 帐户。.
步骤 1 – 安装 Docker
Ubuntu 官方软件仓库中的 Docker 安装包可能不是最新版本。为了确保您获得最新版本,我们将从 Docker 官方软件仓库安装 Docker。为此,我们将添加一个新的软件包源,添加 Docker 提供的 GPG 密钥以确保下载有效,然后安装该软件包。.
首先,更新您的可用套餐列表:
sudo apt update
接下来,安装一些必要的软件包,以便 apt 可以通过 HTTPS 使用软件包:
sudo apt install apt-transport-https ca-certificates curl software-properties-common
然后将官方 Docker 仓库的 GPG 密钥添加到您的系统中:
curl -fsSL https://download.docker.com/linux/ubuntu/gpg | sudo apt-key add -
将 Docker 仓库添加到 APT 源:
sudo add-apt-repository "deb [arch=amd64] https://download.docker.com/linux/ubuntu focal stable"
这也会将新添加的存储库中的 Docker 软件包更新到我们的软件包数据库中。.
请确保您是从 Docker 仓库而不是默认的 Ubuntu 仓库进行安装:
apt-cache policy docker-ce
您会看到类似这样的输出,但 Docker 版本号可能有所不同:
docker-ce:
Installed: (none)
Candidate: 5:19.03.9~3-0~ubuntu-focal
Version table:
5:19.03.9~3-0~ubuntu-focal 500
500 https://download.docker.com/linux/ubuntu focal/stable amd64 Packages
请注意,docker-ce 尚未安装,但它是 Ubuntu 20.04 (canonical) Docker 存储库中的可安装候选版本。.
最后,安装 Docker:
sudo apt install docker-ce
Docker 现在应该已经安装完毕,守护进程也已启动,并且已设置为开机启动。请检查它是否正在运行:
sudo systemctl status docker
输出结果应与以下内容类似,表明服务已启动并正在运行:
Output
● docker.service - Docker Application Container Engine
Loaded: loaded (/lib/systemd/system/docker.service; enabled; vendor preset: enabled)
Active: active (running) since Tue 2020-05-19 17:00:41 UTC; 17s ago
TriggeredBy: ● docker.socket
Docs: https://docs.docker.com
Main PID: 24321 (dockerd)
Tasks: 8
Memory: 46.4M
CGroup: /system.slice/docker.service
└─24321 /usr/bin/dockerd -H fd:// --containerd=/run/containerd/containerd.sock
安装 Docker 后,您不仅可以获得 Docker 服务(守护进程),还可以获得 Docker 命令行工具或 Docker 客户端。在本教程的剩余部分,我们将学习如何使用 Docker 命令。.
步骤 2 – 不使用 sudo 运行 Docker 命令(可选)
默认情况下,docker 命令只能由 root 用户或 docker 用户组的成员运行,该用户组在 Docker 安装过程中会自动创建。如果您尝试在未添加 sudo 前缀或未属于 docker 用户组的情况下运行 docker 命令,则会得到类似以下的输出:
Output
docker: Cannot connect to the Docker daemon. Is the docker daemon running on this host?.
See 'docker run --help'.
如果想避免在运行 docker 命令时输入 sudo,请将您的用户名添加到 docker 用户组:
sudo usermod -aG docker ${USER}
要应用新的组成员身份,请注销服务器并重新登录,或键入以下命令:
su - ${USER}
要继续操作,您将被要求输入用户密码。.
输入以下命令,确认您的用户已添加到 docker 用户组:
groups
sammy sudo docker
如果您需要将一个您未登录的用户添加到 Docker 用户组,请使用以下方式显式声明该用户名:
sudo usermod -aG docker username本文余下部分假设您以 docker 用户组成员的身份运行 docker 命令。如果您不想以 docker 用户组成员的身份运行,请在命令后添加 sudo。.
接下来我们来看一下 docker 命令。.
步骤 3 – 使用 Docker 命令
使用 Docker 需要传递一系列选项和命令,后跟参数。语法如下:
docker [option] [command] [arguments]
要查看所有可用的子命令,请键入:
docker从 Docker 19 开始,所有可用子命令的完整列表如下:
Output
attach Attach local standard input, output, and error streams to a running container
build Build an image from a Dockerfile
commit Create a new image from a container's changes
cp Copy files/folders between a container and the local filesystem
create Create a new container
diff Inspect changes to files or directories on a container's filesystem
events Get real time events from the server
exec Run a command in a running container
export Export a container's filesystem as a tar archive
history Show the history of an image
images List images
import Import the contents from a tarball to create a filesystem image
info Display system-wide information
inspect Return low-level information on Docker objects
kill Kill one or more running containers
load Load an image from a tar archive or STDIN
login Log in to a Docker registry
logout Log out from a Docker registry
logs Fetch the logs of a container
pause Pause all processes within one or more containers
port List port mappings or a specific mapping for the container
ps List containers
pull Pull an image or a repository from a registry
push Push an image or a repository to a registry
rename Rename a container
restart Restart one or more containers
rm Remove one or more containers
rmi Remove one or more images
run Run a command in a new container
save Save one or more images to a tar archive (streamed to STDOUT by default)
search Search the Docker Hub for images
start Start one or more stopped containers
stats Display a live stream of container(s) resource usage statistics
stop Stop one or more running containers
tag Create a tag TARGET_IMAGE that refers to SOURCE_IMAGE
top Display the running processes of a container
unpause Unpause all processes within one or more containers
update Update configuration of one or more containers
version Show the Docker version information
wait Block until one or more containers stop, then print their exit codes
要查看特定命令的可用选项,请键入:
docker docker-subcommand --help
要查看有关 Docker 的系统级信息,请使用以下命令:
docker info
让我们来了解一下这些命令。我们先从处理图像开始。.
步骤 4 – 使用 Docker 镜像
Docker 容器由 Docker 镜像构建而成。默认情况下,Docker 从 Docker Hub 拉取这些镜像。Docker Hub 是由 Docker 公司(负责管理 Docker 项目)运营的 Docker 镜像仓库。任何人都可以将自己的 Docker 镜像托管在 Docker Hub 上,因此您需要的绝大多数应用程序和 Linux 发行版都可以在那里找到相应的镜像。.
要检查您是否可以访问和下载 Docker Hub 中的镜像,请键入:
docker run hello-world
输出结果显示 Docker 工作正常:
Output
Unable to find image 'hello-world:latest' locally
latest: Pulling from library/hello-world
0e03bdcc26d7: Pull complete
Digest: sha256:6a65f928fb91fcfbc963f7aa6d57c8eeb426ad9a20c7ee045538ef34847f44f1
Status: Downloaded newer image for hello-world:latest
Hello from Docker!
This message shows that your installation appears to be working correctly.
...
Docker 最初无法在本地找到 hello-world 镜像,因此从默认仓库 Docker Hub 下载了该镜像。下载完成后,Docker 基于该镜像创建了一个容器,容器内的应用程序运行并显示了该消息。.
您可以使用带有 search 子命令的 docker 命令在 Docker Hub 上搜索镜像。例如,要搜索 Ubuntu 镜像,请输入:
docker search ubuntu
该脚本会抓取 Docker Hub 并返回名称与搜索字符串匹配的所有镜像列表。在本例中,输出结果将类似于这样:
Output
NAME DESCRIPTION STARS OFFICIAL AUTOMATED
ubuntu Ubuntu is a Debian-based Linux operating sys… 10908 [OK]
dorowu/ubuntu-desktop-lxde-vnc Docker image to provide HTML5 VNC interface … 428 [OK]
rastasheep/ubuntu-sshd Dockerized SSH service, built on top of offi… 244 [OK]
consol/ubuntu-xfce-vnc Ubuntu container with "headless" VNC session… 218 [OK]
ubuntu-upstart Upstart is an event-based replacement for th… 108 [OK]
ansible/ubuntu14.04-ansible Ubuntu 14.04 LTS with
...
在“官方”列中,“OK”表示该镜像由项目背后的公司构建和维护。找到要使用的镜像后,可以使用 pull 子命令将其下载到您的计算机。.
运行以下命令将官方 Ubuntu 镜像下载到您的计算机:
docker pull ubuntu
您将看到以下输出:
Output
Using default tag: latest
latest: Pulling from library/ubuntu
d51af753c3d3: Pull complete
fc878cd0a91c: Pull complete
6154df8ff988: Pull complete
fee5db0ff82f: Pull complete
Digest: sha256:747d2dbbaaee995098c9792d99bd333c6783ce56150d1b11e333bbceed5c54d7
Status: Downloaded newer image for ubuntu:latest
docker.io/library/ubuntu:latest
下载镜像后,您可以使用 `run` 子命令运行使用该镜像的容器。正如您在 hello-world 示例中所看到的,如果您在使用 `run` 子命令运行 Docker 时镜像尚未下载,Docker 客户端会先下载镜像,然后再使用该镜像运行容器。.
要查看下载到电脑上的图片,请键入:
docker images
输出结果将类似于下图:
Output
REPOSITORY TAG IMAGE ID CREATED SIZE
ubuntu latest 1d622ef86b13 3 weeks ago 73.9MB
hello-world latest bf756fb1ae65 4 months ago 13.3kB
正如您将在本教程后面看到的那样,用于运行容器的镜像可以被修改并用于生成新的镜像,这些新镜像可以上传到 Docker Hub 或其他 Docker 注册表(这是技术术语)。.
让我们更详细地探讨一下容器的工作原理。.
步骤 5 – 运行 Docker 容器
你在上一步运行的 hello-world 容器就是一个例子,它会在发送测试消息后运行并退出。容器的用途远不止于此,它们还可以是交互式的。毕竟,它们类似于虚拟机,只是资源占用更少。.
例如,我们来运行一个使用最新 Ubuntu 镜像的容器。-i 和 -t 参数的组合可以让你以交互式 shell 的方式访问容器:
docker run -it ubuntu
您的命令行应该会发生变化,以反映您现在正在容器内工作,并且应该如下所示:
Output
root@d9b100f2f636:/#
请记下命令行中的容器 ID。在本例中,它是 d9b100f2f636。稍后在删除容器时,您需要使用此容器 ID 来识别它。.
现在你可以在容器内运行任何命令。例如,我们来更新容器内的软件包数据库。你不需要在任何命令前加上 sudo,因为你是以 root 用户身份在容器内运行的:
apt update然后就可以在其中安装任何应用程序了。我们来安装 Node.js:
apt install nodejs
它将从官方 Ubuntu 软件仓库安装 Node.js。安装完成后,请检查 Node.js 是否已安装:
node -v
您将在终端中看到版本号:
Output
v10.19.0
在容器内所做的任何更改都只会应用于该容器。.
要退出容器,请在命令提示符下键入 exit。.
接下来我们来看看如何管理系统中的容器。.
步骤 6 – 管理 Docker 容器
使用 Docker 一段时间后,您的计算机上会有许多正在运行和未运行的容器。要查看正在运行的容器,请使用以下命令:
docker ps
您将看到类似以下内容的输出:
Output
CONTAINER ID IMAGE COMMAND CREATED
在本教程中,您启动了两个容器。一个使用 hello-world 镜像,另一个使用 Ubuntu 镜像。这两个容器目前都已停止运行,但它们仍然存在于您的系统中。.
要查看所有容器(包括活动容器和非活动容器),请运行带有 -a 参数的 docker ps 命令:
docker ps -a
你会看到类似这样的输出:
1c08a7a0d0e4 ubuntu "/bin/bash" 2 minutes ago Exited (0) 8 seconds ago quizzical_mcnulty
a707221a5f6c hello-world "/hello" 6 minutes ago Exited (0) 6 minutes ago youthful_curie
要查看您创建的最后一个容器,请给它添加 -l 参数:
docker ps -l
CONTAINER ID IMAGE COMMAND CREATED STATUS PORTS NAMES
1c08a7a0d0e4 ubuntu "/bin/bash" 2 minutes ago Exited (0) 40 seconds ago quizzical_mcnulty
要启动已停止的容器,请使用 `docker start` 命令,后跟容器 ID 或容器名称。让我们启动 ID 为 1c08a7a0d0e4 的基于 Ubuntu 的容器:
docker start 1c08a7a0d0e4docker start 1c08a7a0d0e4
容器将启动,您可以使用 docker ps 查看其状态:
Output
CONTAINER ID IMAGE COMMAND CREATED STATUS PORTS NAMES
1c08a7a0d0e4 ubuntu "/bin/bash" 3 minutes ago Up 5 seconds quizzical_mcnulty
要停止正在运行的容器,请使用 `docker stop` 命令,后跟容器 ID 或名称。这次我们将使用 Docker 分配给容器的名称,即 `quizical_mcnulty`:
docker stop quizzical_mcnulty
当您决定不再需要该容器时,请使用容器 ID 或名称通过 `docker rm` 命令将其删除。您也可以使用 `docker ps -a` 命令查找与 hello-world 镜像关联的容器 ID 或名称,并将其删除。.
docker rm youthful_curie
您可以使用 `--name` 参数启动一个新容器并为其命名。您还可以使用 `--rm` 参数创建一个在停止后会自动删除自身的容器。有关这些选项和其他选项的更多信息,请参阅 `docker run help` 命令。.
容器可以转换成镜像,然后可以用这些镜像来创建新的容器。我们来看看它是如何工作的。.
步骤 7 – 对 Docker 镜像中的容器进行更改
启动 Docker 镜像后,您可以像操作虚拟机一样创建、修改和删除文件。您所做的更改仅应用于该容器。您可以启动和停止该容器,但如果您使用 `docker rm` 命令将其销毁,则所做的更改将永久丢失。.
本节将向您展示如何将容器状态保存为新的 Docker 镜像。.
在 Ubuntu 容器中安装 Node.js 后,您现在拥有一个基于镜像运行的容器,但该容器与您用于创建它的镜像不同。不过,您以后可能希望将此 Node.js 容器作为创建新镜像的基础。.
然后使用以下命令对新的 Docker 镜像实例进行更改。.
docker commit -m "What you did to the image" -a "Author Name" container_id repository/new_image_name
`-m` 参数用于添加提交消息,方便您和其他人了解您所做的更改;`-a` 参数用于指定作者。`container_id` 是您在教程前面启动交互式 Docker 会话时指定的 ID。除非您在 Docker Hub 中创建了其他仓库,否则它通常是您的 Docker Hub 用户名。.
例如,对于用户 sammy,容器 ID 为 d9b100f2f636,命令如下:
docker commit -m "added Node.js" -a "sammy" d9b100f2f636 sammy/ubuntu-nodejs
推送镜像时,新镜像会保存在您的本地计算机上。本教程稍后将介绍如何将镜像推送到 Docker 镜像仓库(例如 Docker Hub),以便其他人可以访问它。.
重新列出 Docker 镜像将显示新镜像以及它所基于的旧镜像:
docker images
你会看到类似这样的输出:
Output
REPOSITORY TAG IMAGE ID CREATED SIZE
sammy/ubuntu-nodejs latest 7c1f35226ca6 7 seconds ago 179MB
...
在这个例子中,ubuntu-nodejs 是一个基于 Docker Hub 上现有 Ubuntu 镜像生成的新镜像。镜像大小的差异表明了所做的更改。在这个例子中,更改之处在于安装了 NodeJS。因此,下次如果您需要运行一个预装了 NodeJS 的 Ubuntu 容器,只需使用这个新镜像即可。.
您还可以使用 Dockerfile 构建镜像,从而实现软件在新镜像中的自动化安装。不过,这超出了本教程的范围。.
现在让我们把这个新镜像分享给其他人,以便他们可以用它创建容器。.
步骤 8 – 将 Docker 镜像传输到 Docker 仓库
从现有镜像创建新镜像之后,下一步合乎逻辑的做法是将其分享给少数好友、Docker Hub 上的全世界,或者分享给其他你有权访问的 Docker 镜像仓库。要将镜像提交到 Docker Hub 或任何其他 Docker 镜像仓库,你需要拥有一个相应的帐户。.
本节将向您展示如何将 Docker 镜像推送到 Docker Hub。要了解如何创建自己的私有 Docker 镜像仓库,请参阅“如何在 Ubuntu 18.04 上设置私有 Docker 镜像仓库”。.
要推送镜像,请先登录 Docker Hub。.
docker login -u docker-registry-username
系统会提示您使用 Docker Hub 密码进行身份验证。如果您输入的密码正确,身份验证应该会成功。.
注意:如果您的 Docker 镜像仓库用户名与您创建镜像时使用的本地用户名不同,则需要使用您的镜像仓库用户名为镜像添加标签。例如,对于上一步中给出的示例,您需要输入:
docker tag sammy/ubuntu-nodejs docker-registry-username/ubuntu-nodejs
然后您可以使用以下方法裁剪图像:
docker push docker-registry-username/docker-image-name
要将 ubuntu-nodejs 镜像推送到 Sami 仓库,命令如下:
docker push sammy/ubuntu-nodejs
图片上传过程可能需要一些时间,但完成后,输出结果将如下所示:
Output
The push refers to a repository [docker.io/sammy/ubuntu-nodejs]
e3fbbfb44187: Pushed
5f70bf18a086: Pushed
a3b5c80a4eba: Pushed
7f18b442972b: Pushed
3ce512daaf78: Pushed
7aae4540b42d: Pushed
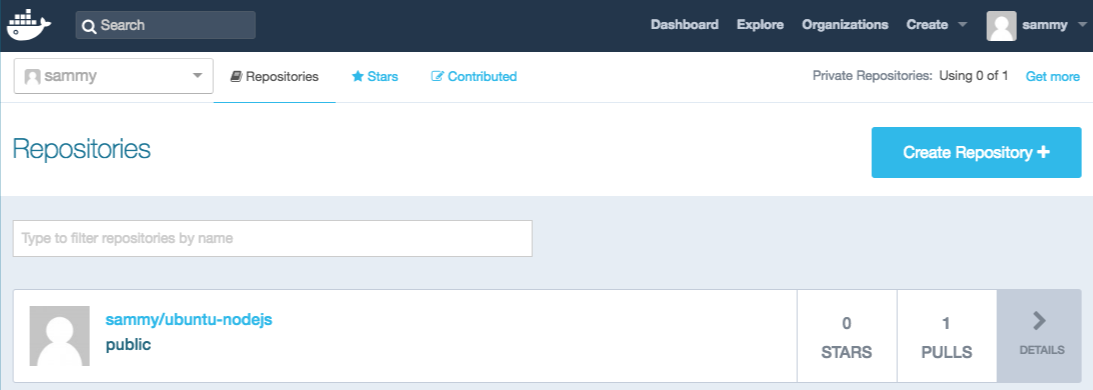
...将镜像推送到镜像仓库后,它应该会列在您的账户控制面板中,如下图所示。.
如果推送尝试导致此类错误,则您可能尚未登录:
Output
The push refers to a repository [docker.io/sammy/ubuntu-nodejs]
e3fbbfb44187: Preparing
5f70bf18a086: Preparing
a3b5c80a4eba: Preparing
7f18b442972b: Preparing
3ce512daaf78: Preparing
7aae4540b42d: Waiting
unauthorized: authentication required
登录您的 Docker 帐户并再次尝试推送。然后检查它是否已出现在您的 Docker Hub 仓库页面上。.
现在您可以使用 docker pull sammy/ubuntu-nodejs 将镜像拉取到新机器并使用它来运行新容器。.
结果
在本教程中,您安装了 Docker,使用了镜像和容器,并将修改后的镜像推送到了 Docker Hub。现在您已经掌握了基础知识,不妨探索 DigitalOcean 社区中的其他 Docker 教程。.