Introduction
While many enterprise companies have adopted Kubernetes in their production, they are often confused about how to achieve continuous deployment, high security, permission isolation, and auditing – all while ensuring business agility with multiple Kubernetes clusters running simultaneously at different stages. Using GitOps can enable such continuous deployment based on Kubernetes clusters, while meeting enterprise-level requirements such as security and permission isolation.
In this blog, we will implement GitOps in an Amazon EKS environment using AWS CodeCommit, AWS CodePipeline, and Flux. We will show in detail how to set up a GitOps workflow that meets production requirements in this Amazon EKS environment, and demonstrate how microservices applications achieve continuous integration and continuous delivery in a GitOps-style CI/CD pipeline.
Prerequisites
- AWS Experience
- AWS account
What is GitOps?
GitOps is a way to deliver continuous deployment for cloud applications. It focuses on a developer-centric experience while leveraging infrastructure by using tools that developers are already familiar with – including Git and Continuous Deployment tools.
The basic idea of GitOps is to have a Git repository that always contains a descriptive description of the infrastructure in production and an automated process to bring the production environment into line with the state described in the repository. If you want to deploy a new application or update an existing application, you just need to update the repository. The automated process takes care of everything. It's like having cruise control to manage your applications in production.
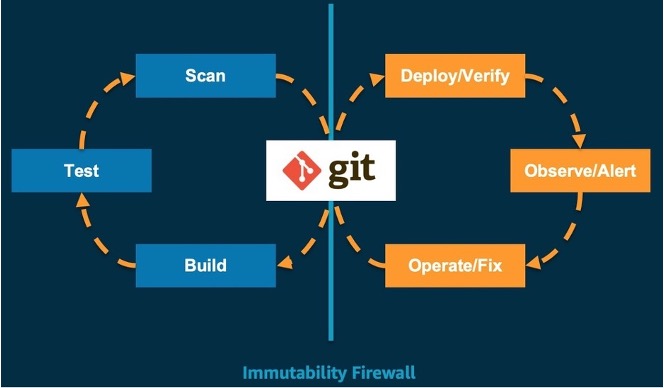
Why use GitOps?
Git is the only true source of state for the system. It supports repeatable and automated deployment, cluster management, and monitoring. Developers reuse Git workflows that are well-established in the organization for building, testing, scanning, and other continuous integration steps. Once the latest system state is committed to the master Git repository branch, the GitOps toolchain is used to verify deployment, view alerts, and fix operations. Based on the core GitOps principles, we believe that GitOps is the best way to continuously deploy Kubernetes clusters. The process is as follows:

Amazon EKS-based best practices for GitOps
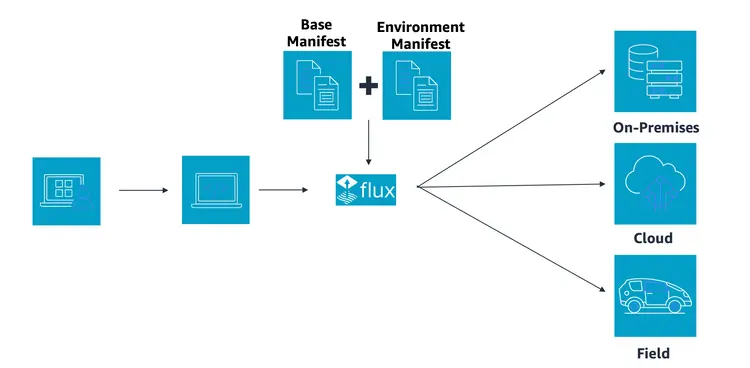
The overall CI/CD pipeline, according to best practices, is shown in the figure below.
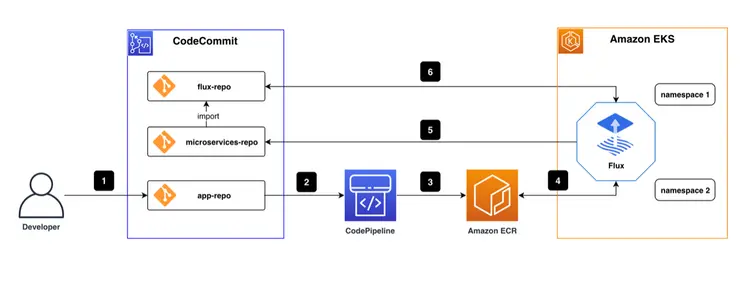
There are three code repositories under the AWS CodeCommit repository. One flux-repo is the configuration repository for Flux CD, which is used to define resources related to Flux The other is microservices-repo, which stores the microservices application configurations and deployment files. The third is the source repository application for business services. This post uses a front-end project as an example. We use AWS CodePipeline for continuous integration in the pipeline. CI/CD We used the Docker image in Amazon ECR We saved and saved, and deployed the Flux CD engine as a pod in the Amazon EKS environment.
The basic workflow is:
- Coding engineers write code and push the final code to the app-repo.
- Code changes in app-repo trigger AWS CodePipeline.
- AWS CodePipeline edits and packages the code, generates container images, and pushes them to the container image repository/Amazon ECR.
- The Flux CD engine, running in the EKS environment, regularly scans the ECR container image repository and pulls container image metadata for applications.
- The URL of the new container image is automatically synchronized with the application deployment file stored in the microservices-repo via git commit/push when a new version of the container image is detected.
- Flux regularly pulls application configurations and deployment files from Flux-repo. Since the Flux-repo repository references the microservices-repo, Flux checks the consistency of the cluster workload execution state with the expectations described in the microservices-repo files. If there are any differences, Flux automatically enables the EKS cluster to synchronize the differences to ensure that the workloads are running in the expected state.
Since we have explained the concept of GitOps and the CI/CD pipeline architecture, we will use a case to complete this exercise by reviewing the following four modules:
- Deploying cloud infrastructure using Infrastructure as Code (IaC)
- Deploy Flux CD on AWS EKS cluster
- Implement GitOps workflows using Flux CD
- Automated deployment based on images using GitOps workflows
1- Deploying cloud infrastructure with IaC
A fundamental tenet of DevOps is that infrastructure is equal to code. Infrastructure as Code (IaC) uses code to enable cloud infrastructure deployment and cloud environment management. Coding engineers use configuration files or code to define the infrastructure and build it with code to ensure consistency and repeatability. With IaC, coding engineers also manage the resource lifecycle, such as hosting infrastructure definitions in version control repositories, and using continuous integration/deployment (CI/CD) that is consistent with programming to change the IaC definition, coordinating environments (e.g., development, test, production) with IaC code changes. In addition, automatic rollback is possible in the event of a failure, and drift detection helps identify deviations from the expected state.
In the cloud, software engineers can use the AWS Cloud Development Kit (CDK) to build their infrastructure model with Python, Java, and TypeScript. The CDK provides advanced components called Constructs that pre-configure cloud resources with valid default values. It also allows engineers to write and share their own custom constructs to suit their organization’s needs. All of this speeds up projects.
1.1 Create a project with CDK CLI
A TypeScript CDK project with cdk init Create, which creates the folder structure and installs the modules required by the TypeScript CDK project.
cdk init --language typescript
1.2 Create an EKS cluster with EKS Blueprints
EKS Blueprints help you build complete EKS clusters that are fully bootstrapped with the operational software needed to deploy and run workloads. With EKS Blueprints, you describe the configuration for the desired state of your EKS environment, such as the control panel, worker nodes, and Kubernetes add-ons, as an IaC blueprint. Once you have configured a blueprint, you can use it to deploy consistent environments across multiple AWS accounts and regions using continuous automation.
You can use EKS Blueprints to easily set up an EKS cluster with Amazon EKS plugins as well as a wide range of popular open source plugins, including Prometheus, Karpenter, Nginx, Traefik, AWS Load Balancer Controller, Fluent Bit, Keda, ArgoCD, and more. EKS Blueprints also helps you implement the relevant security controls needed to run workloads from multiple teams on a cluster.
Directory Quickstart Create and then run the following codes to install the project dependencies.
mkdir quickstart
cd quickstart
npm install @aws-quickstart/eks-blueprints
lib/quickstart-stack.ts Open and enter the code. EKS Blueprints Add the following.
import * as cdk from 'aws-cdk-lib';
import { Construct } from 'constructs';
import * as blueprints from '@aws-quickstart/eks-blueprints';
import { KubernetesVersion } from 'aws-cdk-lib/aws-eks';
export class QuickstartStack extends cdk.Stack {
constructor(scope: Construct, id: string, props?: cdk.StackProps) {
super(scope, id, props);
const account = props?.env?.account!;
const region = props?.env?.region!;
const clusterProvider = new blueprints.GenericClusterProvider({
version: KubernetesVersion.V1_23,
managedNodeGroups: [
{
id: "default-ng",
desiredSize: 2,
minSize: 1,
maxSize: 2,
}
]
});
const cluster = blueprints.EksBlueprint.builder()
.clusterProvider(clusterProvider)
.account(account)
.region(region)
.addOns(
new blueprints.AwsLoadBalancerControllerAddOn,
)
.teams();
}
}
In the previous step, we created an EKS cluster, defined its NodeGroup, and added the AwsLoadBalancerController plugin.
While it is convenient to deploy a stack with the CDK command-line tool, we recommend setting up an automated pipeline for deploying and updating your EKS infrastructure. This makes it easier to deploy development, testing, and production across regions.
CodePipelineStack is a framework for continuous delivery of AWS CDK applications. When the source code of an AWS CDK application is uploaded to Git, the stack automatically builds, tests, and runs new versions. As each stage or stack of the application is added, it automatically reconfigures itself to deploy these new stages or stacks.
Next, we run the cdk deploy command to deploy the stack.
Finally, we used a command to verify that the application load balancer was successfully installed.
$ kubectl get pod -n kube-system
NAME READY STATUS RESTARTS AGE
aws-load-balancer-controller-6bd49cfb7-2cvlk 1/1 Running 0 5m31s
aws-load-balancer-controller-6bd49cfb7-7lcwd 1/1 Running 0 5m31s
aws-node-9hsvz 1/1 Running 0 99m
coredns-66cb55d4f4-gdcqg 1/1 Running 0 106m
coredns-66cb55d4f4-gmzjt 1/1 Running 0 106m
kube-proxy-wr5jn 1/1 Running 0 99m
1.3 Summary
In this section, we introduced the concept of IaC, created a custom EKS cluster with CDK while installing the AWS Application Load Balancer plugin. It provides a prerequisite for accessing microservices web pages in the future. Below is a summary of this section:
- Launched a CDK project using cdk init.
- Quickly defined an EKS cluster with EKS Blueprint by adding the AWS Application Load Balancer plugin.
2. Deploy Fluxcd on Amazon EKS Cluster
Flux CD is a continuous delivery tool developed by Weaveworks and open sourced for CNCF. It is widely used today due to its easy setup and ability to understand Kubernetes changes. One of the important features is that it allows teams to manage their Kubernetes deployments in a declarative manner. Flux CD synchronizes Kubernetes manifest files stored in the source repository with the Kubernetes cluster by polling the repository regularly. Flux CD ensures that the Kubernetes cluster is always in sync with the configuration defined in the source repository, without having to worry about the operational status of kube ctl or monitoring workloads with additional tools and services. So let's install Flux.
2.1 Installing Flux CLI
Flux CLI is a binary executable for all platforms that you can download from the GitHub release page.
curl -s https://fluxcd.io/install.sh | sudo bash
2.2 Prepare AWS CodeCommit credentials
We need to create a user and use CodeCommit as the Git source as well as the access required by AWS CodeCommit via HTTPS Git credentials.
2.3 Install Flux on the Cluster
Clone the prepared GitOps code. The project structure is as follows:
.
├── apps // Define Application
│ ├── base // Application Infrastructure Layer
│ └── overlays // Application Overlays Layer
├── clusters // Cluster configuration portal
│ └── dev-cluster
├── infrastructure // Infrastructure Shared Components
│ ├── base // Infrastructure Infrastructure layer
│ └── overlays // Infrastructure Overlays layer
└── README.md
Install Flux on your Kubernetes cluster and configure it to manage from a Git repository with flux bootstrapping. If Flux components are present in the cluster, the bootstrapping command will perform upgrades as needed. The bootstrapping is powerless and the command can be safely run multiple times. Replace the username and password in the following command with your HTTPS Git credentials for AWS CodeCommit.
flux bootstrap git \
--url=https://git-codecommit.us-west-2.amazonaws.com/v1/repos/gitops \
--username=__replace_with_your_Git_credential_username__ \
--password=__replace_with_your_Git_credential_password__ \
--token-auth=true \
--path="./clusters/dev-cluster" \
--components-extra=image-reflector-controller,image-automation-controller
Use git pull to check the updates that the bootstrapper made. Three new files will appear in the clusters/dev-cluster/flux-system directory of the Git repository:
- gotk-components.yaml: Defines six Flux controllers: helm, Kustomize, source, notification, image automation, and image reflector.
- gotk-sync.yaml: Git Flux source, Source Controller changes in the cluster monitoring code in the GitOps repository and commits the corresponding changes.
- kustomization.yaml: Multi-cluster configuration.
Check if Flux was successfully installed with flux get kustomizations --watch. Output similar to:
$ flux get kustomizations --watch
NAME REVISION SUSPENDED READY MESSAGE
flux-system master/83b7e66 False True Applied revision: master/83b7e66
infrastructure master/83b7e66 False True Applied revision: master/83b7e66
Check the components deployed by flux-system with kubectl -n flux-system get pod,services . The output will be as follows:
$ kubectl -n flux-system get pod,services
NAME READY STATUS RESTARTS AGE
pod/helm-controller-88f6889c6-sblvd 1/1 Running 0 11m
pod/image-automation-controller-6c5f7bbbd9-8xskk 1/1 Running 0 11m
pod/image-reflector-controller-78949bb4b4-bqn4m 1/1 Running 0 11m
pod/kustomize-controller-784bd54978-s82dq 1/1 Running 0 11m
pod/notification-controller-648bbb9db7-627zs 1/1 Running 0 11m
pod/source-controller-79f7866bc7-gdt95 1/1 Running 0 11m
NAME TYPE CLUSTER-IP EXTERNAL-IP PORT(S) AGE
service/notification-controller ClusterIP 172.20.60.72 <none> 80/TCP 11m
service/source-controller ClusterIP 172.20.133.44 <none> 80/TCP 11m
service/webhook-receiver ClusterIP 172.20.196.178 <none> 80/TCP 11m
2.4 Summary
In this section, we used the flux bootstrap command to install Flux on a Kubernetes cluster and introduced three important configuration files: gotk-components.yaml, gotk-sync.yaml, and kustomization.yaml. Below is a summary of this section:
- Installing the Flux client
- Creating an IAM user and CodeCommit credentials
- Install Flux on an Amazon EKS cluster and enable the automatic image update feature
3. Implement GitOps workflows with Flux CD
For GitOps CI/CD pipelines, configuration changes and state changes to EKS clusters and the workloads running on them are driven by code changes in Git (generated by git push or pull requests. GitOps recommends pull requests). The traditional CI/CD pipeline works with the CI engine and triggers the create/apply or install/upgrade kubectl command to deploy the cluster. Thus, GitOps creates a more efficient and concise CI/CD pipeline.
We will demonstrate a specific application – “Sock Shop” – and practical exercises to demonstrate how to achieve continuous integration and delivery in a GitOps CI/CD pipeline.
3.1 About Sock Shop
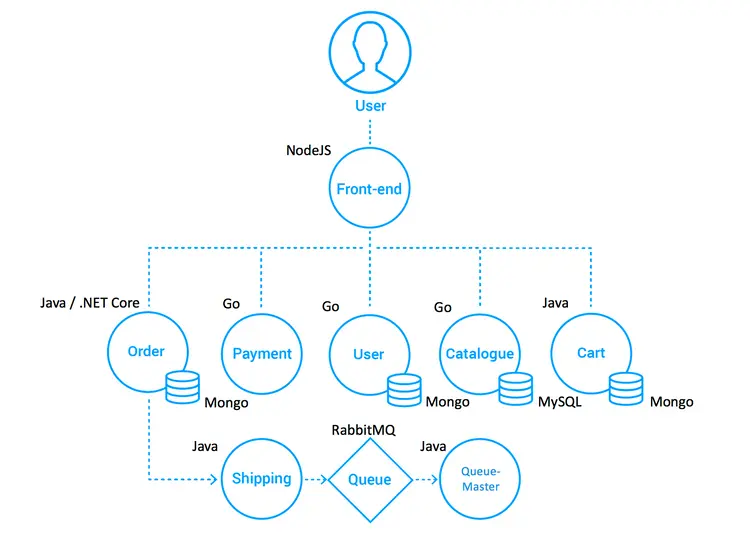
We will use the user-facing part of an online sock store as an example. It is built with Spring Boot, Go Kit, and Node – and packaged in Docker containers. As a “Microservice Standard Demo” shows:
- Best practices for deploying microservices (including examples of mistakes)
- Cross-platform deployment capabilities
- Benefits of Continuous Integration/Deployment
- The complementary nature of DevOps and microservices
- A testable “real” application for different orchestration platforms
The Socks Store project consists of 8 front-end and back-end microservices, which is the front-end of a web page created by NodeJS. The project name is: front-end here. And it accesses several back-end services through http requests, which include: ordering, payment, user management, product management and shopping cart, etc. The data of the back-end services is stored in MongoDB and MySQL.
The reference architecture is as follows:
3.2 About Kustomize
In addition to setting up GitOps workflows, we also need to know how to configure Kubernetes. As system complexity and environment complexity increase, it becomes increasingly difficult to maintain traditional resource inventory (YAML)-based management. Complex business use cases, multiple environments (development, testing, pre-release, production), and a large number of YAML resource inventories need to be maintained and managed. Although Helm can solve some problems, such as unified management of scattered resource files, application distribution, upgrade, rollback, etc., Helm makes it more difficult to deal with small differences between environments. It also requires mastering the complex DSL (Template Syntax) syntax, which is a high barrier to entry. Thus, the declarative configuration management tool Kustomize was born. Kustomize helps teams manage large amounts of YAML Kubernetes resources across different environments and teams. This helps teams manage small differences in environments in a lightweight way, makes resource configurations reusable, reduces copying and modification efforts, and also greatly reduces configuration errors. The entire application configuration process does not require additional learning of template syntax.
Kustomize solves the above problems in the following ways:
- Kustomize maintains the application configuration across different environments through Base & Overlays.
- Kustomize uses Patch to reuse the base configuration and implementation, and source reuse is achieved through the difference section between the Overlay description and the base application configuration.
- Kustomize manages native Kubernetes YAML files without the need to learn DSL syntax.
According to the official website, Kustomize has become a native configuration management tool for Kubernetes that allows users to customize application settings without templates. Kustomize uses native K8s concepts to help create and reuse source configurations (YAML), allowing users to use an application description file (YAML) as a base (Base YAML) and then generate the required description file for the final deployed application via Overlays.
3.3 Multi-cluster configuration
Understanding the Kustomize configuration management tool, we use Kustomization (base, overlays) to enable multi-cluster deployment transformation.
We created two directories in the microservice project: the base directory to store the full source configuration files (YAML) and the overlays directory to store different environments or differential cluster configurations.
For example, in this case, the full configuration file for the microservice is full-demo.yaml and we copy it to the main folder.
cp deploy/kubernetes/complete-demo.yaml deploy/kubernetes/base/complete-demo.yaml
Then we reference the file via kustomization.yaml:
# deploy/kubernetes/base/kustomization.yaml
apiVersion: kustomize.config.k8s.io/v1beta1
kind: Kustomization
resources:
- ./complete-demo.yaml
For development environment, if there are differential requirements, such as changing the number of service ports and copies, just configure the differential settings in the overlays/development/kustomization.yaml file without copying and changing the existing full-demo.yaml.
3.4 Deploying Microservices with GitOps Workflow
After completing multi-cluster support for microservices, Flux needs to know that the microservices configuration has changed, so we register the CodeCommit URL of the microservices repository (microservices-repo) in the Flux repository (flux-repo).
3.4.1 Adding the Microservices Repository Address
We return to the Flux repository under the application layer/applications folder:
.
├── base
│ ├── kustomization.yaml
│ └── sock-shop
│ ├── kustomization.yaml
│ ├── namespace.yaml
│ ├── rbac.yaml
│ └── tenant.yaml
└── overlays
└── development
├── kustomization.yaml
└── sock-shop
└── kustomization.yaml
Open the tenant.yaml file in apps/base/sock-shop/ and replace MICRO_SERVICES_REPO with the microservices URL: https://git-codecommit.xxx.amazonaws.com/v1/repos/microservices-repo.
apiVersion: source.toolkit.fluxcd.io/v1beta1
kind: GitRepository
metadata:
name: sock-shop-tenant
namespace: sock-shop
spec:
interval: 1m
url: __MICRO_SERVICES_REPO__
ref:
branch: main
secretRef:
name: microservices-basic-access-auth
......
3.4.2 Adding CodeCommit Credentials
Find the account and password for "Prepare AWS CodeCommit credentials". Convert the data value to base64 encoding before running the command.
Then open the base/sock-shop/basic-access-auth.yaml file and replace BASE64_USERNAME and BASE64_PASSWORD with the generated base64 encoding:
---
apiVersion: v1
kind: Secret
metadata:
name: microservices-basic-access-auth
namespace: sock-shop
type: Opaque
data:
username: __BASE64_USERNAME__
password: __BASE64_PASSWORD__
3.4.3 Deployment
By adding the microservice Git URL to the Flux configuration repository, Flux automatically scans its configuration changes. Once the code is committed, Flux checks if there are any microservices deployed to the cluster and if they match the Git repository definition, otherwise, Flux automatically deploys the microservices to the cluster.
After executing the code, run the command flux get kustomizations -watch and wait for Flux to update. The deployment is complete when the READY status of all customizations is True.
Search for pods and services in the sock store namespace, shown below:
$ kubectl get pod,service -n sock-shop
NAME READY STATUS RESTARTS AGE
pod/carts-b4d4ffb5c-z4jrj 1/1 Running 0 5m28s
pod/carts-db-6c6c68b747-jl5pd 1/1 Running 0 5m28s
pod/catalogue-759cc6b86-qdmvc 1/1 Running 0 5m28s
pod/catalogue-db-96f6f6b4c-zgp5z 1/1 Running 0 5m28s
pod/front-end-5c89db9f57-cvbdl 1/1 Running 0 5m28s
pod/orders-7664c64d75-lqwbm 1/1 Running 0 5m28s
pod/orders-db-659949975f-qv7pl 1/1 Running 0 5m28s
pod/payment-7bcdbf45c9-szrfq 1/1 Running 0 5m28s
pod/queue-master-5f6d6d4796-nkktx 1/1 Running 0 5m28s
pod/rabbitmq-5bcbb547d7-gzhn4 2/2 Running 0 5m28s
pod/session-db-7cf97f8d4f-9mz6v 1/1 Running 0 5m28s
pod/shipping-7f7999ffb7-95rlc 1/1 Running 0 5m27s
pod/user-68df64db9c-kh247 1/1 Running 0 5m27s
pod/user-db-6df7444fc-jlkp9 1/1 Running 0 5m27s
NAME TYPE CLUSTER-IP EXTERNAL-IP PORT(S) AGE
service/carts ClusterIP 172.20.33.124 <none> 80/TCP 5m29s
service/carts-db ClusterIP 172.20.75.163 <none> 27017/TCP 5m29s
service/catalogue ClusterIP 172.20.92.254 <none> 80/TCP 5m29s
service/catalogue-db ClusterIP 172.20.242.255 <none> 3306/TCP 5m29s
service/front-end LoadBalancer 172.20.55.188 k8s-sockshop-frontend-12345678910-012345678910abc.elb.us-east-1.amazonaws.com 80:30001/TCP 5m29s
service/orders ClusterIP 172.20.8.252 <none> 80/TCP 5m29s
service/orders-db ClusterIP 172.20.40.212 <none> 27017/TCP 5m29s
service/payment ClusterIP 172.20.6.218 <none> 80/TCP 5m29s
service/queue-master ClusterIP 172.20.153.80 <none> 80/TCP 5m29s
service/rabbitmq ClusterIP 172.20.99.37 <none> 5672/TCP,9090/TCP 5m29s
service/session-db ClusterIP 172.20.37.111 <none> 6379/TCP 5m29s
service/shipping ClusterIP 172.20.43.252 <none> 80/TCP 5m29s
service/user ClusterIP 172.20.220.174 <none> 80/TCP 5m29s
service/user-db ClusterIP 172.20.70.57 <none> 27017/TCP 5m29s
Access the AWS Load Balancer DNS name.
3.5 Summary

In this section, we introduced a microservice business application, the Sock Shop online store, and completed its multi-cluster configuration. We also created a standard GitOps workflow based on Flux that automatically synchronizes the target cluster with changes in configuration files to complete the deployment of the microservice on the EKS cluster. Meanwhile, we introduced a practical configuration management tool K8s-Kustomize and how to manage application resource files. Here is a summary of this section:
- Introducing the sock store
- Learn a configuration management tool – Kustomize (base, overlays) and how to change multi-cluster microservice deployments.
- Build a GitOps workflow and deploy microservices
4. Automated image-based deployment with GitOps workflows
We chose the Sock Shop front-end microservice as an example to demonstrate the detailed process of code changes, image build, and custom release with a GitOps workflow.
4.1 Definition of CodePipeline CI
The front-end is a pure Node.js front-end service to support Docker image packaging (see the Sock Shop Architect in Chapter 3.1 for details). To define the CI process executed in CodePipeline, add a buildspec.yml file to the front-end project source code:
version: 0.2
phases:
pre_build:
commands:
- echo Logging in to Amazon ECR...
- aws --version
- AWS_ACCOUNT_ID=`echo $REPOSITORY_URI|cut -d"." -f1`
- AWS_DEFAULT_REGION=`echo $REPOSITORY_URI|cut -d"." -f4`
- echo $AWS_ACCOUNT_ID $AWS_DEFAULT_REGION
- aws ecr get-login-password --region $AWS_DEFAULT_REGION | docker login --username AWS --password-stdin $REPOSITORY_HOST
- COMMIT_HASH=$(echo $CODEBUILD_RESOLVED_SOURCE_VERSION | cut -c 1-7)
- IMAGE_TAG=main-$COMMIT_HASH-$CODEBUILD_BUILD_NUMBER
- echo $IMAGE_TAG
build:
commands:
- echo Build started on `date`
- echo Building the Docker image...
- docker build -t $REPOSITORY_URI:latest .
- docker tag $REPOSITORY_URI:latest $REPOSITORY_URI:$IMAGE_TAG
post_build:
commands:
- echo Build completed on `date`
- echo Pushing the Docker images...
- docker push $REPOSITORY_URI:latest
- docker push $REPOSITORY_URI:$IMAGE_TAG
This CI process automatically builds an image and uploads it to the ECR weaveworksdemos/front-end repository when the front-end code changes. The image tag format is [branch]-[commit]-[build number].
4.2 Automatic image update
When you work in an agile environment with continuous integration, such as when testing development, updating your GitOps repository or using scripts to manage new service images can be a real pain. Luckily, Flux has a great automatic image update feature that takes care of this for you. To use it, all you need to do is enable the image update component in your configuration. If you haven’t done so yet, no worries, just add the parameters –components-extra=image-reflector-controller,image-automation-controller when you iterate over the Flux bootstrap to enable it.
To achieve image-based automatic updates, we need to perform the following steps:
- Register the front-end microservice image repository to allow Flux to periodically scan the ECR image repository reporter in the front-end project.
- Configure credentials to access the image repository. Flux requires credentials to access the ECR image repository to read image information.
- Set the image update policy. In most cases, we don't want all changes to the image versions to trigger the CD every time. Instead, we only want the specified branch (root) code to trigger the CD. A special update policy is needed to meet this requirement.
Next, we will complete the above operations one by one.
4.2.1 Adding an image policy to the frontend of a Git repository
In the microservices-repo project, we will use Kustomization overlays in the DEV environment to replace the microservice front-end with a customized and updated version. Modify the file deploy/kubernetes/overlays/development/kustomization.yaml. (Note: Replace ACCOUNT_ID with your ACCOUNT_ID).
apiVersion: kustomize.config.k8s.io/v1beta1
kind: Kustomization
resources:
- ../../base
images:
- name: weaveworksdemos/front-end
newName: __ACCOUNT_ID__.dkr.ecr.us-west-2.amazonaws.com/weaveworksdemos/front-end # {"$imagepolicy": "sock-shop:sock-shop-front-end:name"}
newTag: latest # {"$imagepolicy": "sock-shop:sock-shop-front-end:tag"}
4.2.2 Registering the Front-End of a Microservice under Flux-repo
In the flux-repo project, create a new apps/overlays/development/sock-shop/registry.yaml file and replace ACCOUNT_ID with your ACCOUNT_ID.
---
apiVersion: image.toolkit.fluxcd.io/v1beta1
kind: ImageRepository
metadata:
name: sock-shop-front-end
namespace: sock-shop
spec:
image: __ACCOUNT_ID__.dkr.ecr.xxxx.amazonaws.com/weaveworksdemos/front-end
interval: 1m0s
4.2.3 Configuring Access Credentials for Amazon ECR
There are two methods for Amazon ECR credentials in Flux.
- Automatic authentication mechanism (Image Reflector Controller retrieves credentials on its own, only for: Amazon ECR, GCP GCR, Azure ACR)
- Regularly retrieve credentials (stored in the cluster via Secret) with CronJob
apiVersion: kustomize.config.k8s.io/v1beta1
kind: Kustomization
resources:
- gotk-components.yaml
- gotk-sync.yaml
patches:
- patch: |-
- op: add
path: /spec/template/spec/containers/0/args/-
value: --aws-autologin-for-ecr
target:
version: v1
group: apps
kind: Deployment
name: image-reflector-controller
namespace: flux-system
4.2.4 Setting the image update policy
Add the file gitops/apps/overlays/development/sock-shop/policy.yaml. The following rules correspond to image versions such as master-d480788-1, master-d480788-2, and master-d480788-3.
---
apiVersion: image.toolkit.fluxcd.io/v1beta1
kind: ImagePolicy
metadata:
name: sock-shop-front-end
spec:
imageRepositoryRef:
name: sock-shop-front-end
filterTags:
pattern: '^main-[a-fA-F0-9]+-(?P<buidnumber>.*)'
extract: '$buidnumber'
policy:
numerical:
order: asc
Add the file gitops/apps/overlays/development/sock-shop/image-automation.yaml. Flux image automation specifies a Git repository for the application configuration, including the branch, path, and other information.
---
apiVersion: image.toolkit.fluxcd.io/v1beta1
kind: ImageUpdateAutomation
metadata:
name: sock-shop-front-end
spec:
git:
checkout:
ref:
branch: main
commit:
author:
email: [email protected]
name: fluxcdbot
messageTemplate: '{{range .Updated.Images}}{{println .}}{{end}}'
push:
branch: main
interval: 5m0s
sourceRef:
kind: GitRepository
name: sock-shop-tenant
namespace: sock-shop
update:
path: ./deploy/kubernetes/overlays/development
strategy: Setters
4.3 Publication and approval
We verify the entire automatic image update process by modifying the front-end source code.
4.3.1 Update the front-end code
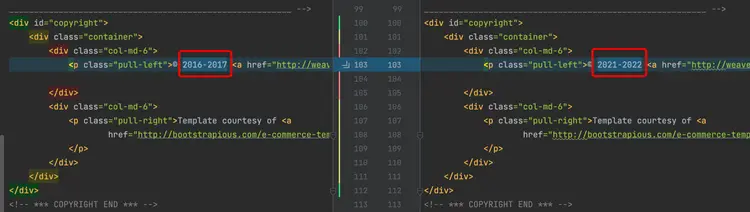
Change the front-end footer and modify the file: front-end/public/footer.html.
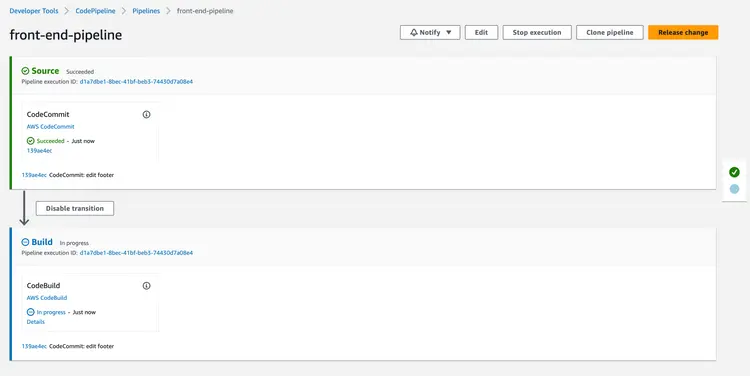
4.3.2 Check CodePipeline
Code changes on the front-end automatically trigger CodePipeline execution.
4.3.3 Confirming the ECR image version change
After CodePipeline completes, log in to the Amazon ECR console to check the weaveworksdemos/front-end image version:
4.3.4 Checking the flux image information

Through Flux CLI, check if ImageRepository and ImagePolicy have successfully retrieved the latest version.
$ flux get images all --all-namespaces
NAMESPACE NAME LAST SCAN SUSPENDED READY MESSAGE
sock-shop imagerepository/sock-shop-front-end 2022-09-18T14:46:45Z False True successful scan, found 20 tags
NAMESPACE NAME LATEST IMAGE READYMESSAGE
sock-shop imagepolicy/sock-shop-front-end 267314483271.dkr.ecr.us-west-2.amazonaws.com/weaveworksdemos/front-end:master-1f49071-24 True Latest image tag for '267314483271.dkr.ecr.us-west-2.amazonaws.com/weaveworksdemos/front-end' resolved to: master-1f49071-24
NAMESPACE NAME LAST RUN SUSPENDED READY MESSAGE
sock-shop imageupdateautomation/sock-shop-front-end 2022-09-18T14:43:51Z False True no updates made; last commit 1ff6d91 at 2022-09-18T14:34:40Z
4.3.5 Microservice source code is automatically updated
Flux automatically updated the front-end image version. The last commit was made by fluxcdbot and the image tag was successfully modified to the latest version: master-1f49071-24.
4.3.6 Verifying the Pod Image Version

Verify the pod name with kubectl get pod -n sock-shop | grep front-end. Check the pod details with kubectl describe pod/front-end-759476784b-9r2rt -n sock-shop | grep Image: To verify the image version update. It will show as below:
$ kubectl describe pod/front-end-759476784b-9r2rt -n sock-shop | grep Image:
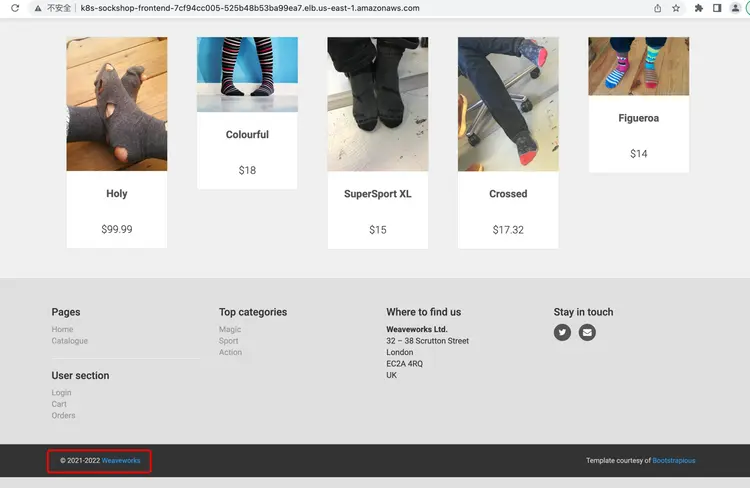
Image: 267314483271.dkr.ecr.us-west-2.amazonaws.com/weaveworksdemos/front-end:master-1f49071-244.3.7 Verify that the static page is up to date
4.4 Summary
In this section, we have described the entire automated deployment process based on images in detail. In short, we use Flux's continuous monitoring capability for image repositories. When a change is detected in the image version, it automatically changes the image configuration in the Git repository and completes the automated deployment by connecting to the standard GitOps workflow in the previous section. To summarize this section:
- Run the CI process through CodePipeline to achieve continuous integration of front-end code.
- Locate and modify the business configuration file with Flux annotations.
- Configure Flux image update policy to enable Flux to monitor specific versions of images and fully automate deployment.
Result
This article focuses on how to use FluxCD to automate the deployment of microservices to an Amazon EKS cluster in the cloud, as well as best practices for GitOps pipelines. GitOps is a continuous delivery methodology that encompasses a set of best practices. There are no hard limits to building CI/CD tools as long as they adhere to GitOps fundamentals.