Introduction
I remember my first servers. I did almost nothing to secure them because I didn't know someone with bad intentions could get to my server. And you can guess how that ended. Luckily, I had backups and could easily restore them. But it happened again. So, this time, I did some research, did my homework, and made my servers more secure. I know there is no such thing as an unhackable server, but I'm going to show you how to keep your server secure and what to do if it goes down.
We'll start with the basic setup. You'll learn what to do when you create a new server. Then we'll cover how to maintain it by performing regular checks. Finally, you'll learn what to do when your server goes down. This tutorial won't make you a professional server administrator, as it requires a lot of work and is a serious job. But at least you can keep your hobby projects safe.
Prerequisites
- 1 server (e.g. with Hetzner)
Step 1 – Initial Setup and Basic Security
After you have created your server, follow steps 1 through 5 in the “Initial Server Setup with Ubuntu” tutorial. It explains how to:
- Create a new user with sudo permissions
- Add an SSH key
After completing the first 5 steps of the linked tutorial and connecting to the new sudo user, you can continue with the steps below.
System update
The first thing you should do is check for updates, as outdated software can have vulnerabilities that are easily exploited. It's easier than you think; just run these two commands:
sudo apt update
sudo apt upgrade
Easy, right? We've now made sure we're using the latest versions.
Secure SSH access
When someone targets your server, the first thing they will probably try is accessing it via SSH. They often do this with bots and multiple methods. So securing SSH access is very important.
Edit the configuration file:
sudo nano /etc/ssh/sshd_config
- Disable root access
Find the line “PermitRootLogin” and change it to “no”.
- Disable password entry
If you added an SSH key as suggested above, you can disable password entry.
- “Find ”PasswordAuthentication“ and set it to ”no”.
- “Find ”PubkeyAuthentication“ and set it to ”Yes.”.
- Change the default SSH port
Just by changing that, we can eliminate most of the automated bot attacks, as most of them are fake bots and try to access SSH through port 22.
Find the line “#Port 22” and change it to something like “Port 2222” (or change 2222 to whatever you want).
Save the changes and check if the port has been changed successfully:
sudo systemctl restart ssh.service
sudo systemctl status ssh
Make sure it says Server listening on :: port 2222.
If port 2222 is specified, you can run the following to terminate the connection to the server and check if the connection to the new port works:
ssh -p 2222 holu@<203.0.113.1>
If you can connect to the port you set, you can continue the tutorial.
Configure a firewall
We will use “ufw” to manage firewall rules. It is designed to be easy to use and uses a command line interface. Ufw is probably already installed on your system, but you can run this command to make sure it is installed:
sudo apt install ufw
Next, we will deny all incoming network traffic unless specifically allowed by other rules. This is essential to securing your server by only allowing traffic that you explicitly allow. You will need to run this command:
sudo ufw default deny incoming
Next, we allow all outbound network traffic. This is usually secure and allows your server to communicate with other servers or services without restrictions. Run this command:
sudo ufw default allow outgoing
Now we need to allow our SSH port to connect to our server via SSH. Just make sure to change 2222 to your SSH port if you specified something else and run this command:
sudo ufw allow 2222/tcp
Finally, we need to enable our firewall rules:
sudo ufw enable
Fail2Ban
We changed our SSH port and set up our firewall. But what happens if a bot finds our port and still tries to access our server via SSH? This would be a brute force attack and we can protect our server with Fail2Ban. This software bans IPs that show signs or malicious attempts. To install and enable Fail2Ban you need to run these three commands:
sudo apt install fail2ban
sudo systemctl enable fail2ban
sudo systemctl start fail2ban
You can also customize Fail2Ban settings by editing the configuration files in the /etc/fail2ban/ folder. For more detailed information and best practices, you can check out the Fail2Ban documentation.
Great! You've taken a big step and now have a more protected server. For now, you just need to perform regular maintenance from time to time. We'll explain what you need to do in the next section.
Step 2 – Regular Maintenance
- System update
First, we need to check if there are any updates for our system. Run this command:
sudo apt update && sudo apt upgrade -y
- Monitor reports
You should regularly check your system logs to detect unusual activity. Logwatch can help you automate this process. You can install logwatch with this command:
sudo apt install logwatch
You can check out more detailed information, how to set up daily reports, and see what the reports look like from this guide.
- Check disk usage.
Just to make sure you have enough space to run your server, check your remaining disk space with this command:
df -h
- Back up your data.
You should always have multiple backups to make sure you can recover from a disaster if your server is completely deleted or becomes inaccessible. Luckily, Hetzner has an automated backup solution for cloud servers and you can check it out in the official documentation. If you want to set up your own backup, you can use tools like “rsync” or “Duplicity”.
- Audit user accounts
Don't forget to regularly check the user accounts on the server. Make sure that only authorized users have access to your server. Remove any accounts that are no longer needed. You can check the user accounts by running this command:
sudo nano /etc/passwd
- Check for Rootkits and Malware
To quickly scan your server, you can use tools like “rkhunter” and “chkrootkit”. These tools will help you check for possible rootkits, backdoors, and local exploits and make sure everything is in order. Run these commands to make sure rkhunter is installed and check:
sudo apt install rkhunter
sudo rkhunter --check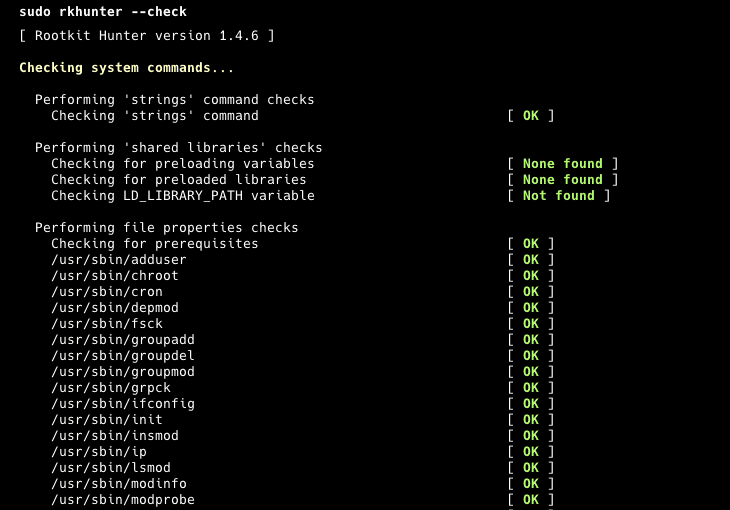
- System performance monitoring
Finally, you can quickly check the system performance to make sure there are no resource bottlenecks while running the software. There are tools like "htop", "top" or "atop". But you can just run this command:
htop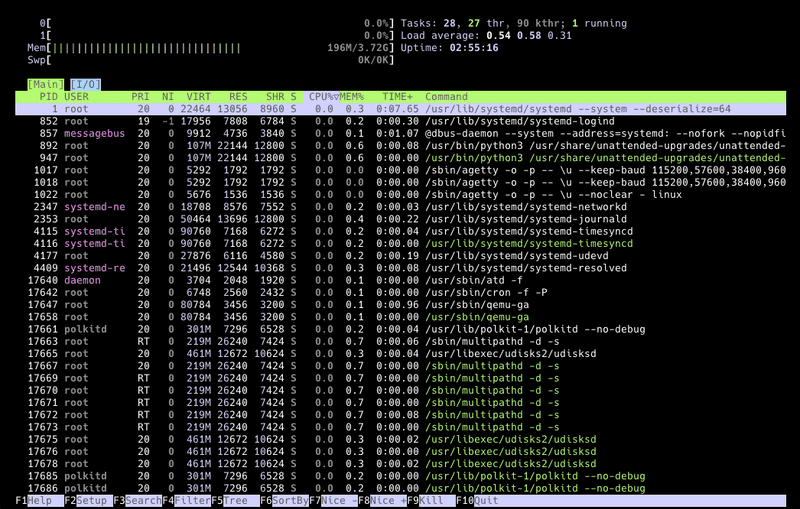
Step 3 – More Security Tools
- Use intrusion detection systems.
You can use tools like “AIDE” (Advanced Intrusion Detection Environment) to monitor your system changes. It creates a database of your files and folders and compares your system against that database to ensure file integrity. You can check out more details from its repository. For initial use, you can install it with this command:
sudo apt install aide
Start and generate the database with these commands:
sudo aideinit
sudo cp /var/lib/aide/aide.db.new /var/lib/aide/aide.db
And compare your system with the database using this command:
sudo aide --config /etc/aide/aide.conf --check
- Enable two-factor authentication (2FA)
You can also set up 2FA (two-factor authentication) to log in to your server via SSH. This adds an extra layer of protection and reduces the risk of unauthorized access. You can install it with this command:
sudo apt install libpam-google-authenticator
And run this command to launch it:
google-authenticator
- Secure web applications
If you are running web applications on your server, make sure you follow their best practices and update them regularly. For example, if you are running WordPress, you should always use the latest version of WordPress and also keep all plugins and themes updated. In addition, you should install a proper WordPress security plugin. This will reduce the risk of unauthorized access to your server and applications.
Step 4 – Incident Response Plan
This plan can be very detailed in large organizations, but we'll keep it simple and workable for small entertainment servers. That's why I've prepared a 3-step plan for you.
- Preparation
For this section, you should create a small text file or note in your notepad program about your server information. Include information such as the server architecture, the software it's running, where your backups and logs are stored, and your configurations. Keep this note somewhere safe. You can check out this example as a starting point:
Server information
| Info | Description |
|---|---|
| Server Name | MyServer01 |
| IP Address | 192.168.1.100 |
| Operating System | Ubuntu 24.04 LTS |
| CPU | 4 vCPUs |
| RAM | 8GB |
| Storage | 100GB SSD |
| SSH Port | 2222 |
- Software and Services: Nginx 1.18.0, PostgreSQL 13, Django 3.1
- Backup: Dual, daily, /mnt/backup and remote storage in AWS S3, 30-day retention
- Nginx configuration: /etc/nginx/nginx.conf
- PostgreSQL configuration: /etc/postgresql/13/main/postgresql.conf
- Django configuration: /home/myuser/myapp/settings.py
- UFW configuration: /etc/ufw/ufw.conf
- Identification
At this point you need to check what the problem is with your server. Is the problem or breach related to your web application, the server itself, or one of the databases inside your server? If you are not sure, always assume that everything is at risk. So you need to start checking everything again, starting with the server.
- Improvement
Restore damaged systems in this section. If you can't access your server, you should restore from a server backup. If one of your web applications is down, you may only need to restore from its backup. Make sure everything is restored, tested, working as expected, and you've run a security scan.
Result
Securing your server requires a combination of best practices and regular maintenance. By following the steps outlined in this post, you can significantly increase your server security and protect your valuable data. Remember, security is an ongoing process, so don't forget to check your servers regularly.