Introduction
At some point, you may find yourself on a network that is insecure or has a very restrictive firewall and you want to make sure that no one is watching your traffic. One solution is to set up a VPN on Ubuntu 22.04 / 20.04 / 18.04, but many VPNs require special client software on your machine that you may not have permission to install. However, if all you need to do is browse the web securely, there is a quick, free, and useful alternative: a SOCKS 5 proxy tunnel.
A SOCKS proxy is an encrypted SSH tunnel through which configured applications route their traffic down, and then on the server end, the proxy forwards the traffic to the public internet. Unlike a VPN, a SOCKS proxy must be configured on an application-by-application basis on the client device, but as long as the application is capable of using the SOCKS proxy, you can launch applications without any specialized client software. On the server side, all you need to configure is SSH.
In this tutorial, you will use a server running Ubuntu 22.04 (although any Linux distribution that you can access via SSH will work) and the Firefox web browser as the client application. By the end of this tutorial, you will be able to browse websites through an encrypted SSH tunnel.
Prerequisites
- A Linux server running Ubuntu (other distributions work) with user
sudoand SSH access. - A program to configure with a SOCKS proxy, such as the Firefox web browser.
- For Windows users, you will also need the PuTTY tool or Windows Subsystem for Linux (WSL).
PuTTY is used to set up a proxy tunnel for Windows users. macOS or Linux users have pre-installed tools to set up the tunnel.
Step 1 (macOS/Linux) – Setting up the tunnel
On your local computer, if you haven't already created your Droplet with one, generate an SSH key. Once the key is generated, make sure the public key is added to the "authorized_keys" file in your SSH Droplet. Then open a terminal application to create an SSH tunnel with SOCKS proxy enabled.
Start the tunnel with this command:
ssh -i ~/.ssh/id_rsa -D 1337 -f -C -q -N sammy@your_domainExplanation of the proof
-i: SSH key path to connect to the host-D: tells SSH that we want a SOCKS tunnel on the specified port number (you can choose a number between 1025 and 65536)-f: Moves the process to the background-C: Compresses data before sending-q: Uses silent mode-N: Tells SSH that no commands will be sent after the tunnel is closed.
Check that the tunnel is running with this command:
ps aux | grep sshYou will see a line like this in the output:
Output
sammy 14345 0.0 0.0 2462228 452 ?? Ss 6:43AM 0:00.00 ssh -i ~/.ssh/id_rsa -D 1337 -f -C -q -N sammy@your_domain
You can exit your terminal application and the tunnel will remain active. This is because we used the -f argument, which puts the SSH session in the background.
Step 1 (Windows) – Setting up the tunnel
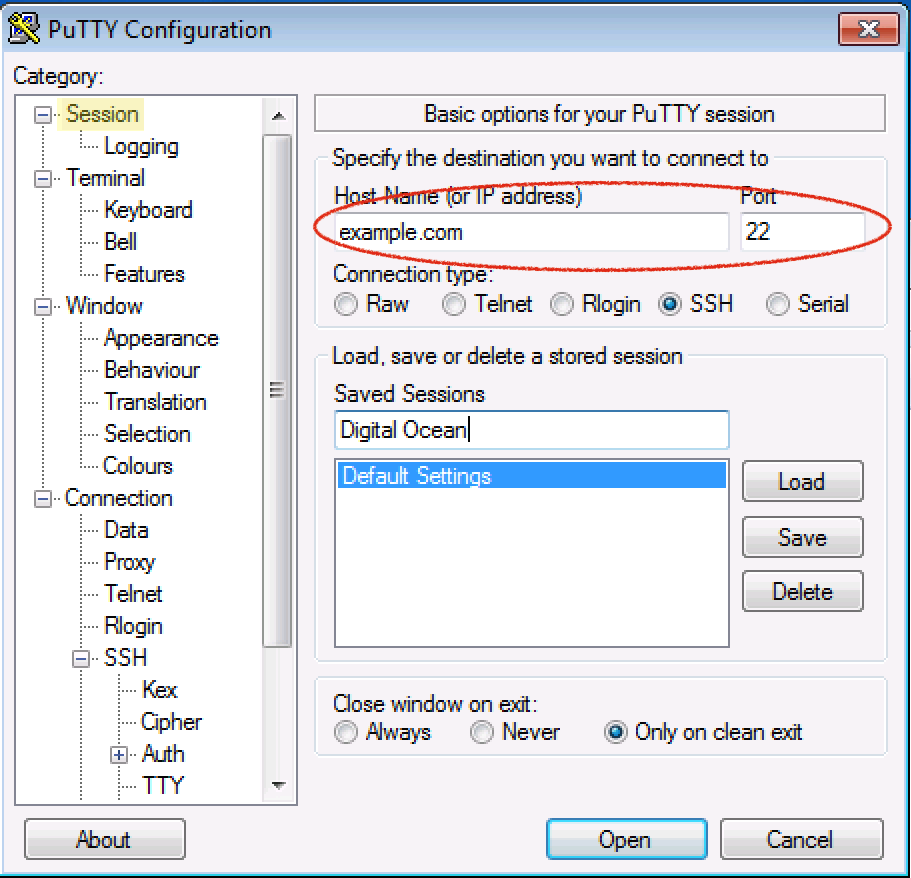
Open PuTTY. If you haven't installed it yet, download PuTTY and save it to a location of your choice. PuTTY does not require administrator rights to install. Just .exe Download and run.
To set up a tunnel, follow these steps:
From the Session section, add the hostname (or IP address) of your server and the SSH port (usually 22).
On the left, navigate to: Connection > SSH > Tunnels
Enter any source port number between 1025 and 65536, such as 1337.
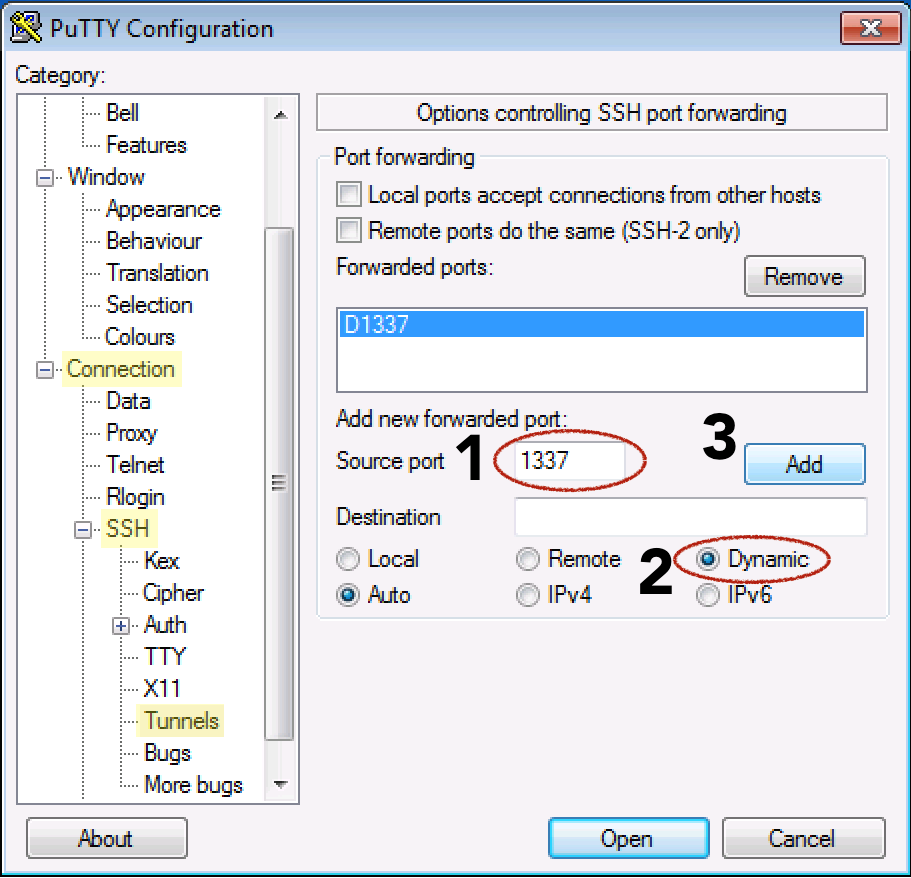
Select the Dynamic Radio button.
Click the Add button.
Go back to Session on the left.
Add a name in the Saved Sessions field and click the Save button.
Now click the Open button to establish the connection.
Username sudo and enter your server password to log in
Step 2 – Configure Firefox to use the tunnel
Now that you have an SSH tunnel, it's time to configure Firefox to use that tunnel. Remember that for a SOCKS 5 tunnel to work, you need to use a local application that can implement the tunnel. Firefox has this capability:
This step is the same for Windows, macOS, and Linux.
Make sure you have the port number you used in your SSH command. In our examples, we used 1337.
(The steps below were performed with Firefox version 80, but should work on other versions, although the location of the options may vary.)
Open Firefox.
- In the top right corner, click the hamburger icon to access the Firefox menu.
- Click the Preferences or Options menu item.
- Scroll down and select the Settings… button in the Network Settings section.
- Under the heading "Configure proxy access to the Internet," select Manual proxy configuration.
- For SOCKS Host enter localhost or 127.0.0.1 and for Port use the custom port specified in your tunnel, 1337.
- Near the bottom, check the box for "DNS proxy when using SOCKS v5"
- Click the OK button to save and close your settings.
Now open another tab in Firefox and start browsing the web. You should be ready to browse securely through the SSH tunnel. The data you receive from the website is encrypted. Additionally, since you have checked the Proxy DNS option, your DNS lookups are also encrypted so that your ISP can't see what you're viewing or where you're going to get it.
To verify that you are using a proxy, go back to the network settings in Firefox and enter a different port number and save the settings. Now if you try to browse the web, you should get an error message: “The proxy server is refusing connections.” This proves that Firefox is using a proxy and not just the default connection. Alternatively, you can go to a public IP site like ipecho.net, and the IP it returns should be your SSH Droplet IP, as it is now acting as your proxy.
Step 3 – Reset Proxy in Firefox
When you're done with the need to maintain the privacy of the SSH tunnel, go back to the Network Proxy settings in Firefox. Click the "Use system proxy settings" radio button and click OK. Now that Firefox is no longer using the SOCKS tunnel, we can turn it off as well. You can leave the tunnel up so you can enable and disable the proxy in Firefox, but if you leave the tunnel idle for too long, it may close itself.
Close the tunnel (macOS/Linux)
The tunnel we previously created on our local machine was sent to the background, so closing the terminal window you used to open the tunnel will not terminate it. To terminate the tunnel, we need to identify the process ID (PID) using the ps command, and then using the kill Let's end the process.
Let's search for all active ssh processes on our machine:
ps aux |grep sshFind the line that looks similar to the command you entered earlier to create the tunnel. Here is sample output:
Output
sammy 14345 0.0 0.0 2462228 452 ?? Ss 6:43AM 0:00.00 ssh -i ~/.ssh/id_rsa -D 1337 -f -C -q -N sammy@your_domain
From the beginning of the line, in one of the first two columns, there is a 3-5 digit number. This is the PID. The PID of the example 14345 is highlighted here.
Now that you know what the PID is, you can use the kill command to bring down the tunnel. Use its PID when killing the process:
kill 14345Close the tunnel (Windows)
Close the PuTTY window you used to create the tunnel. That's it.
Step 4 (macOS/Linux) – Create a shortcut for frequent use
For macOS or Linux systems, we can create an alias or create a script to quickly create the tunnel for us. There are two ways to automate the tunneling process:
These shortcut methods both require passwordless/passphraseless SSH key authentication to the server.
Clickable BASH Script
If you want an icon that starts the tunnel when you click it, we can create a small BASH script to do the job. The script will start the tunnel and then launch Firefox, although you still need to manually add the proxy settings in Firefox the first time.
On macOS, the Firefox binary that we can launch from the command line is inside Firefox.app. Assuming the application is in the Applications folder, the binary is in /Applications/Firefox.app/Contents/MacOS/firefox It is found.
On Linux systems, if you installed Firefox from a repository or it is already installed, its location should be /usr/bin/firefox If Firefox is not in the standard location, you can always use the find firefox command to find out where Firefox is located on your system.
In this script, replace the Firefox path with the path that is appropriate for your system. You may also need to adjust the SSH line to reflect the successful command you used earlier to establish a tunnel.
Using a text editor
Create a new file with nano:
nano ~/socks.shAdd the following lines:
#!/bin/bash -e
ssh -i ~/.ssh/id_rsa -D 1337 -f -C -q -N sammy@`your_domain`
/Applications/Firefox.app/Contents/MacOS/firefox &
- Replace the port number with your desired one.
1337(It should match what you have set in Firefox) - Replace SSH user@your hostname or IP
sammy@your_domainDo /Applications/Firefox.app/Contents/MacOS/firefoxReplace with the Firefox binary path for your system.
Save your script. For nano, type CONTROL + o and then to exit, type CONTROL + x.
Make the script executable so that it runs when you double-click it. From the command line, use the chmod command to add execute permissions:
chmod +x /path/to/socks.shOn macOS, you may have to take an extra step to tell macOS that a .sh file should be run as a program and not opened in an editor. To do this, right-click on your socks.sh file and select «Get Info.».
Find the "Open with:" section and if the disclosure triangle is not pointing down, click it to see the drop-down menu. Xcode may be set as the default application.
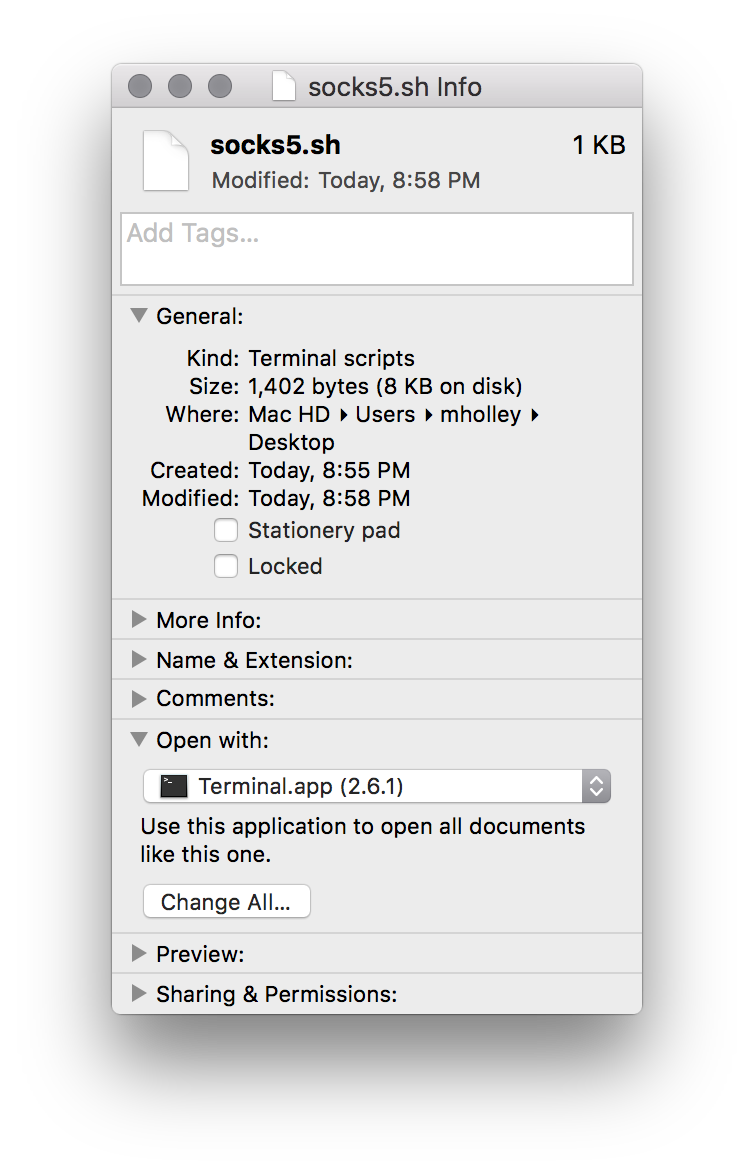
Change it to Terminal.app. If Terminal.app isn't listed, select "Other" and then go to Applications > Utilities > Terminal.app (you may need to set the "Active" drop-down menu from "Recommended Applications" to "All Applications").
To open your SOCKS proxy, click on the file socks.sh Double-click. The script will open a terminal window, initiate an SSH connection, and launch Firefox. It's safe to close the terminal window at this point. As long as you've kept the proxy settings in Firefox, you can start browsing through your secure connection:
This script will help you quickly stop the proxy, but you will still need to follow the manual steps listed above to find the ssh process and kill it when it is finished.
Command line alias
If you regularly find yourself at the command line and want to bring up the tunnel, you can create a command line alias to do the work for you. The hardest part of creating an alias is figuring out where to store the alias command.
Different Linux distributions and macOS versions store aliases in different locations. Your best bet is to look for one of the following files and alias Search to see where other aliases are currently stored. Features include:
- ~/.bashrc
- ~/.zshrc
- ~/.bash_aliases
- ~/.bash_profile
- ~/.profile
Once you find the correct file, add the following alias to any file you already have or just to the end of the file. In the example below we use the alias “firesox” to represent the SOCKS tunnel, but you can use any word you want as your alias:
alias firesox='ssh -i ~/.ssh/id_rsa -D 1337 -f -C -q -N sammy@your_domain && /Applications/Firefox.app/Contents/MacOS/firefox &'- Replace 1337 with your desired port number (it should match what you put in Firefox)
- Replace sammy@your_domain with the hostname or IP of your SSH user.
- Replace /Applications/Firefox.app/Contents/MacOS/firefox with the path to the Firefox binary.
Your alias will only be loaded when you start a new shell, so close your terminal session and start a new shell. Now when you type:
firesoxThis will set up your tunnel alias, then launch Firefox for you and return you to the command line. Make sure Firefox is still set to use the proxy. You can now browse securely.
Step 5 (Optional) – Troubleshooting: Bypassing Firewalls
If your connection works, you're good to go and you can stop reading. However, if you find that you can't establish an SSH connection due to a restrictive firewall, it's likely that port 22, which is required to establish the tunnel, is blocked. If you can control the SSH proxy server settings (which you can do with root access to your DigitalOcean Droplet), you can configure SSH to listen on a port other than 22.
Which port can you use that is not blocked?
Ports that are often open include 80 (general web traffic) and 443 (TLS, secure web traffic).
If your SSH server does not serve web content, we can tell SSH to use one of these web ports for communication instead of the default port 22. 443 is the best choice because it is expected to have encrypted traffic on this port. SSH traffic will be encrypted.
From a location without a firewall, SSH into the DigitalOcean Droplet you are using for proxying, or use the built-in console from the Digital Ocean control panel.
Edit the SSH server settings:
sudo nano /etc/ssh/sshd_configLook for the line Port 22.
We can replace «22» entirely or add a second port for SSH to listen on. We choose to have SSH listen on multiple ports, so we add a new line below port 22 that reads port 443. Here’s an example:
. . .
Port 22
Port 443
. . .
Restart SSH to reload the SSH configuration you just edited. Depending on your distribution, the name of the SSH server ghost may be different, but it is likely ssh or sshd. If one doesn't work, try the other:
sudo service ssh restartTo verify that your new SSH port is working, open a new shell (don't close the current one yet, just in case you accidentally locked yourself out) and open SSH using the new port:
ssh sammy@your_domain -p 443
If you were successful, you can now exit both shells and open your SSH tunnel using the new port:
ssh -i ~/.ssh/id_rsa -D 1337 -f -C -q -N sammy@your_domain -p 443The Firefox settings will be the same as it does not depend on the SSH port, only on the tunnel port (1337 above).
Result
In this modern day and age, there are many ways to browse securely when you’re on a potentially hostile network, like a public Wi-Fi network at a coffee shop. In most cases, if you can use a VPN to secure and protect all of your traffic, it’s preferable to use one. But having a SOCKS tunnel gives you the security you need when browsing the web when you can’t use or trust a VPN. A SOCKS tunnel is quick to set up and easy to use, and you have complete control over it. They’re a great option for secure browsing.