Introduction
Odoo is an open source enterprise resource planning (ERP) tool written in Python. It supports a number of plugins for a variety of business needs, such as accounting, payroll, inventory management, and more. In this tutorial, you will install Odoo and a PostgreSQL database using Docker Compose, then install Nginx to act as a reverse proxy for your Odoo site. Finally, you will enable secure HTTPS connections by using Certbot to download and configure a TLS certificate from the Let's Encrypt Certificate Authority.
Prerequisites
- An Ubuntu server with 2 or more CPUs, a non-root user with sudo privileges, and an enabled firewall.
- Docker installed
- Finally, to enable TLS you need a domain name that points to your server's public IP address. This should be something like example.com or odoo.example.com.
Once you have all the prerequisites ready, proceed to step 1, where you will install the docker-compose package.
Step 1 – Install Docker Compose
To install the command line tool docker-compose, refresh your package list, then install the package using apt Install:
sudo apt update
sudo apt install docker-compose
You can verify that the package is installed by running the following command:
docker-compose –versionYou should get output like the following:
Output
docker-compose version 1.25.0, build unknown
docker-py version: 4.1.0
CPython version: 3.8.10
Once you have verified that Docker Compose is installed on your server, you will configure and launch Odoo and PostgreSQL using Docker Compose in the next step of this tutorial.
Step 2 – Running Odoo and PostgreSQL with Docker Compose
To start creating your Odoo and PostgreSQL containers, create a directory called odoo in your home directory to store the files you will create in this tutorial. You will use this directory to store all the files you need to run Odoo.
Run the following commands to create the directory and then cd Run it:
mkdir ~/odoo
cd ~/odoo
Now create a new empty YAML file called docker-compose.yml using nano Or open your favorite editor:
nano docker-compose.ymlYou can use this file with the command docker-compose You will use it to start your Odoo and PostgreSQL containers and link them together. Add the following lines to the file:
version: '3'
services:
odoo:
image: odoo:15.0
env_file: .env
depends_on:
- postgres
ports:
- "127.0.0.1:8069:8069"
volumes:
- data:/var/lib/odoo
postgres:
image: postgres:13
env_file: .env
volumes:
- db:/var/lib/postgresql/data/pgdata
volumes:
data:
db:
The file defines two services. The first is called odoo, which runs the Odoo application. The second is called postgres, which is the PostgreSQL database container. Both services point to volumes that they use to store data outside of the running container instances. Finally, the odoo service exposes port 8069 on your server to the Odoo container, which runs on the same port 8069.
When you're done editing the file, save it and exit. If you're using nano, press CTRL+O then RETURN to save, then CTRL+X to exit.
The Odoo and PostgreSQL containers use environment variables for their configuration. The docker-compose.yml file specifies an env_file directive for both services. That directive then includes a reference file that contains the variables that each service needs to run.
This approach is usually recommended over adding environment variables directly to the docker-compose.yml file, as it is good practice to keep passwords out of your docker-compose.yml file. This approach is especially useful if you commit your files to a Git repository or other source control system.
Open a new env file with nano:
nano .envAdd the following lines to the file and replace the highlighted values with a POSTGRES_USER and POSTGRES_PASSWORD Replace your selection:
# postgresql environment variables
POSTGRES_DB=postgres
POSTGRES_PASSWORD=a_strong_password_for_user
POSTGRES_USER=odoo
PGDATA=/var/lib/postgresql/data/pgdata
# odoo environment variables
HOST=postgres
USER=odoo
PASSWORD=a_strong_password_for_user
To generate a password for Odoo and PostgreSQL, use the openssl command, which should be available on most Linux systems. Run the following command on your server to generate a random set of bytes and print a base64 encoded version that you can use as a password:
openssl rand -base64 30Use the resulting string instead of the guard passwords. a_strong_password_for_user In the file .env Once you are finished editing your .env file, save and exit your text editor.
Now you are ready to create containers. odoo and postgres with the command docker-compose Get started:
docker-compose up -dThe up subcommand tells docker-compose to start the containers and the associated volumes and networks defined in the docker-compose.yml file. The -d flag (which stands for “daemonize”) tells docker-compose to run the containers in the background so that your terminal command doesn’t take over. docker-compose prints a brief output as it downloads the required Docker images and then starts the containers:
Output
Creating network "odoo_default" with the default driver
Creating volume "odoo_odoo_data" with default driver
Creating volume "odoo_postgres_data" with default driver
Pulling odoo (odoo:14.0)...
15.0: Pulling from library/odoo
. . .
When this is done, Odoo should be running. You can test that a web server is running by fetching the home page using the curl command. 127.0.0.1:8069 Runs:
curl --head http://localhost:8069This will print only the HTTP headers from the response:
Output
HTTP/1.0 303 SEE OTHER
Content-Type: text/html; charset=utf-8
Content-Length: 215
Location: http://localhost:8069/web
Set-Cookie: session_id=142fa5c02742d0f5f16c73bc14ec8144b8230f8a; Expires=Mon, 06-Jun-2022 20:45:34 GMT; Max-Age=7776000; HttpOnly; Path=/
Server: Werkzeug/0.14.1 Python/3.7.3
Date: Tue, 08 Mar 2022 20:45:34 GMT
Answer 303 SEE OTHERS This means that the server Odoo It's up and running, but you'll need to visit another page to complete the installation. Header http://localhost:8069/web The specified location indicates where you should visit the Odoo installer page in your browser.
Then we will set up Nginx to proxy public traffic to the Odoo container.
Step 3 – Install and Configure Nginx
Putting a web server like Nginx in front of the Odoo server can improve performance by offloading caching, compression, and static file serving for a more efficient process. We are going to install Nginx and configure it to reverse proxy requests to Odoo, meaning it will take care of sending your users' requests to Odoo and back again. Using a non-container Nginx process will make it easier to add Let's Encrypt TLS certificates in the next step.
First refresh your package list, then install Nginx using apt Install:
sudo apt update
sudo apt install nginx
Using the Nginx Full UFW application profile, allow public traffic to ports 80 and 443 (HTTP and HTTPS):
sudo ufw allow "Nginx Full"Output
Rule added
Rule added (v6)Then open a new Nginx configuration file in the /etc/nginx/sites-available directory. We'll call ours odoo.conf but you can use another name:
sudo nano /etc/nginx/sites-available/odoo.confPaste the following into the new configuration file, making sure to replace your_domain_here with the domain you have configured to point to your Odoo server. This should be something like odoo.example.com, for example:
server {
listen 80;
listen [::]:80;
server_name your_domain_here;
access_log /var/log/nginx/odoo.access.log;
error_log /var/log/nginx/odoo.error.log;
location / {
proxy_set_header X-Forwarded-For $proxy_add_x_forwarded_for;
proxy_set_header X-Real-IP $remote_addr;
proxy_set_header X-Forwarded-Host $host;
proxy_set_header X-Forwarded-Proto https;
proxy_pass http://localhost:8069;
}
}
This configuration is HTTP-only for now, as we'll let Certbot configure TLS in the next step. The rest of the configuration file sets up the registrar locations and then sends all traffic, as well as some important proxy headers, to http://localhost:8069, the Odoo container we started in the previous step.
Save and close the file, then enable the configuration by linking it to /etc/nginx/sites-enabled/:
sudo ln -s /etc/nginx/sites-available/odoo.conf /etc/nginx/sites-enabled/Use nginx -t to check the syntax of the configuration file:
sudo nginx -tOutput
nginx: the configuration file /etc/nginx/nginx.conf syntax is ok
nginx: configuration file /etc/nginx/nginx.conf test is successfulAnd finally, reload the nginx service with the new configuration:
sudo systemctl reload nginx.serviceYour Odoo site should now be accessible over plain HTTP. Load http://your_domain_here (you may have to click through a security warning) and it will look like this:
Now that you have your site set up over HTTP, it's time to secure the connection with Certbot and Let's Encrypt certificates. You need to do this before proceeding with the Odoo web-based setup process.
Step 4 – Install Certbot and Set Up TLS Certificates
Thanks to Certbot and the free Let's Encrypt license, adding TLS encryption to your Odoo application takes just two commands.
First, install Certbot and its Nginx plugin:
sudo apt install certbot python3-certbot-nginxNext, run certbot in –nginx mode and specify the same domain that you used in the Nginx server_name configuration directive:
sudo certbot --nginx -d your_domain_hereYou will be asked to agree to the Let's Encrypt terms of service and enter an email address. After that, you will be asked if you want to redirect all HTTP traffic to HTTPS. This is up to you, but it is generally recommended and safe to do.
After that, Let's Encrypt will approve your request and Certbot will download your certificate:
Output
Congratulations! You have successfully enabled https://odoo.example.com
You should test your configuration at:
https://www.ssllabs.com/ssltest/analyze.html?d=odoo.example.com
- - - - - - - - - - - - - - - - - - - - - - - - - - - - - - - - - - - - - - - -
IMPORTANT NOTES:
- Congratulations! Your certificate and chain have been saved at:
/etc/letsencrypt/live/odoo.example.com/fullchain.pem
Your key file has been saved at:
/etc/letsencrypt/live/odoo.example.com/privkey.pem
Your cert will expire on 2022-05-09. To obtain a new or tweaked
version of this certificate in the future, simply run certbot again
with the "certonly" option. To non-interactively renew *all* of
your certificates, run "certbot renew"
- Your account credentials have been saved in your Certbot
configuration directory at /etc/letsencrypt. You should make a
secure backup of this folder now. This configuration directory will
also contain certificates and private keys obtained by Certbot so
making regular backups of this folder is ideal.
- If you like Certbot, please consider supporting our work by:
Donating to ISRG / Let's Encrypt: https://letsencrypt.org/donate
Donating to EFF: https://eff.org/donate-le
Certbot will automatically load Nginx with the new configuration and certificates. Reload your site in your browser and it should automatically switch you to HTTPS if you select the redirect option.
Your site is now secure and it is safe to continue with the web-based setup process.
Step 5 – Setting up Odoo
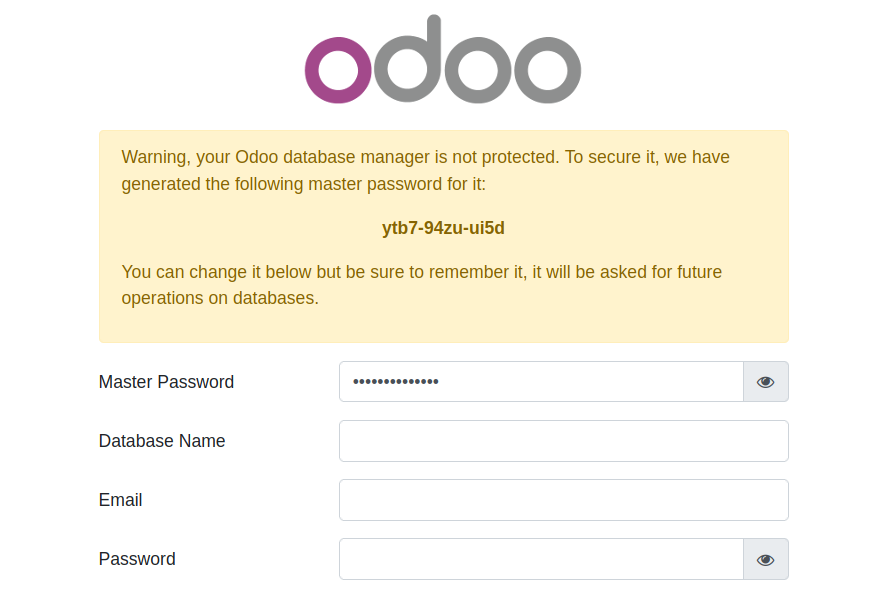
Go back to your web browser, reload the page. You should now be able to open the Odoo database configuration page over a secure https:// connection. You can now safely enter your username and password to complete the installation process.
The information you fill in on this page tells the Odoo application how to create its PostgreSQL database and details about the default administrative user.
Fill in the following fields:
- Database name: odoo
- Email: Your email address
- Password: A strong and unique password for your administrator login.
- Demo data: If this is your first time installing Odoo, make sure this option is checked.
The defaults are fine for the remaining fields. Be sure to record the email and password values you choose, as you will use them to log in to Odoo in the future.
Now click on the Create Database button at the bottom left of the page. It may take a minute or two for Odoo to create its database tables. Once the process is complete, you will be redirected to the Odoo Apps administration page.

From here you can choose which Odoo modules you want to install and use for your ERP needs. If you want to test an app, click the Install button in the Sales tile. Odoo will install the module and then redirect you to the Discuss app's personal page.
Click the divided square icon at the top left of the page, and then select the Sales link in the drop-down list of options.
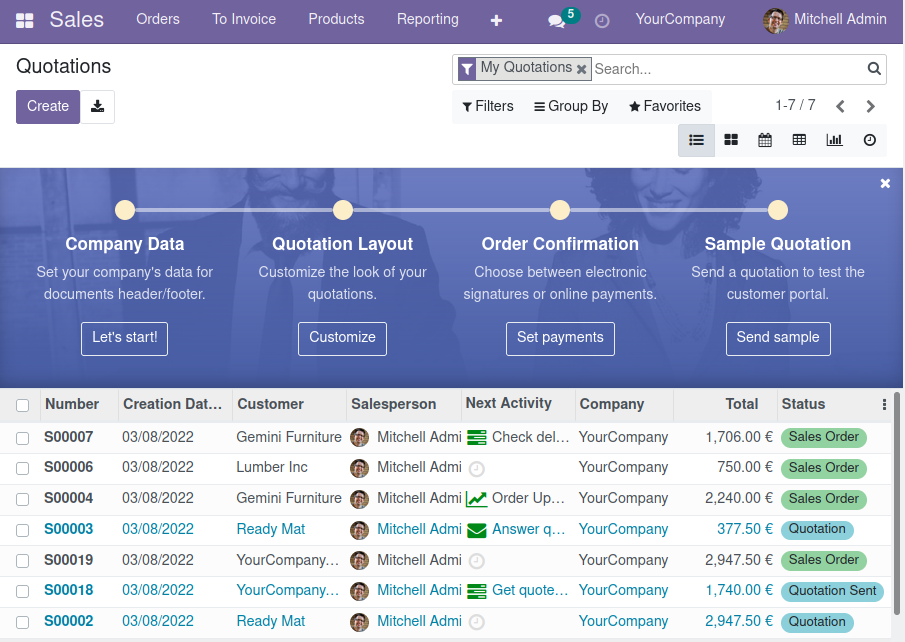
You will be on a page that will guide you through customizing data, pricing, orders, and a list of sales samples that you can experiment with.
Result
In this tutorial, you deployed the Odoo ERP application and PostgreSQL database using Docker Compose, then set up an Nginx reverse proxy and secured it using Let's Encrypt TLS certificates.