
Introduction
If you've been following our Django development series, you've successfully created a Django application that allows users with admin privileges to add comments and posts through the Django admin interface dashboard. You've also set up data persistence using Django's Object Relational Mapping solution models and MySQL.
In this tutorial, we will create Django views that enable our web application to properly handle web requests and return the required web responses. As defined in the Django documentation, a web response can be the HTML content of a web page, a redirect, or an HTTP error (e.g., 404). The code for view functions can technically exist anywhere in your project, as long as it is in your Python path. However, there are some common conventions for naming and placing the file that contains these view functions, and we will follow these steps.
Once you have completed the steps in this tutorial, your Django blog site will pull a recent post to your IP-or-domain/post URL.
Prerequisites
This tutorial is part of the Django Development series and is a continuation of that series.
If you haven't been following this series, we make the following assumptions:
- You have installed Django version 4 or higher.
- You have connected your Django application to a database.
- You are working with a Unix-based operating system, preferably an Ubuntu 22.04 cloud server as this is the system we have tested on.
- You have set up your Django management interface.
Since this guide deals mainly with Django views, you may be able to follow it even if you have a different setup.
Step 1 – Create display functions
In your terminal, you will first need to navigate to the appropriate directory and activate your Python virtual environment. If you have been following along with this series, you can enter the following commands. It is important to always use the Python programming environment when developing your application to ensure that your code is contained and working with the proper settings.
cd ~/my_blog_app
. env/bin/activate
Now that your virtual environment is enabled, let's go to the blog directory of the site, where we'll open a Python file and create our first view function.
cd ~/my_blog_app/blog/blogsiteOpen the views.py file for editing using nano or your text editor of choice.
nano views.pyAfter opening the file, it should be filled with code similar to this:
from django.shortcuts import render
# Create your views here.
We keep the import statement that imports the render() function from the django.shortcuts library. The render() function allows us to combine both a template and a text to return the appropriate HttpResponse object. Keep this in mind because with every view we write, we are responsible for instantiating, populating, and returning the HttpResponse.
Next, we'll add our first view that welcomes users to the index page. We'll import the HttpResponse() function from the Django http library. Using that function, we'll send some text to be displayed when the web page is requested.
from django.shortcuts import render
from django.http import HttpResponse
def index(request):
return HttpResponse('Hello, welcome to the index page.')
After that, we add another function that displays the individual posts that we are going to create later in the tutorial.
...
def individual_post(request):
return HttpResponse('Hi, this is where an individual post will be.')
Our final views.py file will now look like this.
from django.http import HttpResponse
from django.shortcuts import render
def index(request):
return HttpResponse('Hello, welcome to the index page.')
def individual_post(request):
return HttpResponse('Hi, this is where an individual post will be.')
When you're done editing the file, be sure to save and exit. In nano, you can press CTRL and X, then Y, then ENTER.
Right now, there is no specific URL that these functions point to, so we need to add it to our url patterns block in our URL configuration file. With the views added, let's map URLs to them via this configuration file so that we can view the pages we've created.
Step 2 – Show URLs to Views
With Django, we can design our own URLs for use in our application. This is done in pure Python using a file commonly referred to as a URLconf or «URL configuration» file.
To display a web page, Django must first determine the root URLconf module to use, then look for url patterns, a list data structure containing all the URL patterns. Django then iterates through each URL pattern until it finds the first match. When a match is found, Django finds the associated view, and that view function receives the data for the URL pattern and an HttpRequest object. If there is a failure at any point in this process, an error-handling view is displayed instead.
In this section, we will work with two different urls.py files in two different directories of our application.
Once you are in the ~/my_blog_app/blog/blogsite directory, open the urls.py file – also known as your URLconf file – for editing. Here we will use nano to edit the file.
nano urls.pyModify the file so that it looks like the file below with a list of urlpatterns.
from django.urls import path
from . import views
urlpatterns = [
path('', views.index, name='index'),
path('post/', views.individual_post, name='individual_post')
]
Once you are done adding the lines above, save and close the file.
When we update the blog directory URLconf file, we put it in the blog directory URLconf or it won't be recognized. We need to do this because it's set as ROOT_URLCONF in our configuration file. This means that Django will look at the blog directory URLconf for url patterns.
To include your blog URLconf in your blog URLconf, you need to go to that directory.
cd ~/my_blog_app/blog/blogOnce there, you can open the URLconf file with nano or another text editor of your choice.
nano urls.pyIn this file, we add the following lines to include the /blogsite/urls.py file we just worked with, shown in the second line.
from django.contrib import admin
from django.urls import include, path
urlpatterns = [
path('admin/', admin.site.urls),
path('', include('blogsite.urls'))
]
Save and close the file.
Now let's open a web browser to navigate to the URLs we created and verify that they display the text we added to the views. We need to go to the parent directory to access the manager.py file that provides the Django application.
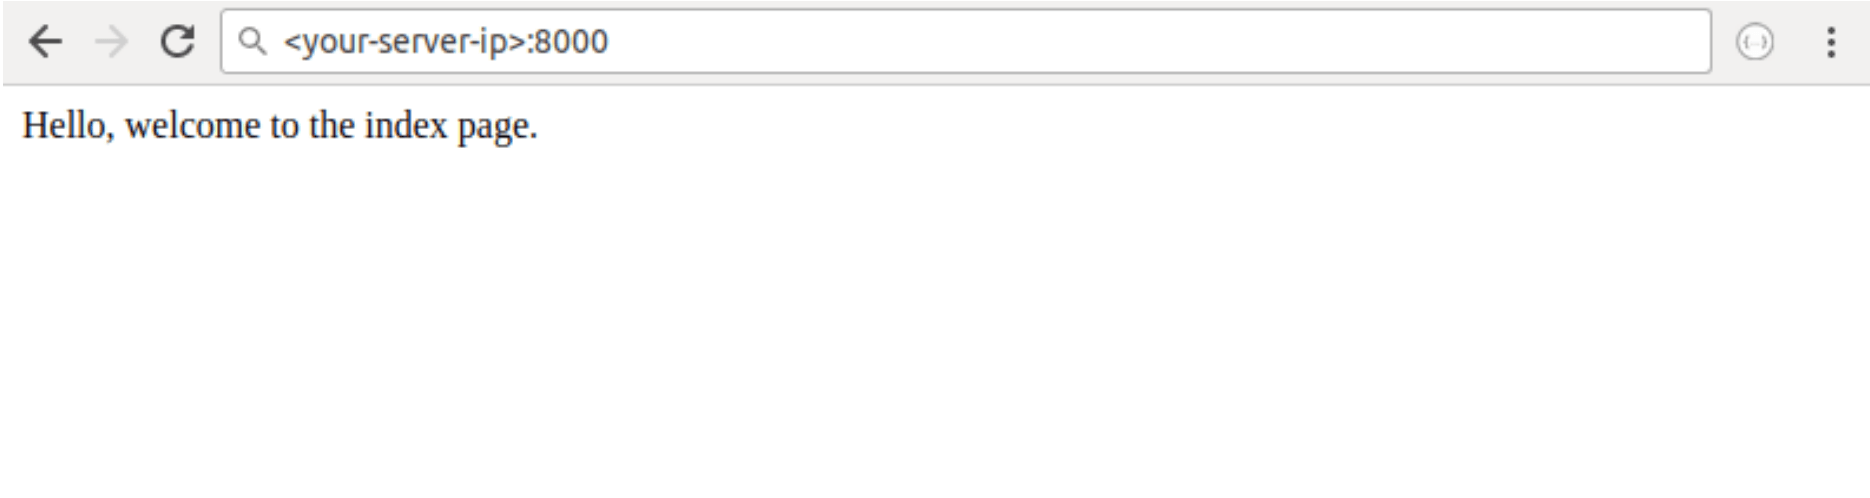
cd ..Issue the following command. You can replace 0.0.0.0 with your IP address below.
python manage.py runserver 0.0.0.0:8000In your web browser, go to your IP address, port 8000:
your-server-ip:8000You will get a web page similar to the following:
Then go to the following address:
your-server-ip:8000/post/
From here the following web page should be displayed:

Now that we've verified that the two urls.py files are working and the data is showing us exactly what we expect, let's add some real data to our blog.
Step 3 – Create a blog post
Now that you understand the basics of how URL patterns and views work, let's add a blog post and have it displayed on a web page instead of the text we've coded in Python files.
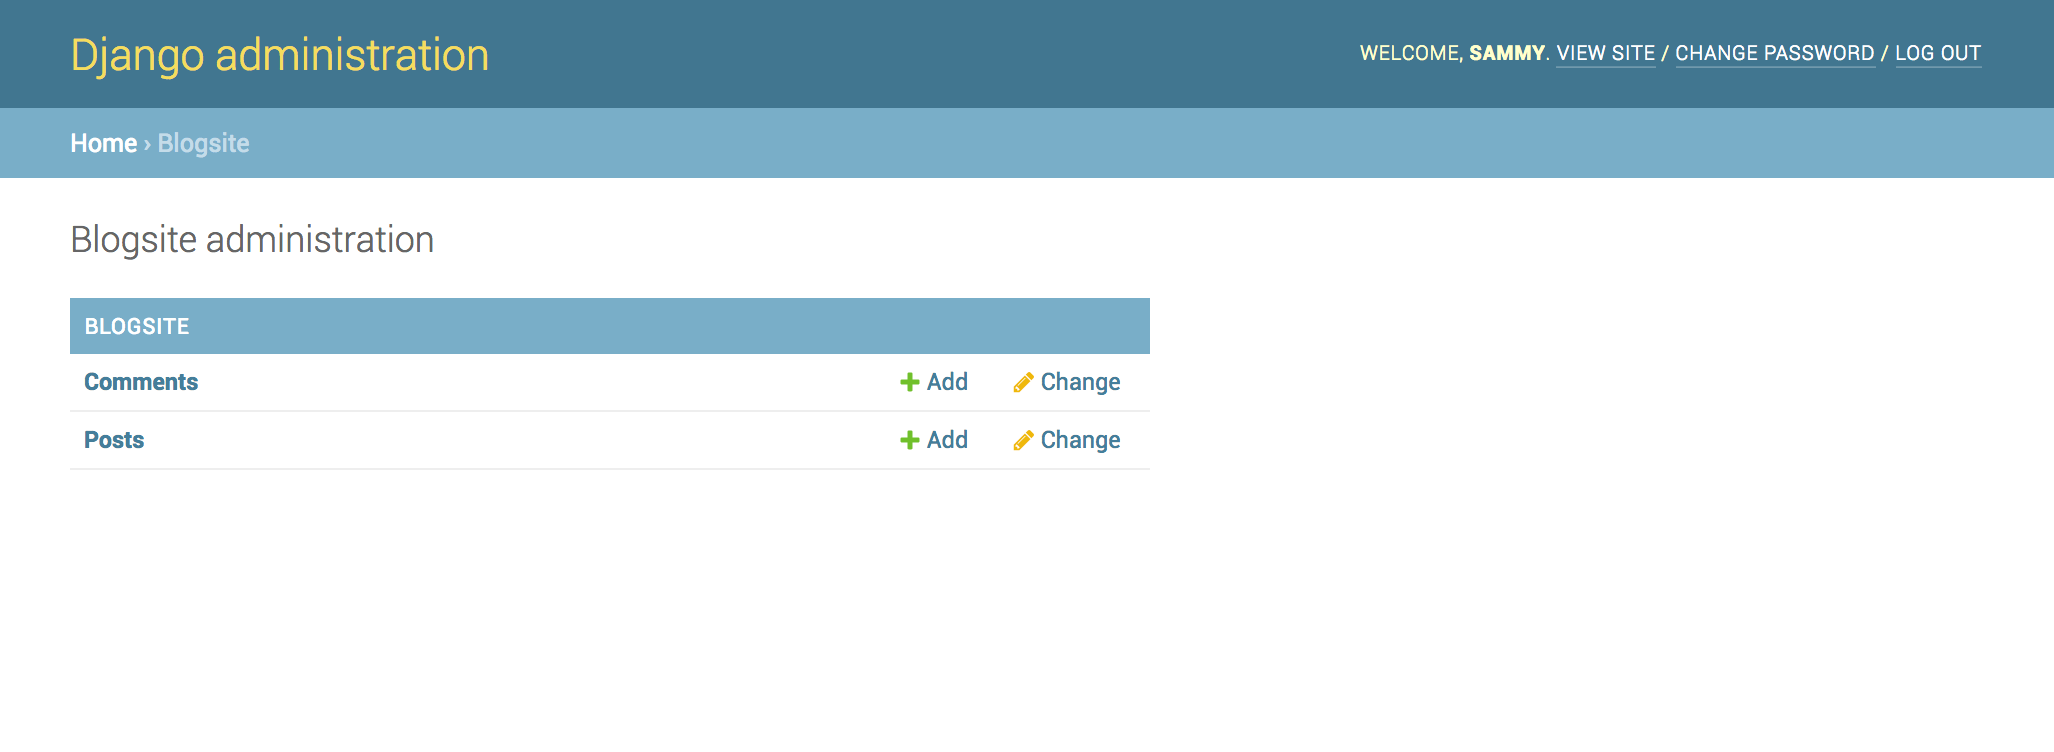
We will create a post through the admin page we set up earlier. While your server is serving the Django application, use a web browser to navigate to the blog admin page at the following address:
your-server-ip:8000/admin/blogsite/In the interface, click the + Add link located in the Posts row to populate the database with a sample blog post.
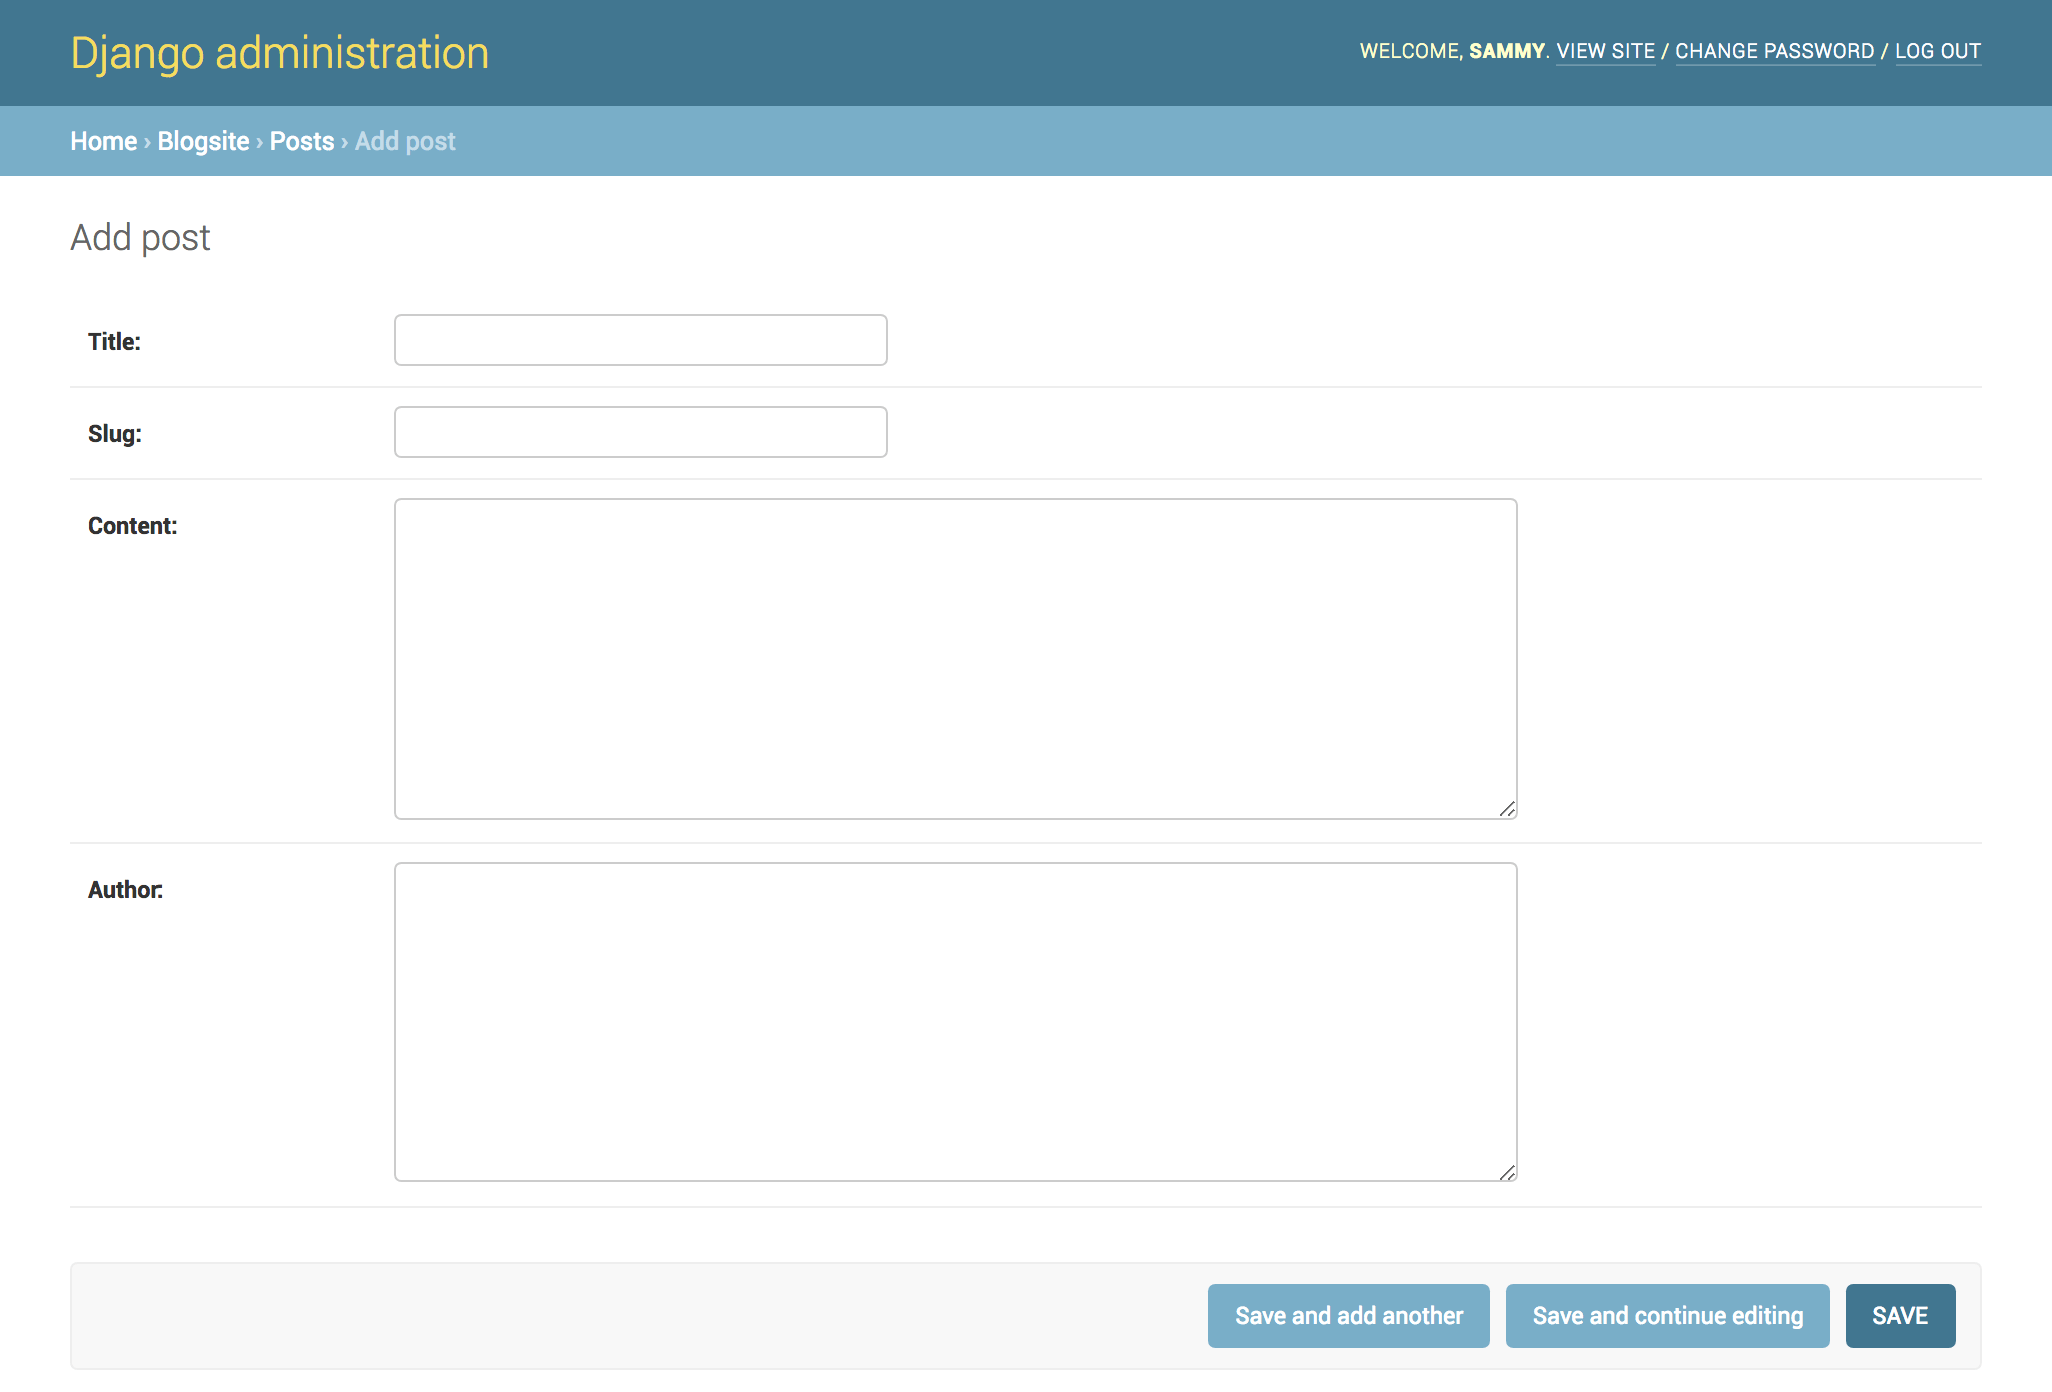
By clicking on the link, you will get an input form like the one below:
Whenever you want to add a post, you go to this page to do so. Alternatively, you can edit posts with the edit link.
In the form, you can edit the following fields:
- Title: Add your desired blog post title here, for example My First Blog Post.
- SLUG: This refers to the part of the URL that identifies a valid web address element with human-readable keywords. This is generally taken from the page title, so in this case we can use my-first-blog-post.
- CONTENT: This is the text of your blog post. We'll just add Hello, World! for the purposes of this example, but this is where you can get wordy.
- AUTHOR: Add your name or username here. We will use Sami.
Fill out the blog post form as you see fit for your testing purposes.
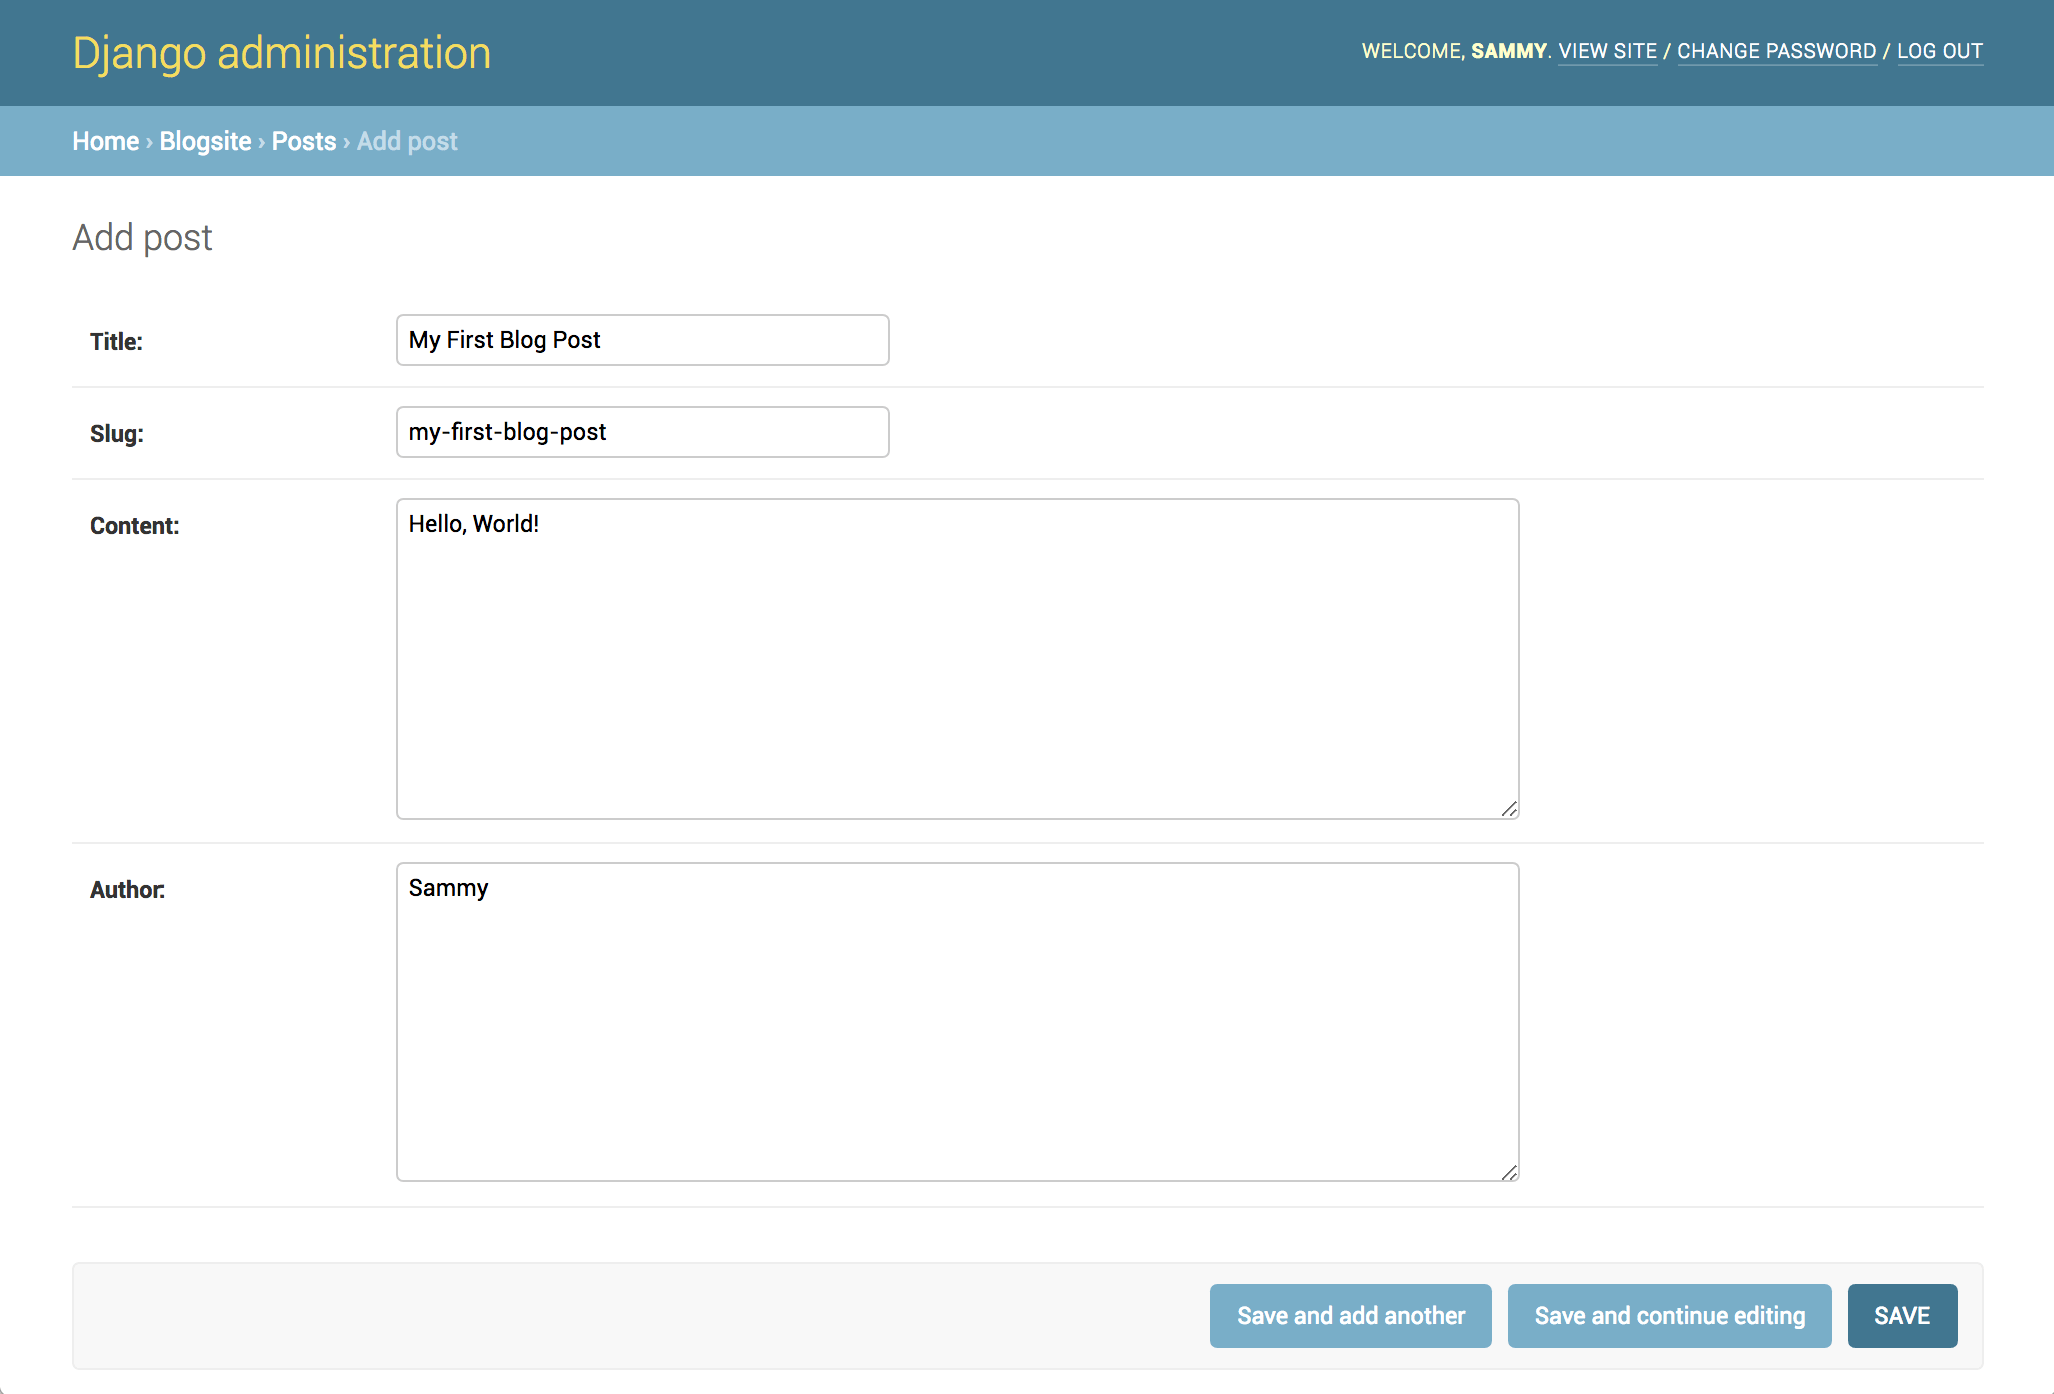
Once you have added the sample data to the page, click the SAVE button. You will get the following confirmation page:
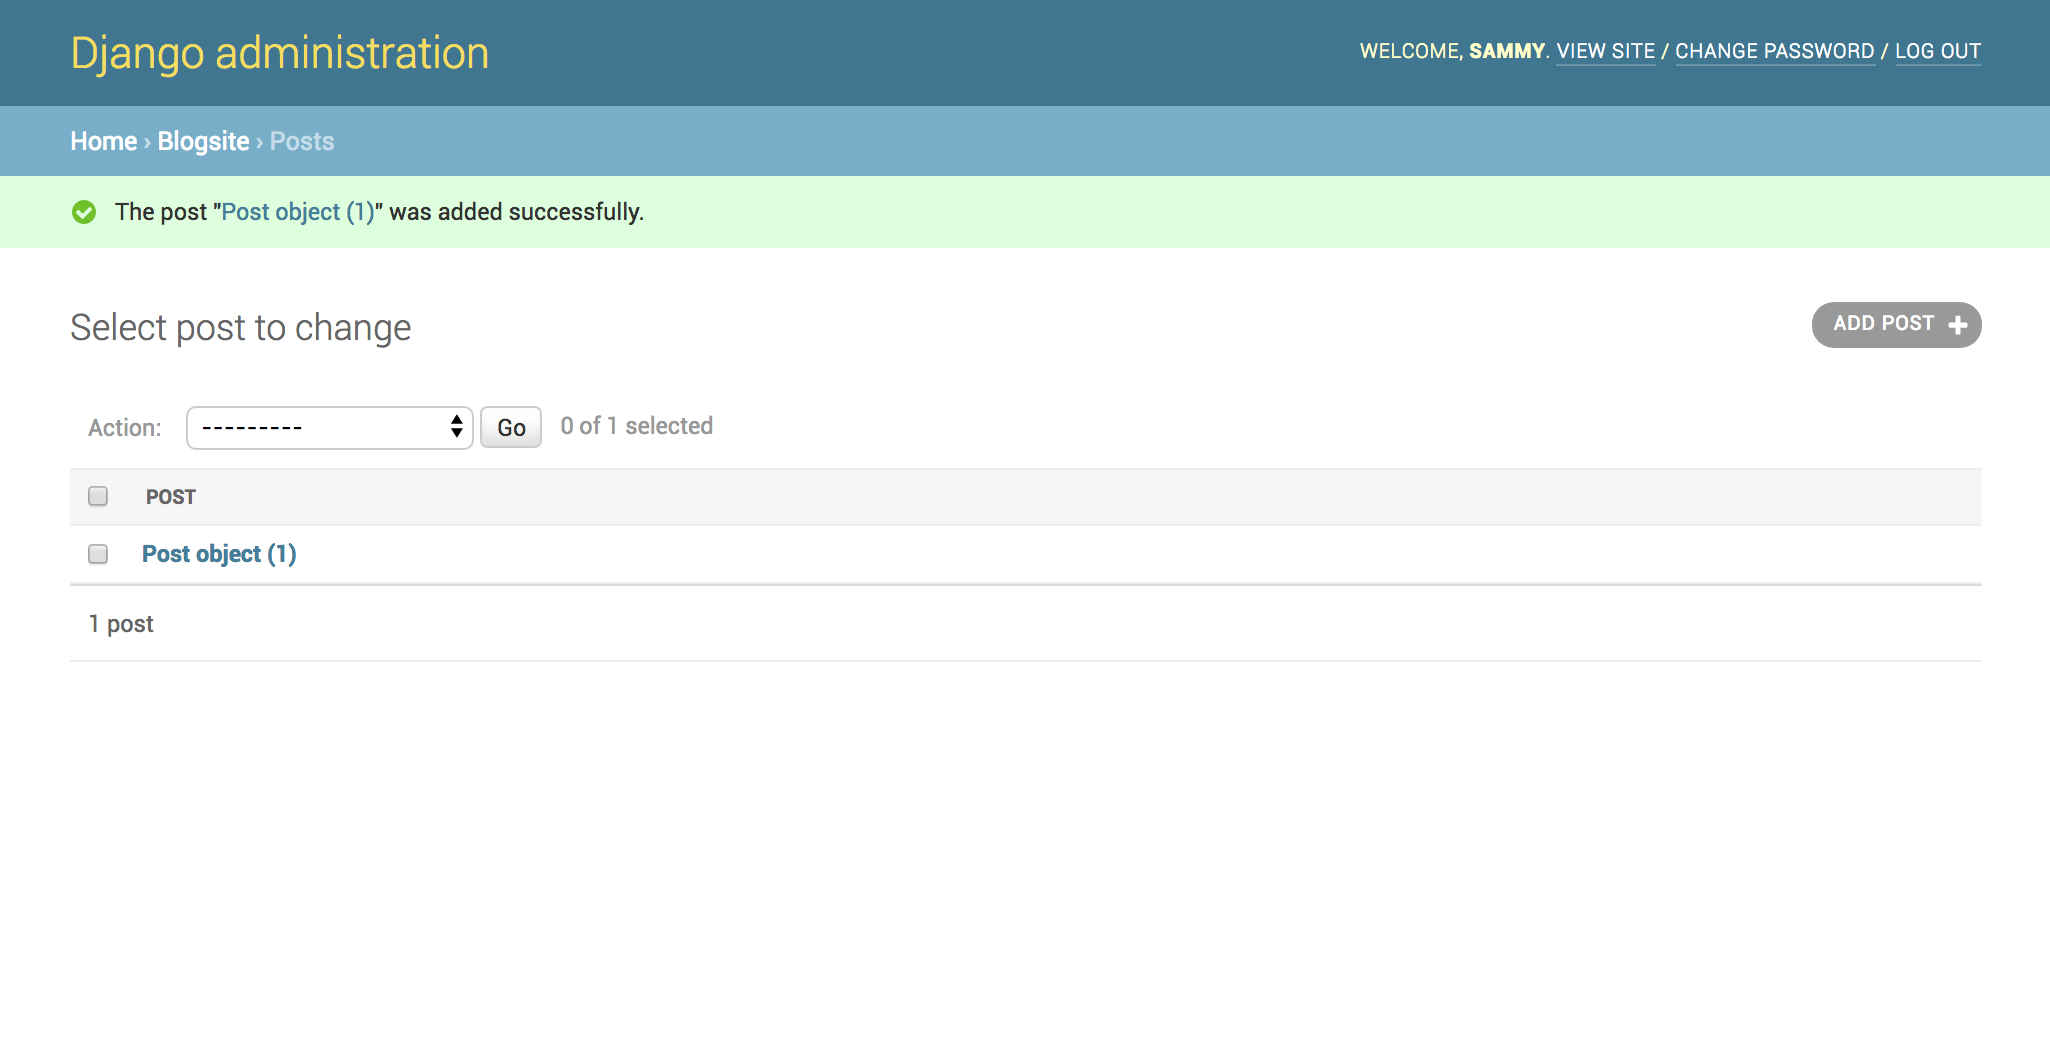
Congratulations! You have created your first blog post!
Next, let's check that it has added a row to the MySQL database containing the data we just entered into the management interface.
Step 4 – Displaying Database Data
At this point, we need to go to MySQL, so stop the current server process via the terminal by typing CTRL + C, then open your MySQL interpreter. Our user for our Django application database is djangouser, but make sure you use the appropriate user for your project.
mysql -u djangouserOnce you are at the MySQL prompt, navigate to the blog_data database (or whatever database is appropriate for your project):
use blog_data;Then display the contents of the blogsite_post table.
select * from blogsite_post;You will get output similar to the one below, which should display the information you added to the admin interface.
Output
+----+--------------------+--------------------+---------------+----------------------------+--------+
| id | title | slug | content | created_on | author |
+----+--------------------+--------------------+---------------+----------------------------+--------+
| 1 | My First Blog Post | my-first-blog-post | Hello, World! | 2020-05-14 00:30:03.186564 | Sammy |
+----+--------------------+--------------------+---------------+----------------------------+--------+
1 row in set (0.00 sec)
As shown in the output, there is a row with the post data that we added. Now let's reference this data to the view function for posts. Use CTRL + D to exit the MySQL interpreter.
Navigate to the location of the views.py file within your site's blog application.
cd ~/my_blog_app/blog/blogsiteNow open the file so we can add our new information.
nano views.pyEdit the file like the one below.
from django.shortcuts import render
from django.http import HttpResponse
from .models import Post
def index(request):
return HttpResponse('Hello, welcome to the index page.')
def individual_post(request):
recent_post = Post.objects.get(id__exact=1)
return HttpResponse(recent_post.title + ': ' + recent_post.content)
In the code above, we added an additional import statement for Post. We also removed the quoted string from the HttpResponse and replaced it with our blog post data. To reference the data for a specific object, we use the blog post ID associated with the object we want to display, and store that ID in a variable called last_post. We can then retrieve specific fields from that object by appending the field with a dot separator.
After saving and closing the file, navigate to the location of the manager.py file to run the Django application.
cd ~/my_blog_app/blog
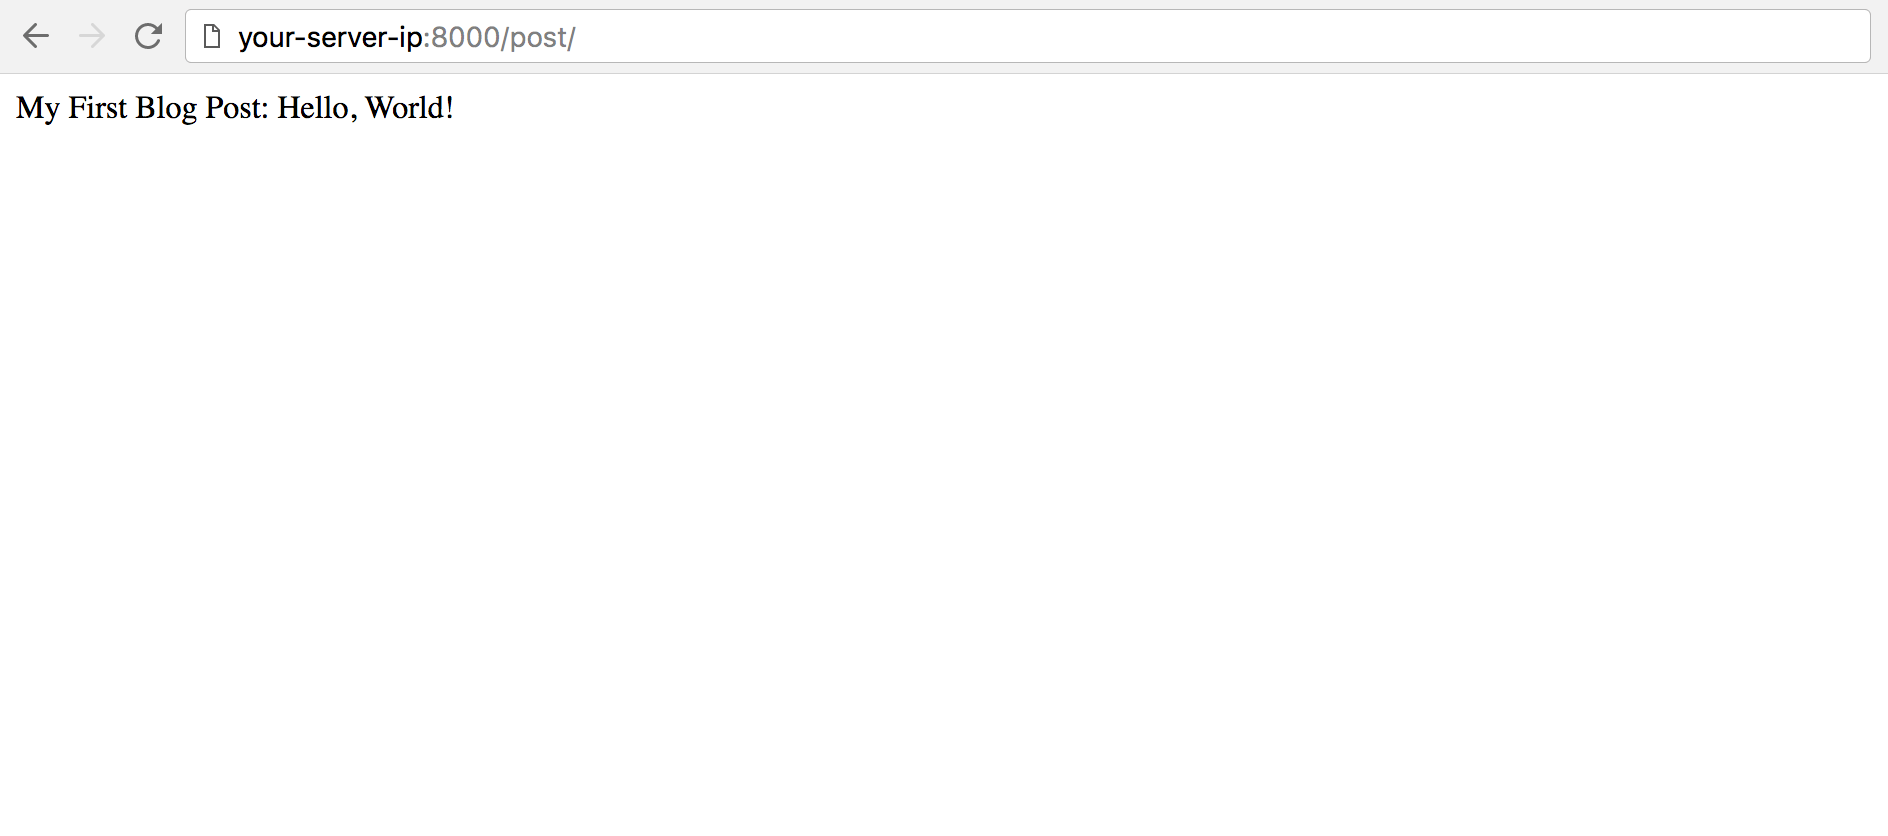
python manage.py runserver 0.0.0.0:8000From a web browser, go to the following address:
your-server-ip:8000/post/
Here, we'll see the changes we've made. The page will look similar to this, displaying the text you added to the post.
When you are finished inspecting the page, press CTRL + C in the terminal to stop the execution process.
To disable your development environment, you can type the disable command and then log out of the server.
Result
In this tutorial we have created views, mapped URL patterns, and displayed text on a web page from our blog post database.
The next tutorial will cover how to create a more aesthetically pleasing Django template using HTML. So far, this series has covered Django models and Django views. Templates are the last important part when it comes to the foundation of a Django application.