Introduction
MongoDB is the most popular NoSQL database—MongoDB stores data in collections. The individual records in the collection are called documents, which have a key-value structure similar to JSON data. MongoDB is preferred for its performance, flexibility, and scalability features.
What is a mongoose?
Mongoose is a promise-based object data modeling (ODM) library for the Node.js framework. Mongoose simplifies the way you interact with the MongoDB database. It allows you to create and model MongoDB schemas. This saves you from having to write complex database queries/schemas. Mongoose allows you to model the data you want to store in MongoDB.
This guide will help you understand how to connect MongoDB to Node.js using Mongoose.
Prerequisite:
To follow this guide, make sure you have Node.js installed on your computer. MongoDB is installed on your computer or set up on a MongoDB Atlas cloud account. Basic knowledge of creating Node.js servers. Postman is installed. Setting up a Node.js Mongoose project To create a Node.js project, go to your desired folder and run npm init -y . Then install the following packages: Express — to create a Node.js HTTP server. Mongoose — an ODM for MongoDB in Node.js.
npm install mongoose --save
Communicating with Mongoose and MongoDB in Node.js To communicate with Mongoose using Mongoose, create a file called db.js and configure the Mongoose connection as follows:
Import the Mongoose library:
const connectDB = async () => {
try {
const conn = await mongoose.connect(`mongodb://localhost:27017/test`, {
useNewUrlParser: true,
});
console.log(`MongoDB Connected: {conn.connection.host}`);
} catch (error) {
console.error(error.message);
process.exit(1);
}
}
The MongoDB used here is running locally. So, Mongoose creates a connection to where is the name of your database. Make sure to enter the correct URI that connects to your local MongoDB installation or the MongoDB Atlas cloud.mongodb://localhost:27017test.
Finally, export the connectDB function:
module.exports = connectDB;State and import the db.js file:
const express = require('express');
const connectDB = require('./db');
Add the Express middleware and parser:
// express
const app = express();
//body parser
app.use(express.json());
Run the connectDB() function:
//connect to database
connectDB();
Add server root:
// routes
// We will add these routes later in this guide.
Run the program on the localhost port:
onst PORT = process.env.PORT || 5000;
app.listen(PORT, () => console.log(`Server running on port {PORT}`));
Model a Schema using Mongoose
A model defines a collection schema in a MongoDB database. Create a model.js file and a Mongoose collection schema as follows:
const {
Schema,
model
} = require("mongoose");
const MySchema = new Schema({
name: {
type: String,
required: true,
maxlength: 50
},
createdAt: {
type: Date,
default: Date.now,
},
});
const TaskModel = model("test", MySchema)
module.exports = TaskModel
Here, we create a function MySchema that executes the mongoose.Schema method. This method sets up the schema that Mongoose runs on MongoDB. To create the schema, add the files to your document. In this case, we add two fields:
A name – Within the code above, this field is created as a string with a maximum length of fifty characters. Required is set to true to indicate that every document must contain this field.
A createAt field — specifies the time the document was created. It defaults to the current date as the created date type.
Add data to the database using the Mongoose schema:
To add data to the database, create a controller.js file.
Import MySchema from model file const Task = require('./model');
Add a task to the task set. This specifies the POST path.
exports.createTask = async (req, res) => {
try {
// get the task from the body
const taskData = await req.body;
//create a new task then save
await Task.create(taskData)
.then((createdTask) => {
if (!createdTask) return res.status(404)
.json({
success: false,
message: "Task creation failed",
error: "Unable get created task"
})
res.status(201)
.json({
success: true,
createdTask
})
})
.catch((error) => {
res.status(404)
.json({
success: false,
error: error.message
})
})
} catch (error) {
res.status(500)
.json({
success: false,
message: "Internal server error"
})
}
}
Recover all tasks:
Add this code to the controller.js file. This specifies the GET route.
exports.createTask = async (req, res) => {
try {
// get the task from the body
const taskData = await req.body;
//create a new task then save
await Task.create(taskData)
.then((createdTask) => {
if (!createdTask) return res.status(404)
.json({
success: false,
message: "Task creation failed",
error: "Unable get created task"
})
res.status(201)
.json({
success: true,
createdTask
})
})
.catch((error) => {
res.status(404)
.json({
success: false,
error: error.message
})
})
} catch (error) {
res.status(500)
.json({
success: false,
message: "Internal server error"
})
}
}
exports.getTasks = async (req, res) => {
//get all the data in the model and return it as response
try {
Task.find()
.then((allTasks) => {
res.status(200)
.json({
success: true,
allTasks
})
})
.catch((error) => {
res.status(404)
.json({
success: false,
message: "Cant fined ",
error
})
})
} catch (error) {
res.status(500)
.json({
success: false,
message: "Internal server error",
error: error.message
})
}
}
Create route:
Create a route to run the above controllers. Create a new file and call it routes.js and add the following code:
const router = require("express")
.Router()
const controller = require('./controller')
router
.post('/', controller.createTask)
.get('/', controller.getTasks)
module.exports = router
Finally, run these routes inside the server.js file.
const router = require('./routes')
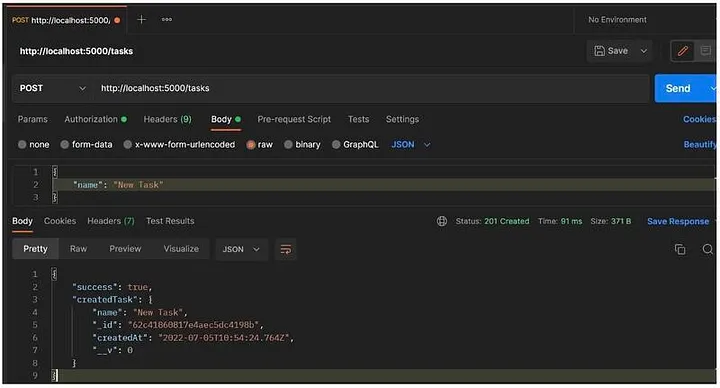
app.use('/tasks', router)To add a new task, send a POST request using Postman as follows:
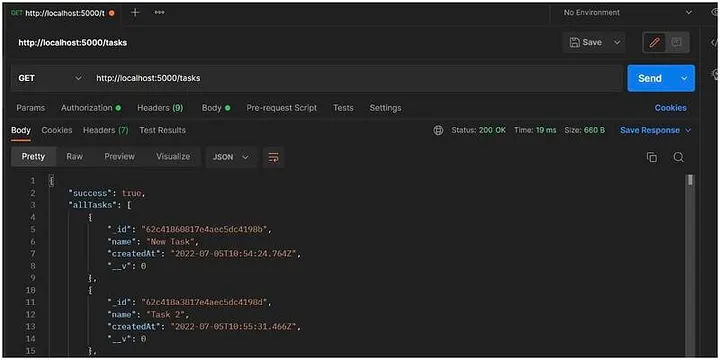
To retrieve the added tasks, send a GET request using Postman as follows:
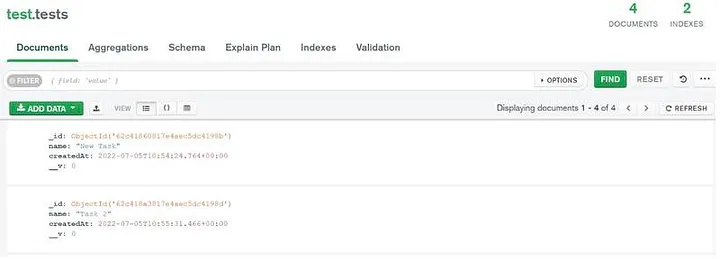
You can see the added tasks by accessing your MongoDB database: