Introduction
People use a variety of devices to connect to the Internet and browse the web. For this reason, applications need to be accessible from a variety of locations. For traditional websites, having a responsive user interface is usually sufficient, but more complex applications often require the use of other techniques and architectures. These include having separate back-end and front-end REST applications that can be run as client-side web applications, progressive web applications (PWAs), or native mobile apps.
Some tools you can use when building more complex applications include:
- React is a JavaScript framework that allows developers to build web and native pages for their REST API backends.
- Django is a free and open-source Python web framework that follows the Model-View-Controller (MVC) software architecture pattern.
- Django REST Framework, a powerful and flexible toolkit for building REST APIs in Django.
In this tutorial, you will build a modern web application with a separate REST API backend and frontend using React, Django, and the Django REST Framework. By using React with Django, you can take advantage of the latest advances in JavaScript and front-end development. Instead of building a Django application that uses a built-in templating engine, you will use React as a UI library that uses a virtual Document Object Model (DOM), a declarative approach, and components that quickly render changes to data.
The web application you're going to build will store customer records in a database, and you can use it as a starting point for a CRM application. When you're done, you can read, update, and delete using a React interface styled with Bootstrap 4.
Prerequisites
To complete this tutorial, you will need:
- A development machine with Ubuntu 18.04.
- Python 3, pip, and venv are installed on your machine by following steps 1 and 2 of How to Install Python 3 and Set Up a Local Development Environment on Ubuntu 18.04.
- Node.js 6+ and npm 5.2 or higher are installed on your machine. You can install both of them by following the instructions in How to Install Node.js on Ubuntu 18.04 in Install from PPA.
Step 1 – Create a Python virtual environment and install dependencies
In this step, we create a virtual environment and install the required dependencies for our application, including Django, the Django REST framework, and django-cors-headers.
Our application will use two different development servers for Django and React. They will run on different ports and act as two separate domains. For this reason, we need to enable Cross-Resource Sharing (CORS) to send HTTP requests from React to Django without being blocked by the browser.
Go to your home directory and create a virtual environment using the Python 3 venv module:
cd ~
python3 -m venv ./env
Activate the created virtual environment using the source:
source env/bin/activateNext, install the project dependencies with pip. These will include the following:
- Django: Web framework for the project.
- Django REST Framework: A third-party application that builds REST APIs with Django.
- django-cors-headers: A package that enables CORS.
Install the Django framework:
pip install django djangorestframework django-cors-headersBy installing the project dependencies, you can create a Django project and a React frontend.
Step 2 – Create a Django Project
In this step, we generate the Django project using the following commands and tools:
django-admin startproject-name: django-admin is a command line tool used to perform tasks with Django. The startproject command creates a new Django project.
python manager.py startapp myapp: manager.py is a utility script that is automatically added to every Django project and performs a number of administrative tasks: creating new applications, migrating databases, and serving the Django project locally. Its startapp command creates a Django application within the Django project. In Django, the term application describes a Python package that provides a set of features to a project.
To get started, create a Django project with django-admin startproject . We'll call our project djangoreactproject :
django-admin startproject djangoreactprojectBefore moving on, let's look at the directory structure of the Django project using the tree command.
Go to the djangoreactproject folder in the root of your project and run the tree command:
cd ~/djangoreactproject
tree
You will see the following output:
Output
├── djangoreactproject
│ ├── __init__.py
│ ├── settings.py
│ ├── urls.py
│ └── wsgi.py
└── manage.py
The ~/djangoreactproject folder is the root of the project. In this folder, there are several files that are important for your work:
- manager.py: A utility script that performs a number of administrative tasks.
- settings.py: The main configuration file for a Django project where you can change project settings. These settings include variables such as INSTALLED_APPS, a list of strings that determine the active applications for your project. The Django documentation has more information about the available settings.
- urls.py: This file contains a list of URL patterns and associated views. Each pattern maps a relationship between a URL and the function that should be called for that URL. For more information about URLs and views, please see our tutorial on how to create Django views.
Our first step in working with the project is to configure the packages we installed in the previous step, including the Django REST framework and the Django CORS package, by adding them to settings.py. Open the file with nano or your favorite editor:
nano ~/djangoreactproject/djangoreactproject/settings.pyGo to the INSTALLED_APPS settings and add the rest_framework and corsheaders applications to the end of the list:
...
INSTALLED_APPS = [
'django.contrib.admin',
'django.contrib.auth',
'django.contrib.contenttypes',
'django.contrib.sessions',
'django.contrib.messages',
'django.contrib.staticfiles',
'rest_framework',
'corsheaders'
]
Next, add the corsheaders.middleware.CorsMiddleware middleware from the previously installed CORS package to the MIDDLEWARE configuration. This configuration is a list of middleware, a Python class that contains code that is processed every time your web application makes a request or response:
...
MIDDLEWARE = [
...
'django.contrib.messages.middleware.MessageMiddleware',
'django.middleware.clickjacking.XFrameOptionsMiddleware',
'corsheaders.middleware.CorsMiddleware'
]
Next, you can enable CORS. The CORS_ORIGIN_ALLOW_ALL setting specifies whether you want to allow CORS for all domains, and CORS_ORIGIN_WHITELIST is a Python tuple containing the allowed URLs. In our case, since the React development server will be running at http://localhost:3000, we'll add the new CORS_ORIGIN_ALLOW_ALL = False and CORS_ORIGIN_WHITELIST('localhost:3000',) settings to our settings.py file. Add these settings anywhere in the file:
...
CORS_ORIGIN_ALLOW_ALL = False
CORS_ORIGIN_WHITELIST = (
'localhost:3000',
)
...
You can find more configuration options in the django-cors-headers documentation.
Save the file and exit the editor when finished.
Still in the ~/djangoreactproject directory, create a new Django application called customers:
python manage.py startapp customersThis includes client management models and views. Models define the fields and behaviors of our application's data, while views enable our application to properly handle web requests and return the required responses.
Next, add this application to the list of installed applications in your project's settings.py file so that Django recognizes it as part of the project. Open settings.py again:
nano ~/djangoreactproject/djangoreactproject/settings.pyAdd the customer application:
...
INSTALLED_APPS = [
...
'rest_framework',
'corsheaders',
'customers'
]
...
Then, migrate the database and start the local development server. Migrations are Django's way of propagating changes you make to your models into your database schema. These changes can include things like adding a field or deleting a model. For more information about models and migrations, see How to Create Django Models.
Database transfer:
python manage.py migrateStart the local development server:
python manage.py runserverYou will see output similar to the following:
Output
Performing system checks...
System check identified no issues (0 silenced).
October 22, 2018 - 15:14:50
Django version 2.1.2, using settings 'djangoreactproject.settings'
Starting development server at http://127.0.0.1:8000/
Quit the server with CONTROL-C.
Your web application will run from http://127.0.0.1:8000. If you go to this address in your web browser, you should see the following page:
At this point, leave the program running and open a new terminal to continue developing the project.
Step 3 – Create React Frontend
In this section, we are going to create the front-end application of our project using React.
React has an official tool that allows you to quickly generate React projects without having to configure Webpack directly. Webpack is a module bundler used to bundle web assets such as JavaScript code, CSS, and images. Normally, you would need to set various configuration options before you can use Webpack, but thanks to the Create-react-app tool, you don’t have to deal with Webpack directly unless you decide you need more control. To run Create-react-app, you can use npx, a tool that runs npm packaged binaries.
In your second terminal, make sure you are in your project directory:
cd ~/djangoreactprojectCreate a React project called frontend using create-react-app and npx:
npx create-react-app frontendNext, navigate inside your React app and start the development server:
cd ~/djangoreactproject/frontend
npm start
Your application will run from http://localhost:3000/:
Leave the React development server running and open another terminal window to continue.
To see the directory structure of the entire project at this point, go to the root folder and run the tree again:
cd ~/djangoreactproject
tree
You will see a structure like this:
Output
├── customers
│ ├── admin.py
│ ├── apps.py
│ ├── __init__.py
│ ├── migrations
│ │ └── __init__.py
│ ├── models.py
│ ├── tests.py
│ └── views.py
├── djangoreactproject
│ ├── __init__.py
│ ├── __pycache__
│ ├── settings.py
│ ├── urls.py
│ └── wsgi.py
├── frontend
│ ├── package.json
│ ├── public
│ │ ├── favicon.ico
│ │ ├── index.html
│ │ └── manifest.json
│ ├── README.md
│ ├── src
│ │ ├── App.css
│ │ ├── App.js
│ │ ├── App.test.js
│ │ ├── index.css
│ │ ├── index.js
│ │ ├── logo.svg
│ │ └── registerServiceWorker.js
│ └── yarn.lock
└── manage.py
Our app uses Bootstrap 4 to style the React interface, so we'll put it in the frontend/src/App.css file, which will handle our CSS settings. Open the file:
nano ~/djangoreactproject/frontend/src/App.cssAdd the following entry to the beginning of the file. You can delete the existing contents of the file, although this is not necessary:
@import 'https://maxcdn.bootstrapcdn.com/bootstrap/4.0.0/css/bootstrap.min.css';Here, @import is a CSS directive used to import style rules from other style sheets.
Now that we have created both the Back-end and Front-end applications, let's create the Customer model and some demo data.
Step 4 – Create Customer Model and Initial Data
After creating the Django application and the React instance, our next step will be to create the customer model, which represents the database table that holds the customer information. You don't need any SQL because the Django Object Relational Mapper (ORM) performs database operations by mapping Python classes and variables to SQL tables and columns. In this way, the Django ORM abstracts SQL interactions with the database through a Python interface.
Re-enable your virtual environment:
cd ~
source env/bin/activate
Go to the clients directory and open models.py, a Python file that holds your application's models:
cd ~/djangoreactproject/customers/
nano models.py
The file will contain the following content:
from django.db import models
# Create your models here.
The Customer model API is already included in the file thanks to the import import models from django.db statement. Now you will add the Customer class, which extends models.Model. Every model in Django is a Python class that extends django.db.models.Model.
The Customer model will have these database fields:
first_name– Customer's first name.last_name– Customer's last name.EMAIL– Customer email address.phone– Customer phone number.ADDRESS– Customer address.Description– Customer description.createAt– The date the customer is added.
We also add the __str__() function, which specifies how the model will be displayed. In our case, it will be the customer's first name. For more information on creating classes and defining objects, please see How to Create Classes and Define Objects in Python 3.
Add the following code to the file:
from django.db import models
class Customer(models.Model):
first_name = models.CharField("First name", max_length=255)
last_name = models.CharField("Last name", max_length=255)
email = models.EmailField()
phone = models.CharField(max_length=20)
address = models.TextField(blank=True, null=True)
description = models.TextField(blank=True, null=True)
createdAt = models.DateTimeField("Created At", auto_now_add=True)

def __str__(self):
return self.first_name
Next, migrate the database to create the database tables. The makemigrations command creates the migration files in which the model changes are added, and migrate applies the changes in the migration files to the database.
Go back to the project root folder:
cd ~/djangoreactprojectTo create migration files, run the following:
python manage.py makemigrationsYou will get output like this:
Output
customers/migrations/0001_initial.py
- Create model Customer
Apply these changes to the database:
python manage.py migrateYou will see output indicating a successful transfer:
Output
Operations to perform:
Apply all migrations: admin, auth, contenttypes, customers, sessions
Running migrations:
Applying customers.0001_initial... OK
Next, you will use a data transfer file to create the initial customer data. A data transfer file is a migration that adds or changes data to the database. Create an empty data transfer file for the Customers application:
python manage.py makemigrations --empty --name customers customersYou will see the following confirmation with the name of your migration file:
Output
Migrations for 'customers':
customers/migrations/0002_customers.py
Note that the name of your migration file is 0002_customers.py.
Next, navigate to the migrations folder of the client application:
cd ~/djangoreactproject/customers/migrationsOpen the created migration file:
nano 0002_customers.pyThis is the initial content of the file:
from django.db import migrations

class Migration(migrations.Migration):
dependencies = [
('customers', '0001_initial'),
]
operations = [
]
The import statement imports the Migrations API, a Django API for creating migrations, from django.db, a built-in package that contains classes for working with databases.
The Migration class is a Python class that describes the operations that are performed when migrating a database. It extends migrations.Migration and has two lists:
dependencies: Includes dependent migrations.operations: Contains operations that are executed by applying migrations.
Next, add a method to create the test customer data. Add the following method before defining the Migration class:
...
def create_data(apps, schema_editor):
Customer = apps.get_model('customers', 'Customer')
Customer(first_name="Customer 001", last_name="Customer 001", email="[email protected]", phone="00000000", address="Customer 000 Address", description= "Customer 001 description").save()
...
In this method, we take the Customer class of our customer application and create a test customer to insert into the database.
To get the Customer class, which allows us to create new customers, we use the get_model() method of the apps object. The apps object represents the registry of installed applications and their database models.
When we use the RunPython() method to execute create_data(), the apps object is passed. Add the migrations.RunPython() method to the empty operations list:
...
operations = [
migrations.RunPython(create_data),
]
RunPython() is part of the Migrations API that allows you to run custom Python code in a migration. Our operations list specifies that this method will be executed when we apply the migration.
Here is the complete file:
from django.db import migrations

def create_data(apps, schema_editor):
Customer = apps.get_model('customers', 'Customer')
Customer(first_name="Customer 001", last_name="Customer 001", email="[email protected]", phone="00000000", address="Customer 000 Address", description= "Customer 001 description").save()

class Migration(migrations.Migration):
dependencies = [
('customers', '0001_initial'),
]
operations = [
migrations.RunPython(create_data),
]
For more information about data migration, see the Django Data Migration documentation.
To move your database, first go back to your project's main folder:
cd ~/djangoreactprojectMigrate your database to create test data:
python manage.py migrateYou will see output confirming the migration:
Output
Operations to perform:
Apply all migrations: admin, auth, contenttypes, customers, sessions
Running migrations:
Applying customers.0002_customers... OK
With the customer model and representation data created, we can move on to building the REST API.
Step 5 – Create REST API
In this step, we will create a REST API using the Django REST framework. We will create several different API views. An API view is a function that handles an API request or call, while an API endpoint is a unique URL that represents a point of contact with the REST system. For example, when a user sends a GET request to an API endpoint, Django will call the corresponding function or API view to handle the request and return possible results.
We will also use serializers. A serializer in the Django REST framework allows complex model instances and QuerySets to be converted to JSON format for API consumption. The serializer class can also work in the other direction, providing mechanisms for parsing and separating data in Django models and QuerySets.
Our API endpoints will include:
- api/customers: This endpoint is used to create customers and return paginated collections of customers.
- api/customers/ : This endpoint is used to get, update, and delete individual customers by primary key or ID.
We also create URLs in the project's urls.py file for the relevant endpoints (i.e. api/customers and api/customers/ ).
Let's start by creating the serializer class for our client model.
Add a serializer class
Creating a serializer class for our Customer model is essential for converting Customer instances and QuerySets to and from JSON. To create the serializer class, first create a serializers.py file inside the Customers application:
cd ~/djangoreactproject/customers/
nano serializers.py
Add the following code to import the API serial and client model:
from rest_framework import serializers
from .models import Customer
Next, create a serializer class that extends Serializers.ModelSerializer and specifies the fields that will be serialized:
...
class CustomerSerializer(serializers.ModelSerializer):

class Meta:
model = Customer
fields = ('pk','first_name', 'last_name', 'email', 'phone','address','description')
The Meta class specifies the model and fields for serialization: pk, first_name, last_name, email, phone, address, description.
Here is the full content of the file:
from rest_framework import serializers
from .models import Customer

class CustomerSerializer(serializers.ModelSerializer):

class Meta:
model = Customer
fields = ('pk','first_name', 'last_name', 'email', 'phone','address','description')
Now that we have created our serializer class, we can add API views.
Adding API Views
In this section, we will create API views for our application that will be called by Django when the user visits the endpoint corresponding to the view function.
~/djangoreactproject/customers/views.py Open:
nano ~/djangoreactproject/customers/views.pyDelete the existing ones and add the following imports:
from rest_framework.response import Response
from rest_framework.decorators import api_view
from rest_framework import status
from django.core.paginator import Paginator, EmptyPage, PageNotAnInteger
from .models import Customer
from .serializers import *
We import the serialization we created, along with the client model and the Django REST framework APIs.
Next, add the view to process POST and GET HTTP requests:
...
@api_view(['GET', 'POST'])
def customers_list(request):
"""
List customers, or create a new customer.
"""
if request.method == 'GET':
data = []
nextPage = 1
previousPage = 1
customers = Customer.objects.all()
page = request.GET.get('page', 1)
paginator = Paginator(customers, 10)
try:
data = paginator.page(page)
except PageNotAnInteger:
data = paginator.page(1)
except EmptyPage:
data = paginator.page(paginator.num_pages)
serializer = CustomerSerializer(data,context={'request': request} ,many=True)
if data.has_next():
nextPage = data.next_page_number()
if data.has_previous():
previousPage = data.previous_page_number()
return Response({'data': serializer.data , 'count': paginator.count, 'numpages' : paginator.num_pages, 'nextlink': '/api/customers/?page=' + str(nextPage), 'prevlink': '/api/customers/?page=' + str(previousPage)})
elif request.method == 'POST':
serializer = CustomerSerializer(data=request.data)
if serializer.is_valid():
serializer.save()
return Response(serializer.data, status=status.HTTP_201_CREATED)
return Response(serializer.errors, status=status.HTTP_400_BAD_REQUEST)
First, we use the @api_view(['GET', 'POST']) decorator to create an API view that can accept GET and POST requests. A decorator is a function that takes another function and dynamically extends it.
In the method body, we use the request.method variable to check the current HTTP method and execute the appropriate logic depending on the request type:
- If the request is GET, this method paginates the data using the Django Paginator and returns the first page of data after serialization, the number of available customers, the number of pages available, and links to the previous and next pages. Paginator is a built-in Django class that paginates a list of data into pages and provides methods for accessing the items on each page.
- If the request is a POST, the method serializes the received client data and then calls the save() method of the serializer object. It then returns a Response object, an instance of HttpResponse, with a status code of 201. Each profile you create is responsible for returning an HttpResponse object. The save() method saves the serialized data to the database.
For more information about HttpResponse and views, see this discussion on creating view functions.
Now add the API view that is responsible for processing GET, PUT, and DELETE requests to get, update, and delete customers by pk (primary key):
...
@api_view(['GET', 'PUT', 'DELETE'])
def customers_detail(request, pk):
"""
Retrieve, update or delete a customer by id/pk.
"""
try:
customer = Customer.objects.get(pk=pk)
except Customer.DoesNotExist:
return Response(status=status.HTTP_404_NOT_FOUND)

if request.method == 'GET':
serializer = CustomerSerializer(customer,context={'request': request})
return Response(serializer.data)

elif request.method == 'PUT':
serializer = CustomerSerializer(customer, data=request.data,context={'request': request})
if serializer.is_valid():
serializer.save()
return Response(serializer.data)
return Response(serializer.errors, status=status.HTTP_400_BAD_REQUEST)

elif request.method == 'DELETE':
customer.delete()
return Response(status=status.HTTP_204_NO_CONTENT)
This method is decorated with @api_view(['GET', 'PUT', 'DELETE']) to indicate that it is an API view that can accept GET, PUT, and DELETE requests.
The check on the request.method field verifies the request method and invokes the correct logic depending on its value:
- If the request is GET, the client data is serialized and sent using a Response object.
- If it is a PUT request, this method creates a serializer for the new client data. Then, the save() method calls the created serializer object. Finally, it sends a Response object with the updated client.
- If it is a DELETE request, the delete() method calls the client object's delete() method to delete it, then returns a Response object with no data.
The completed file looks like this:
from rest_framework.response import Response
from rest_framework.decorators import api_view
from rest_framework import status

from django.core.paginator import Paginator, EmptyPage, PageNotAnInteger
from .models import Customer
from .serializers import *


@api_view(['GET', 'POST'])
def customers_list(request):
"""
List customers, or create a new customer.
"""
if request.method == 'GET':
data = []
nextPage = 1
previousPage = 1
customers = Customer.objects.all()
page = request.GET.get('page', 1)
paginator = Paginator(customers, 5)
try:
data = paginator.page(page)
except PageNotAnInteger:
data = paginator.page(1)
except EmptyPage:
data = paginator.page(paginator.num_pages)

serializer = CustomerSerializer(data,context={'request': request} ,many=True)
if data.has_next():
nextPage = data.next_page_number()
if data.has_previous():
previousPage = data.previous_page_number()

return Response({'data': serializer.data , 'count': paginator.count, 'numpages' : paginator.num_pages, 'nextlink': '/api/customers/?page=' + str(nextPage), 'prevlink': '/api/customers/?page=' + str(previousPage)})

elif request.method == 'POST':
serializer = CustomerSerializer(data=request.data)
if serializer.is_valid():
serializer.save()
return Response(serializer.data, status=status.HTTP_201_CREATED)
return Response(serializer.errors, status=status.HTTP_400_BAD_REQUEST)

@api_view(['GET', 'PUT', 'DELETE'])
def customers_detail(request, pk):
"""
Retrieve, update or delete a customer by id/pk.
"""
try:
customer = Customer.objects.get(pk=pk)
except Customer.DoesNotExist:
return Response(status=status.HTTP_404_NOT_FOUND)

if request.method == 'GET':
serializer = CustomerSerializer(customer,context={'request': request})
return Response(serializer.data)

elif request.method == 'PUT':
serializer = CustomerSerializer(customer, data=request.data,context={'request': request})
if serializer.is_valid():
serializer.save()
return Response(serializer.data)
return Response(serializer.errors, status=status.HTTP_400_BAD_REQUEST)

elif request.method == 'DELETE':
customer.delete()
return Response(status=status.HTTP_204_NO_CONTENT)
Now we can continue creating our endpoints.
Adding API endpoints
Now we will create the API endpoints: api/customers/, for querying and creating customers, and api/customers/ , to get, update, or delete individual customers by their pk.
Open ~/djangoreactproject/djangoreactproject/urls.py:
nano ~/djangoreactproject/djangoreactproject/urls.pyLeave what's there, but add the import to the Customers view at the top of the file:
from django.contrib import admin
from django.urls import path
from customers import views
from django.conf.urls import url
Then, the URLs api/customers/ and api/customers/ Add to the list of url patterns that contain the application URLs:
...

urlpatterns = [
path('admin/', admin.site.urls),
url(r'^api/customers/$', views.customers_list),
url(r'^api/customers/(?P<pk>[0-9]+)$', views.customers_detail),
]
With REST endpoints created, let's see how we can consume them.
Step 6 – Consuming REST API with Axios
In this step, we'll install Axios, the HTTP client we'll use to make API calls. We'll also create a class to consume the API endpoints we've created.
First, deactivate your virtual environment:
deactivateThen go to your frontend folder:
cd ~/djangoreactproject/frontendInstall axios from npm using:
npm install axios --saveThe –save option adds the axios dependency to your application's package.json file.
Next, create a JavaScript file called CustomersService.js that contains the code to call the REST APIs. We'll create this in the src folder, where our project's application code is located:
cd src
nano CustomersService.js
Add the following code, which contains methods to connect to the Django REST API:
import axios from 'axios';
const API_URL = 'http://localhost:8000';

export default class CustomersService{

constructor(){}


getCustomers() {
const url = `${API_URL}/api/customers/`;
return axios.get(url).then(response => response.data);
}
getCustomersByURL(link){
const url = `${API_URL}${link}`;
return axios.get(url).then(response => response.data);
}
getCustomer(pk) {
const url = `${API_URL}/api/customers/${pk}`;
return axios.get(url).then(response => response.data);
}
deleteCustomer(customer){
const url = `${API_URL}/api/customers/${customer.pk}`;
return axios.delete(url);
}
createCustomer(customer){
const url = `${API_URL}/api/customers/`;
return axios.post(url,customer);
}
updateCustomer(customer){
const url = `${API_URL}/api/customers/${customer.pk}`;
return axios.put(url,customer);
}
}
The CustomersService class calls the following Axios methods:
- getCustomers(): Gets the first page of customers.
- getCustomersByURL(): Gets customers by URL. This allows you to access subsequent customer pages by passing links like /api/customers/?page=2.
- getCustomer(): Gets the customer by primary key.
- createCustomer(): Creates a customer.
- updateCustomer(): Updates a customer.
- deleteCustomer(): Deletes a customer.
We can now display our API data in the React UI by creating a CustomersList component.
Step 7 – Displaying data from the API in the React app
In this step, we will create the CustomersList React component. A React component represents a part of the user interface. It also allows you to divide the UI into independent, reusable pieces.
Start by creating CustomersList.js in frontend/src:
nano ~/djangoreactproject/frontend/src/CustomersList.jsStart by importing React and Component to create a React component:
import React, { Component } from 'react';Next, import and instantiate the CustomersService module you created in the previous step, which provides methods that communicate with the backend REST API:
...
import CustomersService from './CustomersService';
const customersService = new CustomersService();
Next, create a CustomersList component that extends Component to call the REST API. A React component must extend or subclass the Component class. For more information about E6 classes and inheritance, please see our tutorial on understanding classes in JavaScript.
Add the following code to create a React component that extends react.Component:
...
class CustomersList extends Component {

constructor(props) {
super(props);
this.state = {
customers: [],
nextPageURL: ''
};
this.nextPage = this.nextPage.bind(this);
this.handleDelete = this.handleDelete.bind(this);
}
}
export default CustomersList;
Inside the constructor, we initialize the state object. This holds the state variables of our component using an empty array of customers. This array holds the customers and nextPageURL which holds the URL of the next page to retrieve from the backing API. We also attach the nextPage() and handleDelete() methods to this so that they are accessible from the HTML code.
Next, add a componentDidMount() method and a call to getCustomers() in the CustomersList class, before the closing curly brace.
The componentDidMount() method is a component lifecycle method that is called when the component is created and inserted into the DOM. getCustomers() calls the Customer Service object to get the first page of data and the next page link from the Django backend:
...
componentDidMount() {
var self = this;
customersService.getCustomers().then(function (result) {
self.setState({ customers: result.data, nextPageURL: result.nextlink})
});
}
Now add the handleDelete() method, which handles the client deletion, below componentDidMount():
...
handleDelete(e,pk){
var self = this;
customersService.deleteCustomer({pk : pk}).then(()=>{
var newArr = self.state.customers.filter(function(obj) {
return obj.pk !== pk;
});
self.setState({customers: newArr})
});
}
The handleDelete method calls the deleteCustomer() method to delete the customer using the pk (primary key). If the operation is successful, the customers array is filtered for the deleted customer.
Next, add a nextPage() method to get the data for the next page and update the next page link:
...
nextPage(){
var self = this;
customersService.getCustomersByURL(this.state.nextPageURL).then((result) => {
self.setState({ customers: result.data, nextPageURL: result.nextlink})
});
}
The nextPage() method calls a getCustomersByURL() method that gets the next page URL from the state object, this.state.nextPageURL, and updates the customers array with the returned data.
Finally, add the component's render() method, which renders a table of customers from the component's state:
...
render() {

return (
<div className="customers--list">
<table className="table">
<thead key="thead">
<tr>
<th>#</th>
<th>First Name</th>
<th>Last Name</th>
<th>Phone</th>
<th>Email</th>
<th>Address</th>
<th>Description</th>
<th>Actions</th>
</tr>
</thead>
<tbody>
{this.state.customers.map( c =>
<tr key={c.pk}>
<td>{c.pk} </td>
<td>{c.first_name}</td>
<td>{c.last_name}</td>
<td>{c.phone}</td>
<td>{c.email}</td>
<td>{c.address}</td>
<td>{c.description}</td>
<td>
<button onClick={(e)=> this.handleDelete(e,c.pk) }> Delete</button>
<a href={"/customer/" + c.pk}> Update</a>
</td>
</tr>)}
</tbody>
</table>
<button className="btn btn-primary" onClick= { this.nextPage }>Next</button>
</div>
);
}
Here is the full content of the file:
import React, { Component } from 'react';
import CustomersService from './CustomersService';

const customersService = new CustomersService();

class CustomersList extends Component {

constructor(props) {
super(props);
this.state = {
customers: [],
nextPageURL: ''
};
this.nextPage = this.nextPage.bind(this);
this.handleDelete = this.handleDelete.bind(this);
}

componentDidMount() {
var self = this;
customersService.getCustomers().then(function (result) {
console.log(result);
self.setState({ customers: result.data, nextPageURL: result.nextlink})
});
}
handleDelete(e,pk){
var self = this;
customersService.deleteCustomer({pk : pk}).then(()=>{
var newArr = self.state.customers.filter(function(obj) {
return obj.pk !== pk;
});

self.setState({customers: newArr})
});
}

nextPage(){
var self = this;
console.log(this.state.nextPageURL);
customersService.getCustomersByURL(this.state.nextPageURL).then((result) => {
self.setState({ customers: result.data, nextPageURL: result.nextlink})
});
}
render() {

return (
<div className="customers--list">
<table className="table">
<thead key="thead">
<tr>
<th>#</th>
<th>First Name</th>
<th>Last Name</th>
<th>Phone</th>
<th>Email</th>
<th>Address</th>
<th>Description</th>
<th>Actions</th>
</tr>
</thead>
<tbody>
{this.state.customers.map( c =>
<tr key={c.pk}>
<td>{c.pk} </td>
<td>{c.first_name}</td>
<td>{c.last_name}</td>
<td>{c.phone}</td>
<td>{c.email}</td>
<td>{c.address}</td>
<td>{c.description}</td>
<td>
<button onClick={(e)=> this.handleDelete(e,c.pk) }> Delete</button>
<a href={"/customer/" + c.pk}> Update</a>
</td>
</tr>)}
</tbody>
</table>
<button className="btn btn-primary" onClick= { this.nextPage }>Next</button>
</div>
);
}
}
export default CustomersList;
Now that we have created the CustomersList component to display the list of customers, we can add a component that handles customer creation and updating.
Step 8 – Add React Create Component and Update Client
In this step, we create the CustomerCreateUpdate component, which handles creating and updating customers. It does this by providing a form that users can use to enter new customer data or update existing entries.
In frontend/src, create a CustomerCreateUpdate.js file:
nano ~/djangoreactproject/frontend/src/CustomerCreateUpdate.jsAdd the following code to create a React component by importing React and Component:
import React, { Component } from 'react';We can also import and instantiate the CustomersService class we created in the previous step, which provides methods that communicate with the backend REST API:
...
import CustomersService from './CustomersService';

const customersService = new CustomersService();
Next, create a CustomerCreateUpdate component that extends Component to create and update customers:
...
class CustomerCreateUpdate extends Component {

constructor(props) {
super(props);
}
}
export default CustomerCreateUpdate;
In the class definition, add the component's render() method, which renders an HTML form that captures customer information:
...
render() {
return (
<form onSubmit={this.handleSubmit}>
<div className="form-group">
<label>
First Name:</label>
<input className="form-control" type="text" ref='firstName' />

<label>
Last Name:</label>
<input className="form-control" type="text" ref='lastName'/>

<label>
Phone:</label>
<input className="form-control" type="text" ref='phone' />

<label>
Email:</label>
<input className="form-control" type="text" ref='email' />

<label>
Address:</label>
<input className="form-control" type="text" ref='address' />

<label>
Description:</label>
<textarea className="form-control" ref='description' ></textarea>

<input className="btn btn-primary" type="submit" value="Submit" />
</div>
</form>
);
}
For each form input element, the method adds a ref attribute to access and set the form element's value.
Next, define a handleSubmit(event) method above the render() method to have the appropriate behavior when the user clicks the submit button:
...
handleSubmit(event) {
const { match: { params } } = this.props;
if(params && params.pk){
this.handleUpdate(params.pk);
}
else
{
this.handleCreate();
}
event.preventDefault();
}
...
The handleSubmit(event) method handles the form submission and, depending on the route, calls either the handleUpdate(pk) method to update the client with the passed pk or the handleCreate() method to create a new client. We will define these methods shortly.
Back in the component constructor, link the newly added handleSubmit() method to this so you can access it in your form:
...
class CustomerCreateUpdate extends Component {
constructor(props) {
super(props);
this.handleSubmit = this.handleSubmit.bind(this);
}
...
Then define the handleCreate() method to create the customer from the form data. Add the following code above the handleSubmit(event) method:
...
handleCreate(){
customersService.createCustomer(
{
"first_name": this.refs.firstName.value,
"last_name": this.refs.lastName.value,
"email": this.refs.email.value,
"phone": this.refs.phone.value,
"address": this.refs.address.value,
"description": this.refs.description.value
}).then((result)=>{
alert("Customer created!");
}).catch(()=>{
alert('There was an error! Please re-check your form.');
});
}
...
The handleCreate() method is used to create a customer from the input data. It calls the corresponding CustomersService.createCustomer() method which calls the actual API to the backend to create the customer.
Then, below the handleCreate method, define the handleUpdate(pk) method to implement updates:
...
handleUpdate(pk){
customersService.updateCustomer(
{
"pk": pk,
"first_name": this.refs.firstName.value,
"last_name": this.refs.lastName.value,
"email": this.refs.email.value,
"phone": this.refs.phone.value,
"address": this.refs.address.value,
"description": this.refs.description.value
}
).then((result)=>{

alert("Customer updated!");
}).catch(()=>{
alert('There was an error! Please re-check your form.');
});
}
The updateCustomer() method updates a customer using new information from the customer information form. It calls the customersService.updateCustomer() method.
Then add a componentDidMount() method. If the user visits the route customer/:pk, we want to populate the form with the customer information using the primary key from the URL. To do this, we can add the getCustomer(pk) method after the component is mounted in the componentDidMount() lifecycle event. To add this method, add the following code below the component constructor:
...
componentDidMount(){
const { match: { params } } = this.props;
if(params && params.pk)
{
customersService.getCustomer(params.pk).then((c)=>{
this.refs.firstName.value = c.first_name;
this.refs.lastName.value = c.last_name;
this.refs.email.value = c.email;
this.refs.phone.value = c.phone;
this.refs.address.value = c.address;
this.refs.description.value = c.description;
})
}
}
Here is the full content of the file:
import React, { Component } from 'react';
import CustomersService from './CustomersService';
const customersService = new CustomersService();
class CustomerCreateUpdate extends Component {
constructor(props) {
super(props);

this.handleSubmit = this.handleSubmit.bind(this);
}
componentDidMount(){
const { match: { params } } = this.props;
if(params && params.pk)
{
customersService.getCustomer(params.pk).then((c)=>{
this.refs.firstName.value = c.first_name;
this.refs.lastName.value = c.last_name;
this.refs.email.value = c.email;
this.refs.phone.value = c.phone;
this.refs.address.value = c.address;
this.refs.description.value = c.description;
})
}
}
handleCreate(){
customersService.createCustomer(
{
"first_name": this.refs.firstName.value,
"last_name": this.refs.lastName.value,
"email": this.refs.email.value,
"phone": this.refs.phone.value,
"address": this.refs.address.value,
"description": this.refs.description.value
}
).then((result)=>{
alert("Customer created!");
}).catch(()=>{
alert('There was an error! Please re-check your form.');
});
}
handleUpdate(pk){
customersService.updateCustomer(
{
"pk": pk,
"first_name": this.refs.firstName.value,
"last_name": this.refs.lastName.value,
"email": this.refs.email.value,
"phone": this.refs.phone.value,
"address": this.refs.address.value,
"description": this.refs.description.value
}
).then((result)=>{
console.log(result);
alert("Customer updated!");
}).catch(()=>{
alert('There was an error! Please re-check your form.');
});
}
handleSubmit(event) {
const { match: { params } } = this.props;
if(params && params.pk){
this.handleUpdate(params.pk);
}
else
{
this.handleCreate();
}
event.preventDefault();
}

render() {
return (
<form onSubmit={this.handleSubmit}>
<div className="form-group">
<label>
First Name:</label>
<input className="form-control" type="text" ref='firstName' />

<label>
Last Name:</label>
<input className="form-control" type="text" ref='lastName'/>

<label>
Phone:</label>
<input className="form-control" type="text" ref='phone' />

<label>
Email:</label>
<input className="form-control" type="text" ref='email' />

<label>
Address:</label>
<input className="form-control" type="text" ref='address' />

<label>
Description:</label>
<textarea className="form-control" ref='description' ></textarea>

<input className="btn btn-primary" type="submit" value="Submit" />
</div>
</form>
);
}
}
export default CustomerCreateUpdate;
By creating the CustomerCreateUpdate component, we can update the main App component to add links to the various components we have created.
Step 9 – Update the main application component
In this section, we will update our App component to link to the components we created in the previous steps.
From the frontend folder, run the following command to install the React router, which allows you to add routing and navigation between different React components:
cd ~/djangoreactproject/frontend
npm install --save react-router-dom
Next, open ~/djangoreactproject/frontend/src/App.js:
nano ~/djangoreactproject/frontend/src/App.jsDelete all existing items and add the following code to import the necessary classes to add routing. These are BrowserRouter which creates a Router component and Route which creates a Route component:
import React, { Component } from 'react';
import { BrowserRouter } from 'react-router-dom'
import { Route, Link } from 'react-router-dom'
import CustomersList from './CustomersList'
import CustomerCreateUpdate from './CustomerCreateUpdate'
import './App.css';
BrowserRouter keeps the UI in sync with the URL using the HTML5 history API.
Next, create a base layout that provides the base component to be wrapped by the BrowserRouter component:
...
const BaseLayout = () => (
<div className="container-fluid">
<nav className="navbar navbar-expand-lg navbar-light bg-light">
<a className="navbar-brand" href="#">Django React Demo</a>
<button className="navbar-toggler" type="button" data-toggle="collapse" data-target="#navbarNavAltMarkup" aria-controls="navbarNavAltMarkup" aria-expanded="false" aria-label="Toggle navigation">
<span className="navbar-toggler-icon"></span>
</button>
<div className="collapse navbar-collapse" id="navbarNavAltMarkup">
<div className="navbar-nav">
<a className="nav-item nav-link" href="/">CUSTOMERS</a>
<a className="nav-item nav-link" href="/customer">CREATE CUSTOMER</a>
</div>
</div>
</nav>
<div className="content">
<Route path="/" exact component={CustomersList} />
<Route path="/customer/:pk" component={CustomerCreateUpdate} />
<Route path="/customer/" exact component={CustomerCreateUpdate} />
</div>
</div>
)
We use the Route component to define our application routes. The component that the router should load as soon as a match is found. Each route requires a route to specify the route to match and a component to specify the component to match. The exact attribute tells the router to match the route exactly.
Finally, create the App component, the main or top-level component of our React application:
...
class App extends Component {
render() {
return (
<BrowserRouter>
<BaseLayout/>
</BrowserRouter>
);
}
}
export default App;
We have wrapped the BaseLayout component with the BrowserRouter component because our application is going to run in the browser.
The completed file looks like this:
import React, { Component } from 'react';
import { BrowserRouter } from 'react-router-dom'
import { Route, Link } from 'react-router-dom'
import CustomersList from './CustomersList'
import CustomerCreateUpdate from './CustomerCreateUpdate'
import './App.css';
const BaseLayout = () => (
<div className="container-fluid">
<nav className="navbar navbar-expand-lg navbar-light bg-light">
<a className="navbar-brand" href="#">Django React Demo</a>
<button className="navbar-toggler" type="button" data-toggle="collapse" data-target="#navbarNavAltMarkup" aria-controls="navbarNavAltMarkup" aria-expanded="false" aria-label="Toggle navigation">
<span className="navbar-toggler-icon"></span>
</button>
<div className="collapse navbar-collapse" id="navbarNavAltMarkup">
<div className="navbar-nav">
<a className="nav-item nav-link" href="/">CUSTOMERS</a>
<a className="nav-item nav-link" href="/customer">CREATE CUSTOMER</a>

</div>
</div>
</nav>
<div className="content">
<Route path="/" exact component={CustomersList} />
<Route path="/customer/:pk" component={CustomerCreateUpdate} />
<Route path="/customer/" exact component={CustomerCreateUpdate} />
</div>
</div>
)
class App extends Component {
render() {
return (
<BrowserRouter>
<BaseLayout/>
</BrowserRouter>
);
}
}
export default App;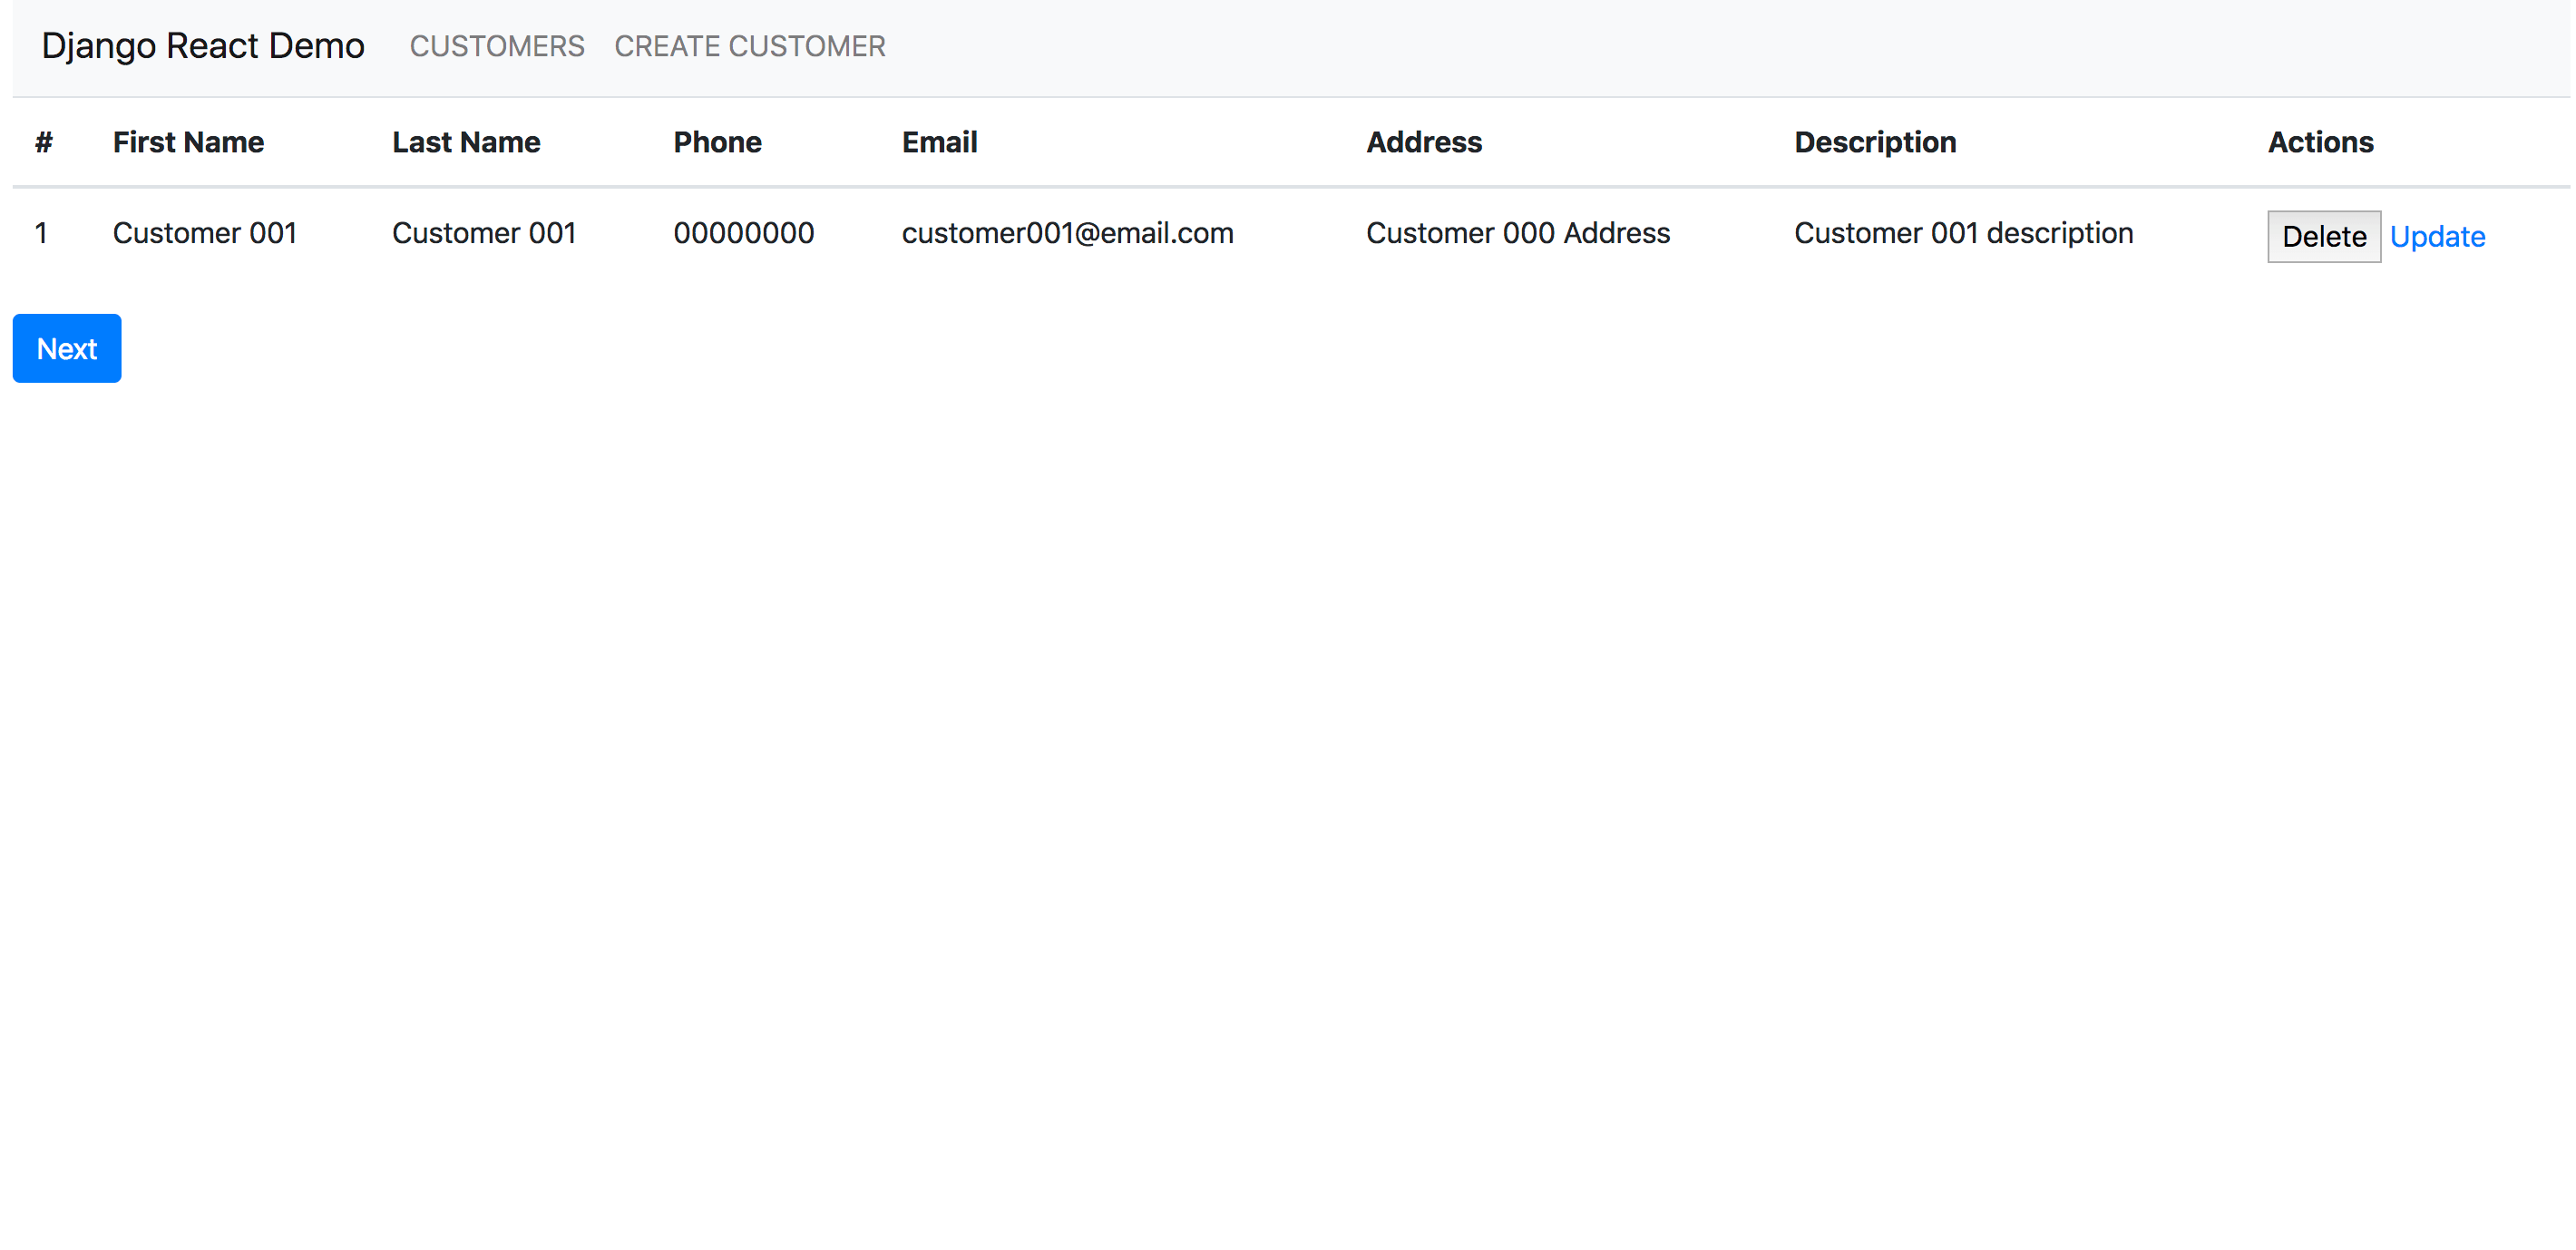
After adding routing to our application, we are now ready to test the application. Go to http://localhost:3000. You should see the application's home page:
With this program, you now have the foundation for a CRM program.
Result
In this tutorial, you created a demo application using Django and React. You used the Django REST framework to build the REST API, Axios to consume the API, and Bootstrap 4 for your CSS styling. You can find the source code for this project in this GitHub repository.