How to change Windows Server port
Remote Desktop Protocol (RDP) allows secure remote access to Windows computers and servers. By default, it uses port 3389, a known port that can leave your system vulnerable to attacks.
Hackers often target this default port, so changing it can add a layer of security and help hide your RDP connection from automated scans.
This guide will walk you through the steps to change the RDP port in Windows and increase the security of your remote connections.
Why change the RDP port?
Changing the RDP port can greatly improve the security of your system.
When RDP uses the default port (3389), it is an easy target for automated scans and hacking attempts. Attackers look for this default port to exploit vulnerabilities or perform brute-force attacks to gain unauthorized access.
Changing to a non-standard port reduces the visibility of your RDP service and makes it harder for malicious actors to find it. Security experts recommend using ports between 49152 and 65535, as these ports are less likely to interfere with other services.
While port switching won't stop all potential threats, it does provide a useful layer of obfuscation and reduce the amount of information exposed. Combined with other security measures, such as strong passwords and VPNs, this can help secure your remote desktop access from unauthorized access.
Step-by-step guide to changing RDP port in Windows
Here is a detailed guide to help you change the default RDP port in Windows. This involves editing the Windows registry, so be careful at every step, as incorrect changes can affect system performance.
Before you begin, make sure you have physical or remote access to the computer you want to configure.
It's also a good idea to back up your registry first. To back up your registry, open Registry Editor, go to File > Export, and save a copy. This backup can be used to restore your settings if anything goes wrong.
Step 1: Access the Registry Editor
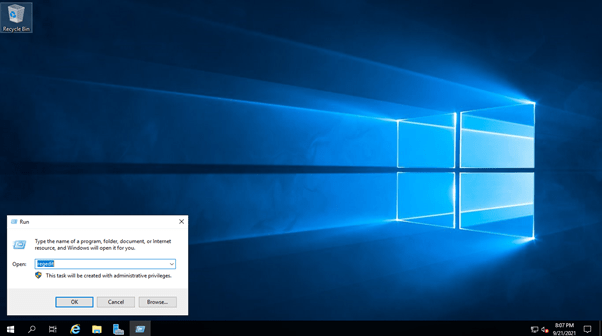
- Open the Run window: To open the Run window, press the keys WIN + R Press .
- Run the Registry Editor: Type regedit and Enter This will open the Windows Registry Editor, where system settings can be viewed and changed.
- Accept User Access Control (UAC): If requested, to allow changes, Yes Select because administrator access is required.
Note: The Registry Editor is a powerful tool. Avoid making changes to keys unless you understand their function.

Step 2: Find the RDP port configuration key
- Go to the RDP-Tcp key: In the Registry Editor, use the left navigation panel to find the following path:
HKEY_LOCAL_MACHINE\System\CurrentControlSet\Control\Terminal Server\WinStations\RDP-Tcp - This folder (RDP-Tcp) contains the configuration related to RDP settings, including the default port value.
Tip: Open each folder in the path to reach RDP-Tcp.

Step 3: Change the PortNumber entry
- Find the value of PortNumber: Once you're in the RDP-Tcp key, look for a registry entry called PortNumber. This is the setting that defines the current RDP port.
- Edit the port number:
– Double-click the PortNumber entry.
– A dialog box opens. Option Decimal Select because this allows you to enter the port number directly in decimal format, which is easier to understand than hexadecimal. Choose a new port number: Enter a port number between 49152 and 65535 (for example, 33091). This range is less likely to interfere with other services. - Save changes: Click OK to save the new port settings.
Important: To avoid interference, avoid using ports that are already in use by other applications.

Step 4: Apply and confirm changes
- Restart RDP services: To apply the changes without rebooting, restart the Remote Desktop service. Here's how to do it:- Command Prompt Open Command Prompt as Administrator. You can do this by typing cmd in the Windows search bar, right-clicking on Command Prompt, and selecting Run as administrator. - In Command Prompt, type the following command to restart the RDP service: net stop termservice && net start termservice - This will stop and restart the Terminal Services (RDP) service.
- Restart option: Alternatively, you can restart the computer for the changes to fully take effect, which may be easier.
Note: Restarting the RDP service will disconnect any active RDP sessions, so save your work before continuing.

Step 5: Confirm the new port configuration
- Test the Remote Desktop connection: To verify that the new port is active, try connecting to the computer using the new port in your Remote Desktop client.
– Format the IP address or hostname with the new port like this:
IP_address:new_port For example: 192.168.1.1:33091 - Check if the port is available:
- In Command Prompt Enter the following command to verify that the new port is open and available:
netstat -an | find “<new_port_number>"- <new_port_number> را با پورتی که در مرحله ۳ تنظیم کردهاید جایگزین کنید. این دستور نشان میدهد که آیا پورت باز و فعال میباشد یا خیر .
عیبیابی: اگر نمیتوانید متصل شوید، بررسی کنید که فایروال طوری پیکربندی شده باشد که ترافیک ورودی را روی پورت جدید مجاز کند. این اغلب میتواند دلیل عدم موفقیت اتصال باشد.

پیکربندی قوانین فایروال برای پورت جدید RDP
پس از تغییر پورت RDP، بهروزرسانی تنظیمات فایروال ویندوز برای اجازه دادن به اتصالات ورودی در پورت جدید ضروری است. بدون این مرحله، فایروال شما ممکن است ترافیک دسکتاپ از راه دور را مسدود کند و اتصال از راه دور را غیرممکن سازد.
مرحله ۱: باز کردن فایروال ویندوز با Advanced Security
- دسترسی به تنظیمات فایروال: منوی استارت را باز کنید، عبارت Windows Defender Firewall را تایپ کنید و Windows Defender Firewall with Advanced Security را انتخاب کنید.
- این کار کنسول Advanced Security را باز میکند، جایی که میتوانید قوانین سفارشی برای ترافیک شبکه ایجاد کنید.
مرحله ۲: یک قانون ورودی جدید برای پورت RDP ایجاد کنید
- وارد تنظیمات inbound شوید : در نوار کناری سمت چپ، روی Inbound Rules کلیک کنید. این بخش شامل تمام قوانینی است که ترافیک ورودی را کنترل میکنند.
- یک قانون جدید بسازید
– در پنل سمت راست «Actions»، روی «New Rule» کلیک کنید.
– نوع قانون ورودی را انتخاب کنید: در New Inbound Rule Wizard ، پورت را انتخاب کرده و روی next کلیک کنید. - پورت جدید را مشخص کنید:
– TCP را انتخاب کنید و سپس Specific local ports را انتخاب کنید.
– شماره پورت جدیدی که برای RDP انتخاب کردهاید (مثلاً ۳۳۰۹۱) را وارد کنید و روی Next کلیک کنید. - عملیات مورد نظر را انتخاب کرده به صورت مثال:
– گزینه Allow the connection را انتخاب کرده و روی Next کلیک کنید. این کار باعث میشود اتصالات ورودی روی این پورت مجاز باشند. - انتخاب پروفایل:
– پروفایل(های) شبکهای که این قانون در آن اعمال میشود (دامنه، خصوصی یا عمومی) را انتخاب کنید. معمولاً هر سه را انتخاب کنید، مگر اینکه الزامات خاصی داشته باشید.
– برای ادامه روی Next کلیک کنید.
مرحله ۳: یک نام بگذارید و ذخیره کنید
- اضافه کردن نام و توضیحات:
– یک نام توصیفی برای قانون وارد کنید، مانند RDP New Port 33091.
– در صورت تمایل، برای شناسایی آسان در آینده، توضیحی اضافه کنید. - برای ذخیره قانون، روی «Finish» کلیک کنید.
مهم: مطمئن شوید که شماره پورت با شماره پورت تنظیم شده در ویرایشگر رجیستری مطابقت دارد. پورت نادرست در قانون فایروال از اتصال RDP جلوگیری میکند.
مرحله ۴: بررسی صحت قانون فایروال
- تست اتصال: پس از تنظیم قانون فایروال، اتصال RDP را با استفاده از پورت جدید
(مثلاً 192.168.1.1:33091) تست کنید. اگر قانون فایروال به درستی پیکربندی شده باشد، باید بتوانید متصل شوید. - بررسی مشکلات اتصال: اگر اتصال برقرار نشد، دوباره بررسی کنید که آیا این قانون فعال است و به درستی پیکربندی شده است تا ترافیک TCP روی پورت خاص مجاز باشد.
نکته امنیتی اضافی
اگر این رایانه از طریق اینترنت قابل دسترسی است، آدرسهای IP مجاز به اتصال را به IP خاص محدود کنید. این کار میزان افشای اطلاعات را به حداقل میرساند و یک لایه محافظتی به تنظیمات ریموت دسکتاپ شما اضافه میکند.
بهروزرسانی فایروال تضمین میکند که اتصال RDP شما در پورت جدید قابل دسترسی و ایمن است. در بخش بعدی، اقدامات امنیتی اضافی را برای تقویت بیشتر تنظیمات RDP شما مورد بحث قرار خواهیم داد.
خرید سرویس با امنیت از طریق سایت
وارد سایت شده و با پشتیبانی در ارتباط باشید . از 72 لوکیشن مختلف امکان ارائه وجود دارد
لینک سایت