
Introduction
Internet Protocol Version 6 (IPv6) is the latest version of the Internet Protocol (IP). This communications protocol provides a system for identifying and locating computers on a network and routes traffic across the Internet. It was developed in 1998 to replace the IPv4 protocol.
IPv6 aims to improve security and performance while ensuring that we don't run out of addresses. It assigns globally unique addresses to each device and stores them in 128 bits, while IPv4 only uses 32 bits.
Although the goal is to replace IPv4 with IPv6, there is still a long way to go. Less than 30% of sites on the Internet offer IPv6 connectivity to users (tracked by Google here). IPv6 can also cause problems for some applications.
Since VPNs offer global services, the fact that IPv6 uses globally assigned (uniquely assigned) routing addresses and there are (still) ISPs that do not offer IPv6 support pushes this feature lower on their priority list. That way, they can focus on what matters most to VPN users: security.
Another possible reason you might want to disable IPv6 on your system is that you don't want to expose yourself to various threats. Although IPv6 itself is more secure than IPv4, the risks I'm referring to are of a different nature. If you're not actively using IPv6 and its features, having IPv6 enabled leaves you vulnerable to various attacks and gives hackers another tool to exploit.
However, configuring the basic network rules is not enough. You need to pay the same attention to changing your IPv6 configuration as you do for IPv4. Doing so (and maintaining it) can be a pain. There are a different set of problems with IPv6 than with IPv4 (and there are many, given the age of the protocol), which adds another layer of complexity to your system.
It has also been observed that disabling IPv6 helps improve WiFi speed in Ubuntu in some cases.
Disabling IPv6 in Ubuntu (For Advanced Users Only)
In this section, I will explain how to disable IPv6 protocol on Ubuntu machine. Open a terminal (default: CTRL+ALT+T) and let's get to it!
Note: You will need root (sudo) privileges for most of the commands you will enter in the terminal.
If you are a regular Linux desktop user and prefer a stable operating system, please avoid this tutorial. This is for advanced users who know what they are doing and why they are doing it.
1. Disable IPv6 using Sysctl
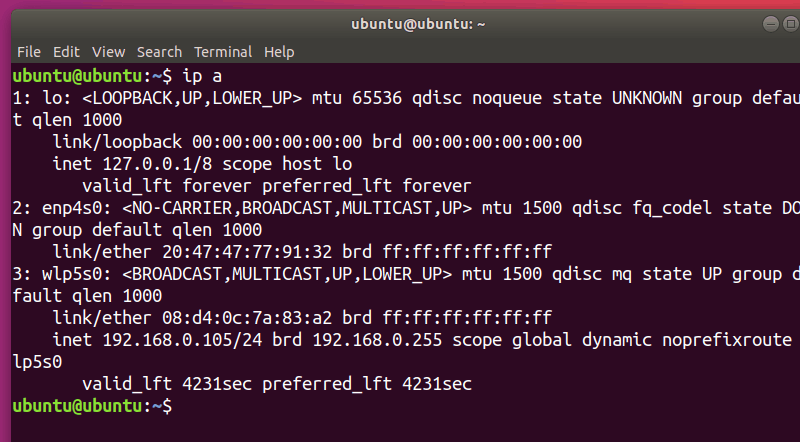
First of all, you need to make sure that you have IPv6 enabled on your system. Check your IP address in Ubuntu with this command:
ip a
If an IPv6 address is active you should see (your internet card name may be different):

You may have seen the sysctl command in the tutorial on how to restart the network in Ubuntu. We are going to use it here too. To disable IPv6, you only need to enter 3 commands:
sudo sysctl -w net.ipv6.conf.all.disable_ipv6=1
sudo sysctl -w net.ipv6.conf.default.disable_ipv6=1
sudo sysctl -w net.ipv6.conf.lo.disable_ipv6=1
You can check if using:
ip a
You should not see the IPv6 entry:
However, this only temporarily disables IPv6. The next time your system boots, IPv6 will be re-enabled.
One way to persist this option is to modify /etc/sysctl.conf. I will use vim to edit the file, but you can use any editor you like. Make sure you have root privileges (use sudo):
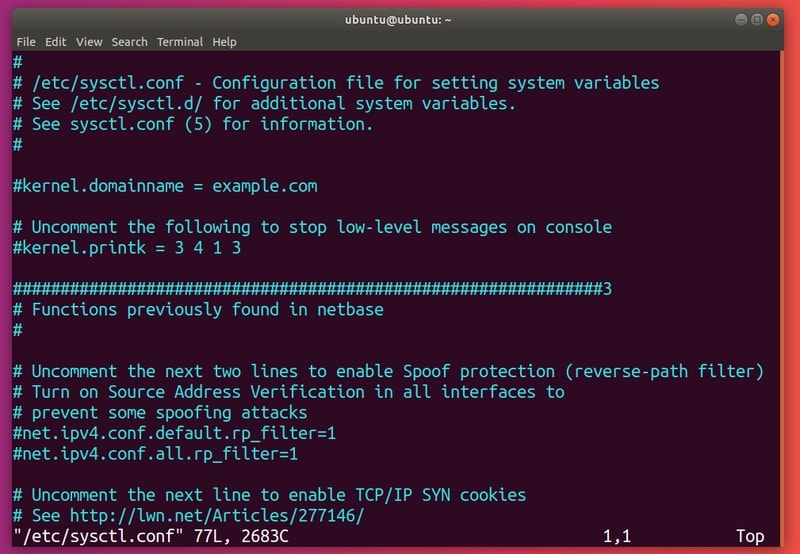
Add the following lines to the file:
net.ipv6.conf.all.disable_ipv6=1
net.ipv6.conf.default.disable_ipv6=1
net.ipv6.conf.lo.disable_ipv6=1
To apply settings from:
sudo sysctl -p
If IPv6 is still enabled after reboot, you need to create the /etc/rc.local file (with root privileges).
⚠️ The file content is different for newer versions of Ubuntu.
For Ubuntu 22.04 and older versions, use this in the /etc/rc.local file:
#!/bin/bash
# /etc/rc.local
/etc/sysctl.d
/etc/init.d/procps restart
exit 0
For Ubuntu 24.04 and newer, use this instead:
#!/bin/bash
# /etc/rc.local
/sbin/sysctl -p/etc/sysctl.conf
/etc/init.d/procps restart
exit 0
Now use the chmod command to make the file executable:
sudo chmod 755 /etc/rc.local
This manually (during boot time) reads kernel parameters from your sysctl configuration file.
2. Disable IPv6 using GRUB
An alternative method is to configure GRUB to send kernel parameters at boot time. You will need to edit /etc/default/grub. Once again, make sure you have administrator privileges:
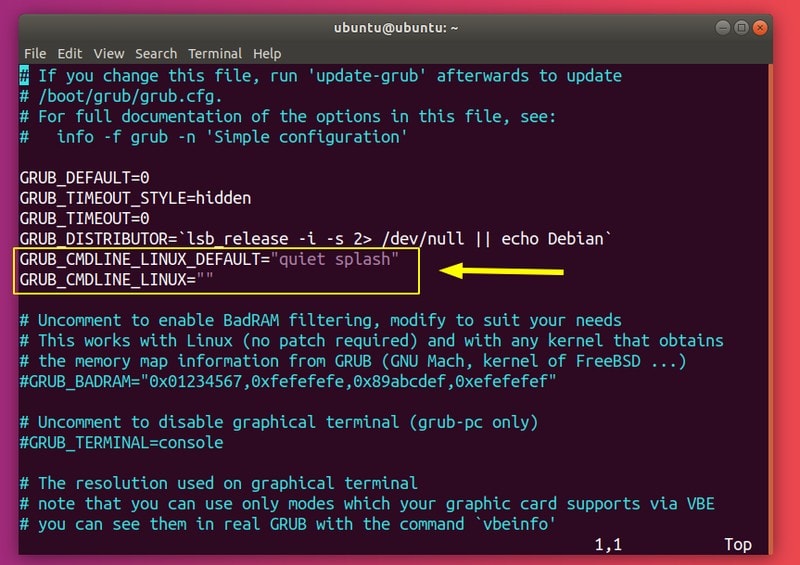
Now you need to change GRUB_CMDLINE_LINUX_DEFAULT and GRUB_CMDLINE_LINUX to disable IPv6 at boot:
GRUB_CMDLINE_LINUX_DEFAULT="quiet splash ipv6.disable=1"
GRUB_CMDLINE_LINUX="ipv6.disable=1"
Save the file and run the update-grub command:
sudo update-grub
The settings should now persist across reboots.
Re-enable IPv6 in Ubuntu
To re-enable IPv6, you must undo the changes you made. To enable IPv6 until reboot, enter:
sudo sysctl -w net.ipv6.conf.all.disable_ipv6=0
sudo sysctl -w net.ipv6.conf.default.disable_ipv6=0
sudo sysctl -w net.ipv6.conf.lo.disable_ipv6=0
Otherwise, if you modified /etc/sysctl.conf, you can remove the lines you added or change them to:
net.ipv6.conf.all.disable_ipv6=0
net.ipv6.conf.default.disable_ipv6=0
net.ipv6.conf.lo.disable_ipv6=0
You can optionally reload these values:
sudo sysctl -p
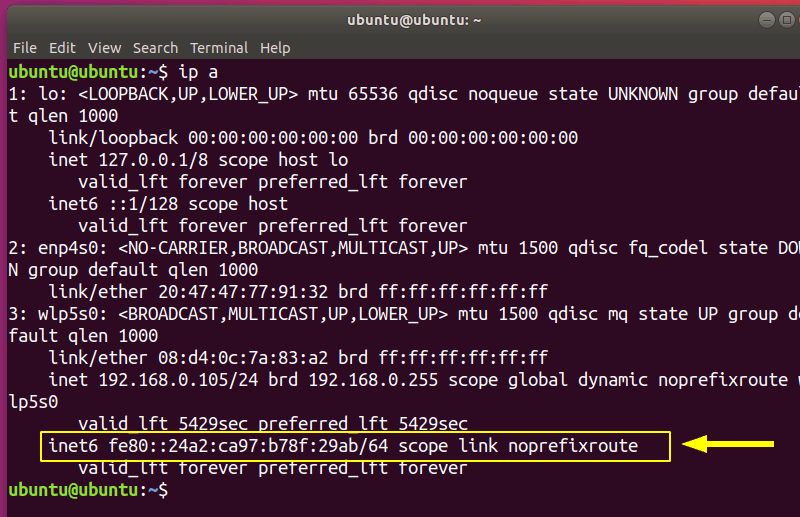
You should see an IPv6 address once again:
Optionally, you can delete /etc/rc.local:
sudo rm /etc/rc.local
If you changed kernel parameters in /etc/default/grub, go ahead and remove the added options:
GRUB_CMDLINE_LINUX_DEFAULT="quiet splash"
GRUB_CMDLINE_LINUX=""
Do it now:
sudo update-grub
Result
In this guide, I have provided you with ways through which you can disable IPv6 in Linux, and also given you an idea of what IPv6 is and why you might want to disable it.