
Introduction
Using the SSH protocol enables a secure channel over an insecure network in a client-server architecture, connecting an SSH client with an SSH server. Creating an SSH key set gives you a public key and a private key. You can place the public key on a server and then connect to it with a client that has the corresponding private key. If the SSH public and private keys match, you will be logged in without a password.
This is generally the most secure and convenient method of connection.
This guide explains how to configure SSH keys on your local machine for secure connections to remote servers.
Prerequisites
- Access to the OVHcloud control panel
- A dedicated server or a VPS on your OVHcloud account
- An SSH client program (command line or GUI)
- Administrative (sudo) access via SSH to your server
This guide does not apply to standard Windows Server installations as they rely on Remote Desktop Protocol (RDP) for connections. SSH connections are used for OVHcloud rescue mode. You can find more information in the Go more section of this guide.
Creating an SSH key pair
The following instructions cover two methods of using SSH keys:
- Creating an Open SSH key pair and connecting to the server from the SSH command line client
- Creating a PuTTY key pair and connecting to the server from the PuTTY SSH client
You can use both methods together, but keep in mind that PuTTY saves key files in a specific format that makes them incompatible with SSH key files created with the Open SSH client. This means that a private key created with the SSH command-line client must first be converted to PuTTY format, and vice versa.
Creating an SSH key pair from the command line
From a Mac computer or a device with a Linux operating system installed, open the command line application (Terminal).
Check that you have a folder called .ssh in your $HOME folder. If the folder doesn't exist, create it:
mkdir ~/.ssh
On the current Windows operating system, open Command Prompt by typing “cmd” in the search bar (or open PowerShell from the menu).
Go to the .ssh directory for your active Windows user (by default: C:\Users\WindowsUsername\.ssh):
cd .sshTo generate a 4096-bit RSA key, use the following command:
ssh-keygen -b 4096
Using the -t option with this command allows you to specify a different encryption method, for example:
ssh-keygen -t ed25519 -a 256
The command line will ask you to save the newly created key to the standard file:
Generating public/private rsa key pair.
Enter file in which to save the key (/home/user/.ssh/id_rsa):
You can confirm with Enter to accept the suggested file name or enter an individual name. This is relevant if more than one key pair is placed in the .ssh directory. You can find more information about this in the section Managing Multiple SSH Keys.
This example uses the standard file names id_rsa and id_rsa.pub.
In the next prompt, you can protect your SSH key with a passphrase. This is recommended for added security.
Remote access to your server is only as secure as the client device that stores the private key. So when using SSH keys, it's crucial to protect your device and files from unauthorized access.
For convenience and security purposes, use a password manager on your device, such as the open source solution KeePass.
All SSH keys should be stored in the .ssh folder. Public key files will have .pub in the file name.
Your identification has been saved in /home/user/.ssh/id_rsa.
Your public key has been saved in /home/user/.ssh/id_rsa.pub.
The key fingerprint is:
SHA256:MRk+Y0zCOoOkferhkTvMpcMsYspj212lK7sEauNap user@hostname
The key's randomart image is:
+---[RSA 4096]----+
| .. o |
| . .= o |
| o o X |
|. . . . |
|. .=.o .S. |
| =o.o. . . |
|o + . . o .. |
|.. . . oEoo . |
|o. .o+oo |
+----[SHA256]-----+
To view and export your public key, use the cat command on your pub.key file. Copy the full key string to the clipboard to add it to your server later.
cat ~/.ssh/id_rsa.pub
ssh-rsa AAAAB3NzaC1yc2EAAAADAQABAAABAQC8teh2NJ42qYZV98gTNhumO1b6rMYIkAfRVazl
k6dSS3xf2MXJ4YHsDacdjtJ+evXCFBy/IWgdkFtcvsGAMZ2N1RdvhDyQYcy6NDaJCBYw1K6Gv5fJ
SHCiFXvMF0MRRUSMneYlidxUJg9eDvdygny4xOdC6c1JrPrSgOc2nQuKeMpOoOWLINIswg1IIFVk
kFMPrFivP8Z6tidzVpAtbr1sXmJGZazYWrU3FoK2a1sF1zEWrmlMOzX81zEWrmlMOzX8CpZW8Rae
i4ANmLy7NULWK36yU0Rp9bFJ4o0/4PTkZiDCsK0QyHhAJXdLN7ZHpfJtHIPCnexmwIMLfIhCWhO5
user@hostname
In the MacOS Terminal, you can use the pbcopy and pbpaste commands to manage key strings more quickly. For example, use this command to copy the key from the id_rsa.pub file to the clipboard:
pbcopy < ~/.ssh/id_rsa.pub
On Windows, you can open the file with Notepad from File Explorer (right-click the file and select Open with) or use one of the following commands (in \Users\WindowsUsername\.ssh):
cmd
more id_rsa.pub
powershell
cat id_rsa.pub
Copy the full key string to the clipboard to add it to your server later.
Using the clipboard
When working from a Windows command prompt, right-click to paste the contents of your clipboard into the command prompt window. To copy a string from the command prompt window, highlight it, then press Enter. You can also find these functions by right-clicking on the menu bar.
Creating an SSH key pair with PuTTY
PuTTY is an open source SSH client software with a graphical user interface, available for Windows and other operating systems. It offers a companion software for generating SSH keys: PuTTY Key Generator (PuTTYgen).
The main purpose of PuTTY is to manage SSH connections from a Windows client machine to a GNU/Linux server. PuTTY stores key files in a specific format that makes them incompatible with SSH key files created with the Open SSH client that is natively available on most modern operating systems.
If necessary, keys generated from the command line as described above can be converted to PPK format for use with the PuTTY client. For the most convenient use of SSH keys, choose one option and stick with it (SSH private keys or PuTTY private keys).
If it is not already installed (check your programs list or use the search function), download PuTTY from the official website. The recommended standard installation package contains PuTTYgen but it is also available as a standalone file on the website.
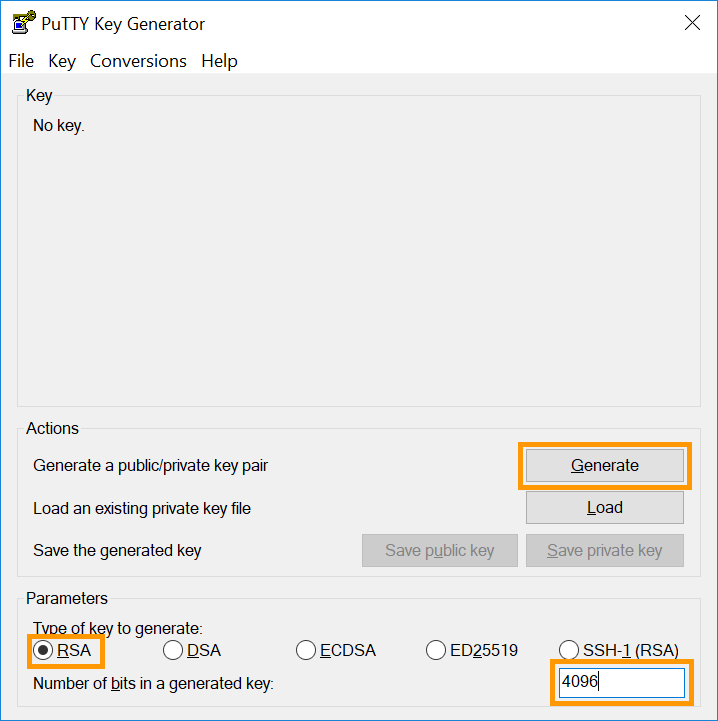
Open PuTTYgen and select a supported encryption algorithm. This example uses RSA. Enter 4096 as the number of bits in the lower right corner, then click the Generate button.
Move your mouse pointer freely in the area below the progress bar:
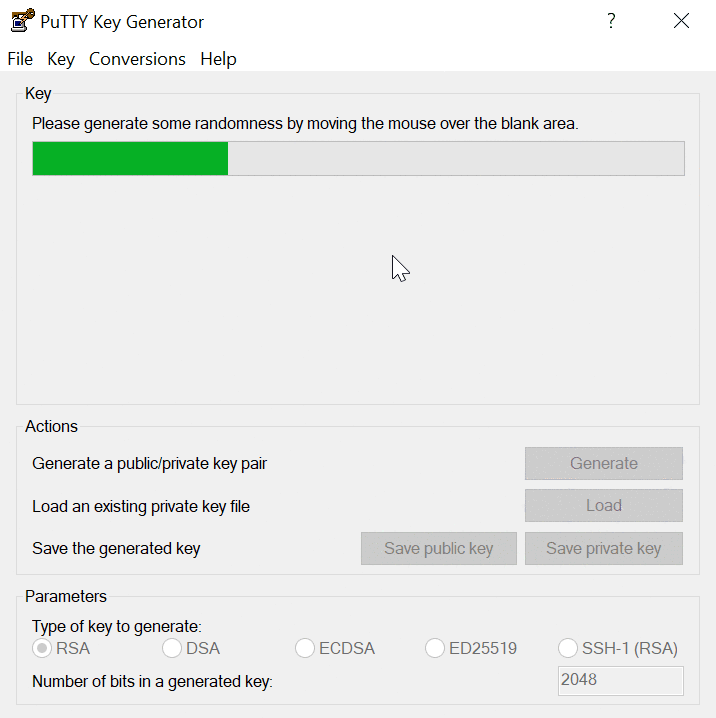
When the progress bar is full, the key is ready.
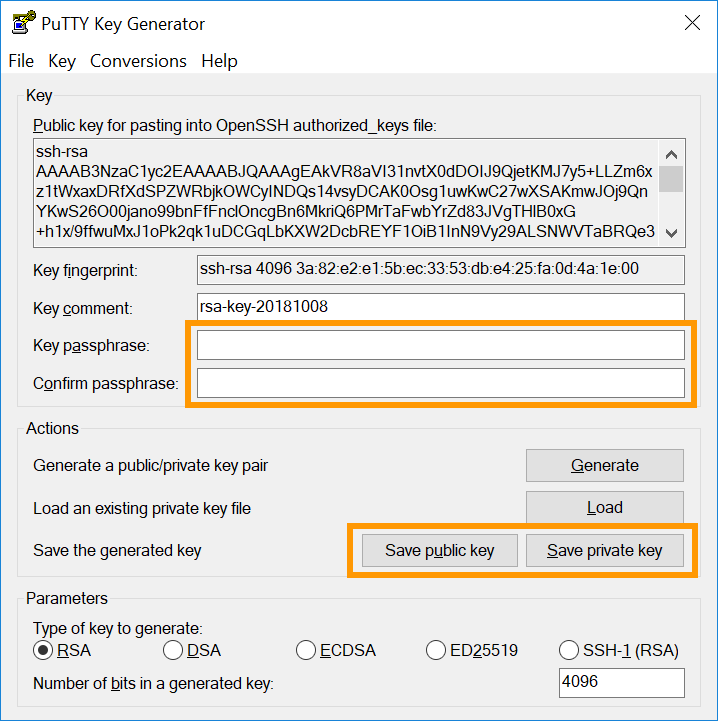
Copy the full key string to the clipboard to add it to your server. Save both keys as files by clicking the corresponding buttons and enter a passphrase to protect them.
Remote access to your server is only as secure as the client device that stores the private key. So when using SSH keys, it's crucial to protect your device and files from unauthorized access.
For convenience and security purposes, use a password manager on your device, such as the open source solution KeePass.
One of the advantages of using PuTTY is the ability to save multiple connections as Sessions. Find more information below in the section Managing Multiple SSH Keys on Your Local Machine.
You can learn more about SSH connections in our Getting Started guides and in our SSH Introduction.
Adding SSH keys to your server
Transferring public keys created on GNU/Linux, MacOS, or BSD-based systems
If you created your SSH key pairs on a GNU/Linux, MacOS, or BSD-based system, you can use the ssh-copy-id command to add the public keys to your server.
The ssh-copy-id tool copies the public keys to the file ~/.ssh/authorized_keys on the specified remote server, automatically creating the file in this directory if necessary.
ssh-copy-id user@IP_ADDRESSBy default, ssh-copy-id will attempt to move all public keys into your local user's ~/.ssh directory. To add a public key, you can specify this key file with the -i option followed by the path to the file:
ssh-copy-id -i ~/.ssh/KeyFileName user@IP_ADDRESS
Example:
ssh-copy-id -i ~/.ssh/VPS_rsa.pub [email protected]
You will be prompted for the user password. If the process is successful, you will receive a message similar to the image below.
Number of key(s) added: 1
Now try logging into the machine, with: "ssh 'user@server-ip'"
and check to make sure that only the key(s) you wanted were added.
If you get an error message instead, you can always add your public keys manually by following the steps explained below.
As a best practice and for security reasons, the same key pair should not be used by multiple users. Since each user on GNU/Linux systems has their own authorized_keys file in ~/.ssh/, you can use the ssh-copy-id command as shown above and match the KeyFileName and user after creating the key pair.
Adding public keys to the server manually
Connect to your server and make sure you are in your user's $HOME directory. Create the .ssh folder (if it doesn't exist):
mkdir ~/.ssh
To store the key for the current user, open (or create) the authorized_keys file with your favorite text editor (nano is used in this example):
nano ~/.ssh/authorized_keys
Place your public key in this file. Save the file and exit the editor. Reboot your server (sudo reboot) or just restart the OpenSSH service with one of the following commands (the appropriate command may vary depending on your operating system):
sudo systemctl restart ssh
sudo systemctl restart sshd
To ensure your key is set up correctly, connect to your server with the following command. Replace "user" with the username the keys were created for and "IP_ADDRESS" with the IP address (or hostname) of the server you want to access:
ssh user@IP_ADDRESS
Example:
Adding additional public keys to your server
To add SSH keys for other users who will have access to your server, repeat the key creation steps, but use the appropriate $HOME folder or the Windows Users directory of the intended user to create and store SSH keys (or run commands on this person's dedicated machine). . Then add the new public key to the server as described above in authorized_keys.
Removing public keys from your server
Open the authorized_keys file as described above and delete the key string for the user whose access has been revoked.
Save the file and exit the editor.
Manage multiple SSH keys on your local machine
You may want to use multiple SSH key pairs to connect to different remote hosts. (If you are using PuTTY, skip to the relevant section below.)
Since all keys must be placed in the .ssh folder on your local machine, the file names must be different. When you create a new key pair and are prompted to provide a file name, enter a name of your choice. For example, match it to your server name.
Generating public/private rsa key pair.
Enter file in which to save the key (/home/user/.ssh/id_rsa): KeyFileName_rsa
Your identification has been saved in /home/user/.ssh/KeyFileName_rsa.
Your public key has been saved in /home/user/.ssh/KeyFileName_rsa.pub.
When connecting to the relevant server, in addition to the user and server details, specify the name of the key file:
ssh -i ~/.ssh/KeyFileName user@IP_ADDRESS
Example:
ssh -i ~/.ssh/myVPS_rsa [email protected]
As mentioned in the previous sections, the same instructions work on the Windows client. Just replace ~/ with the path to your Windows user folder, by default C:\Users\WindowsUsername\. (Example: ssh -i C:\Users\Username\.ssh/myVPS_rsa [email protected])
Using the “config” file.
An alternative to adding the -i option every time you edit a file called config inside the ~/.ssh folder (\Users\Username\.ssh for Windows). You can use it to configure details for different connections (username, port, key file, optional parameters, etc.).
If this file exists inside .ssh, it probably already contains information. Depending on your environment, first create a backup of the original.
An example of the contents of the .ssh folder:
ls ~/.ssh/
config id_rsa id_rsa.pub known_hosts known_hosts.old
With the configuration file, multiple SSH connections can be stored along with their individual parameters, in addition to the standard values. Using the full potential of this file can be tricky, as it is very useful for experienced users who regularly manage multiple servers.
Below is a simple example to explain how to configure an SSH connection to a VPS.
Open the file and add the following lines at the top:
Host vps
HostName 203.0.113.100
IdentityFile ~/.ssh/myVPS_rsa
You can then connect to the VPS with the alias you defined as Host:
ssh ubuntu@vps
Only the server IP and key file were specified in the previous example, but more details can be added. To configure an SSH connection to the second server with the username “rocky”, the changed SSH port “49160”, and the private key in the file “myserver_rsa”, expand the contents of the file as shown in this example:
Host vps
HostName 203.0.113.100
IdentityFile ~/.ssh/myVPS_rsa
Host dedicated_server
HostName 203.0.113.101
User rocky
Port 49160
IdentityFile ~/.ssh/myserver_rsa
You can then connect to this server by entering the following:
ssh dedicated_serverFor more information, you can read the relevant man page.
Using PuTTY
If you followed the instructions in the section Creating an SSH key pair with PuTTY and adding SSH keys to your server, you have a key pair that you can use to connect to your server.
PuTTY can store the credentials and parameters of an SSH connection as a Session. This also enables you to connect to different servers using separate keys.
Open PuTTY and expand the SSH subsection in the left menu, then click Auth and Credentials.
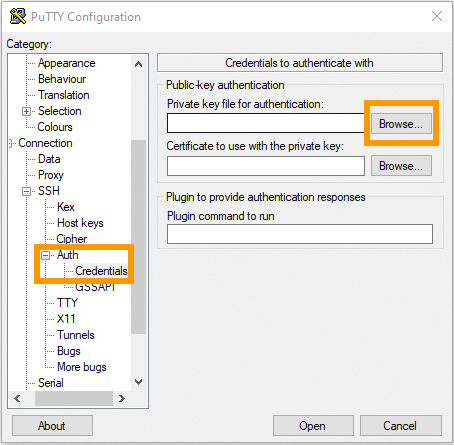
Click the Browse button and select the PuTTY private key file (keyfile.ppk) from the folder where you saved it.
The key file is now associated with the current SSH session. Go to Session in the left menu and enter your login credentials for the server (username@IPv4_address).
Enter a name for this connection in the Saved Sessions field and click Save to add it to the list.
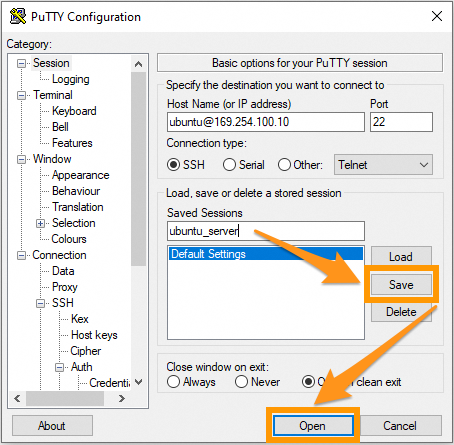
From now on you can click on this Session item and open a connection to your server. Click Open to test it. If you have protected the key file with a passphrase, you will need to enter it at this point.
To configure another server connection, repeat the steps:
- Create the key pair.
- Add the public key to your server.
- Enter the server details and add the key file in PuTTY.