Introduction
This tutorial explains how to run a Discord bot on a Linux server. A Discord bot is a great way to learn the basics of web and backend development while having fun with your friends. With the recent expansion of Discord for public use, learning how to build and run Discord bots can also become a fun side hustle. Building a Discord bot isn't difficult, but it does require a set of specific steps that you need to follow to keep your Discord bot secure and operational.
Since Discord bots run code and can perform very complex interactions with Discord servers, they need to be hosted on servers. Even though you can get paid services that will host your Discord bot on the internet, after the tutorials you will learn here, it is much easier to host your own Discord bot.
This tutorial uses Python with the discord.py library. Discord bots are primarily written in Python (discord.py library) or JavaScript (discord.js library), both of which are great ecosystems that can work with all the other libraries written in that language. As a result, most of the steps are the same for both (apart from language-specific steps). However, it is easier to get started with the Python library, which is why it was chosen for this tutorial.
The Discord bot example in this library will be a simple spell-correction bot that will show you some of the most important commands in the discord.py library.
Prerequisites
- A VPS or Virtual Private Server
If you don't have many users or your bot does a simple task, there are practically no hardware requirements and all you need to be able to do is run Python.
- Any 64-bit Linux operating system (x86-64 or Arm64)
This tutorial assumes you are running Ubuntu, but the same steps will work on other Linux distributions and Windows with minor modifications.
- A Discord account with a Discord server where you have administrator privileges.
Basic or intermediate knowledge of Python
Step 1 – Set up a virtual environment
Before you begin, it is recommended to use a Python virtual environment called virtualenv, which allows each project to have specific versions of libraries just for that project to avoid incompatibilities between projects that may require specific versions of libraries. This is highly recommended for Discord bots running on Python, as you can ensure that your bot will always work and you can easily move it to another server.
Open the terminal on your Linux or connect to your server via SSH (secure shell) and run the following commands:
apt update && apt install python3.10-venv
mkdir discord-bot && cd discord-bot/
python3 -m venv discord-bot-env
source discord-bot-env/bin/activate
This will install the Python package required to create virtual environments, create a directory for the Discord bot, and activate the Python virtual environment. Your terminal should now look like this: (discord-bot-env) Before your username is displayed. Next, install the discord.py library.
python3 -m pip install --upgrade discord.pyمرحله 2 – ربات خود را با Discord ثبت کنید
Before running any scripts, you need to register your Discord bot with Discord itself and get a token that your bot will use to authenticate with Discord. This is a simple, albeit lengthy, process. Just follow these steps:
1_Open a web browser.
2_Log in to the Discord site.
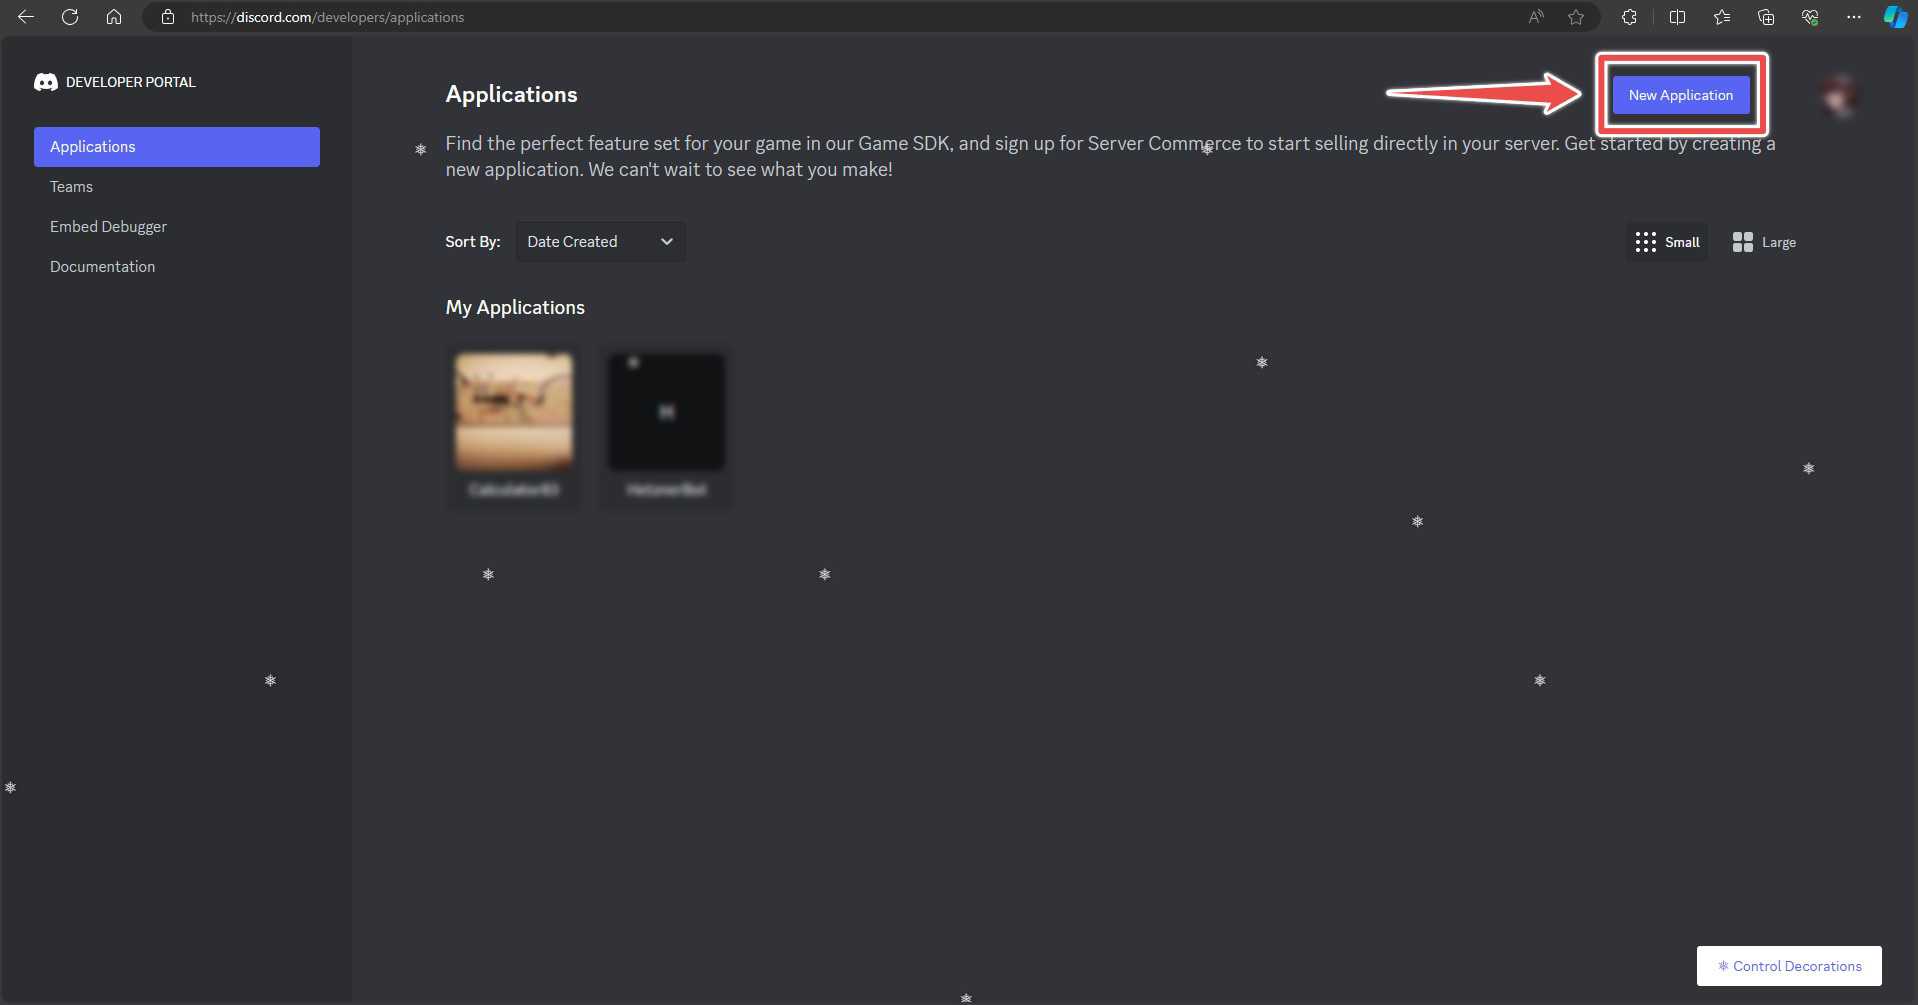
3_Enter the discord developer portal.
4_Click on new application.
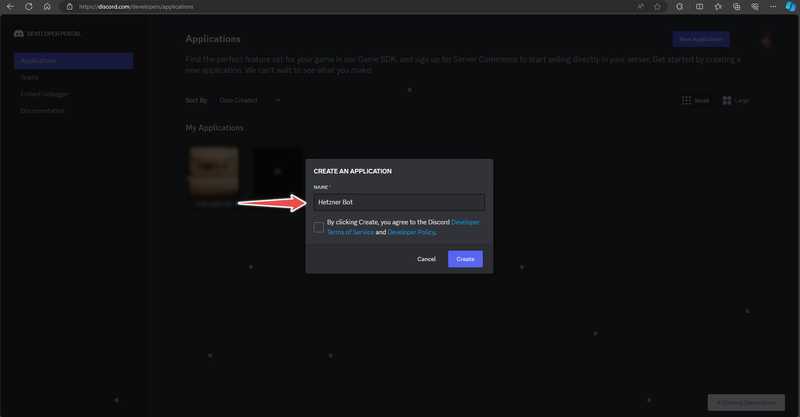
5_In the "create an application" section, name your bot.
6_Click on the bot and go to the bot section.
7_Make sure “Public Bot” is selected and “Requires OAuth2 Code Grant” is not selected.
8_Click on “Reset Token” and write down your token. Make sure you don’t lose this token. If you do, you will need to click on the button again, get a new token again and update the token in your code to the new token.
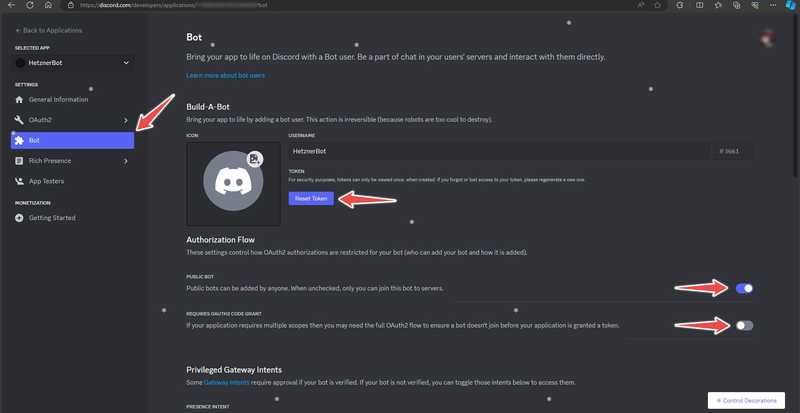
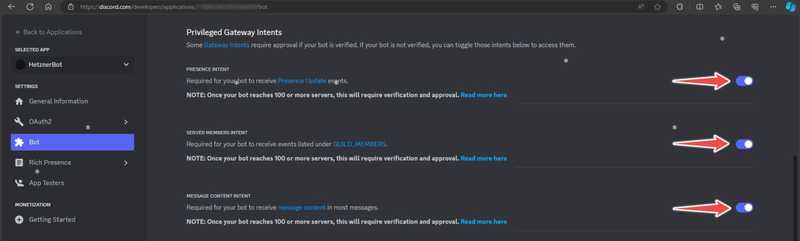
9_Scroll down and read the entire section "«Privileged Gateway Intents» Turn on. This will allow the bot to function. Since your bot does not have any code yet, the conditions for more than 100 servers do not apply.
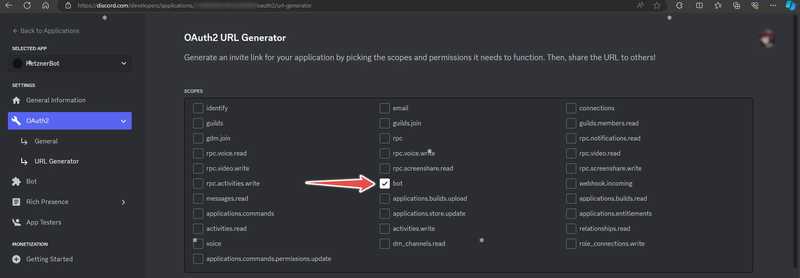
10_Go to the OAuth2 section and then the URL Generator subsection. The URL allows you and anyone else who wants to use your bot to easily add your bot to your server with only the permissions and functionality they want the bot to have.
11_In the “Scopes” section, click on “bot”.
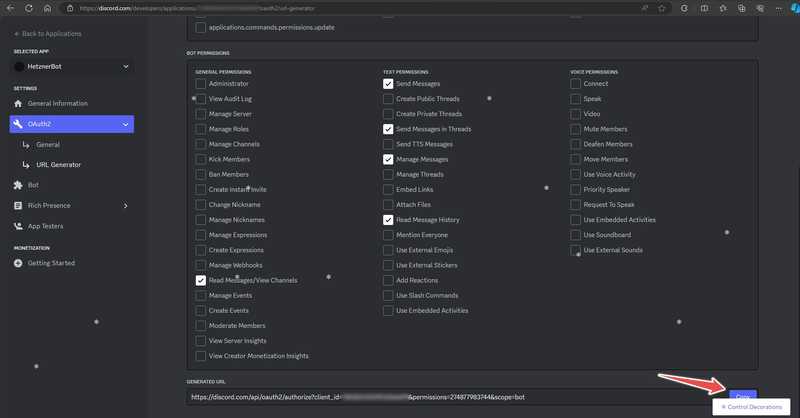
12_In the section "«Bot Permissions», click on all the permissions you want to allow to the bot you want. This depends on what you want your bot to be able to do. For the simple bot in this example, the following permissions should be sufficient.
13_In the "Generated URL" section, click "Copy".
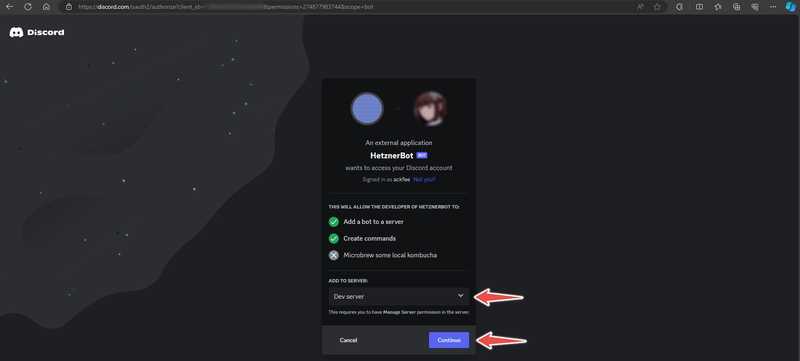
14_Put this URL in the search bar and go to the link.
15_Read the information provided about what the bot will be able to do and add it to the server. You can only add the bot to a server where you have administrative privileges.
16_Roy“Continue”"Click"

17_Choose the permissions you want your bot to have on the server you are adding it to. Try to give the bot the fewest permissions that are still fully functional. Giving it extra permissions can be a security risk if someone gets your bot token.
Step 3 - Write your bot code
Now that the bot is registered in Discord, you need to write its code. Fortunately, creating a simple Discord bot is easy, and discord.py files are great for that.
In the same folder where you ran the commands in "Step 1", a file called discord_bot_script.py Create with your favorite text editor. In this example, I will use nano.
nano discord_bot_script.pyCopy and paste the following code and replace the token in the last line with your own token:
import discord


intents = discord.Intents.default()
intents.message_content = True


client = discord.Client(intents=intents)


words = [["youre", "you're"], ["im", "i'm"], ["Im", "I'm"], ["hes", "he's"], ["shes", "she's"]]


@client.event
async def on_ready():
    print("Bot successfully logged in as " + client.user)


@client.event
async def on_message(message):
    if message.author == client.user:
        return
    for word in words:
        if word[0] in message.content:
            await message.channel.send(str(message.author) + ", you misspelled " + word[1] + " as " + word[0], reference=message)


client.run('<YOUR-TOKEN-HERE>')
من خط به خط نمیروم، اما این ربات ساده بیشتر آنچه را که برای شروع ایجاد رباتهای Discord خود در پایتون باید بدانید را نشان میدهد. با اعلام مقاصد شروع می شود، که اساساً فیلترهایی هستند که ربات شما برای قضاوت در مورد رویدادهایی که ثبت می کند و به آنها پاسخ می دهد استفاده می کند. برای مثال، اگر یک ربات غلطگیر املا دارید، فقط به رویدادهای پیام پاسخ میدهید، اما رویدادهایی مانند پیوستن افراد به سرور یا انجام بازیهای خاص را نادیده میگیرید. میتوانید در صفحه مستندات discord.py درباره مقاصد بیشتر بخوانید.
On_Ready, which is when the bot script is loaded and the bot connects to its servers.ON_MESSAGE, when someone writes a new message on any server that the bot is connected to. This event also has an argument that passes the message content and metadata to the function.
For the function on_readyThe code simply causes the bot to write a message to the terminal. You can use the print function to record events during development.
For the function on_messageFirst, the code checks whether the author of the message is the bot itself, and if so, it returns from the function. If it didn't do this check, the bot might accidentally get stuck in a loop that would reply to its own messages forever. Then, the code checks whether any of the words in the list are present in the received message. If so, it replies to the sent message using the send function. This is one of the most important and powerful functions in discord.py, and learning to use its full potential will allow you to build some interesting and complex bots.
Now that you have written your bot, save the code and run it with the following function:
python3 discord_bot_script.py