Introduction
Hello, and welcome to this tutorial on how to protect your website with Cloudflare. It explains how to host a website on a server, how to protect it with Cloudflare's excellent and free L7 protection while maintaining security, and how to lock down server ports so that an attacker can't bypass Cloudflare and attack the server directly.
About Cloudflare
Before we start, a little note about Cloudflare and its features:
- Cloudflare is one of the largest networks in the world. Today, businesses, nonprofits, bloggers, and anyone with an internet presence boast faster and more secure websites and apps. They are protected from DDoS attacks, and their backend servers are protected from attackers. Cloudflare also offers a suite of security services that protect websites from attacks like SQL injection, XSS, and DDoS attacks.
- Cloudflare powers internet requests for millions of websites, serving an average of 55 million HTTP requests per second.
- Cloudflare has made many improvements in internet security and performance. It is a great tool for website owners to protect their websites from attacks and improve their websites performance. The best part is that it is free to use.
- As your traffic increases, you can always upgrade to a paid plan for more features and better performance.
Prerequisites
- A domain name
- A Cloudflare account with an added domain
- A server running Debian 12
- A website for protection
Step 1 – Update the server and install NGINX
First of all, we need to update the server, then we need to add the NGINX repository and install NGINX.
apt update && apt upgrade -y
apt install curl gnupg2 ca-certificates lsb-release debian-archive-keyring -y
# Add the signing key for the nginx packages
curl https://nginx.org/keys/nginx_signing.key | gpg --dearmor | tee /usr/share/keyrings/nginx-archive-keyring.gpg > /dev/null
# Add the NGINX repository
echo "deb [signed-by=/usr/share/keyrings/nginx-archive-keyring.gpg] http://nginx.org/packages/debian `lsb_release -cs` nginx" | tee /etc/apt/sources.list.d/nginx.list
# Pin down the NGINX repository to avoid conflicts with the default Debian repository
echo -e "Package: *\nPin: origin nginx.org\nPin: release o=nginx\nPin-Priority: 900\n" | tee /etc/apt/preferences.d/99nginx
apt update
# Install NGINX
apt install nginx -y
Step 2 – Website Setup and Configuration
Configuring NGINX to serve a website is beyond the scope of this tutorial, but we will use the default settings for this tutorial and secure the server with Cloudflare.
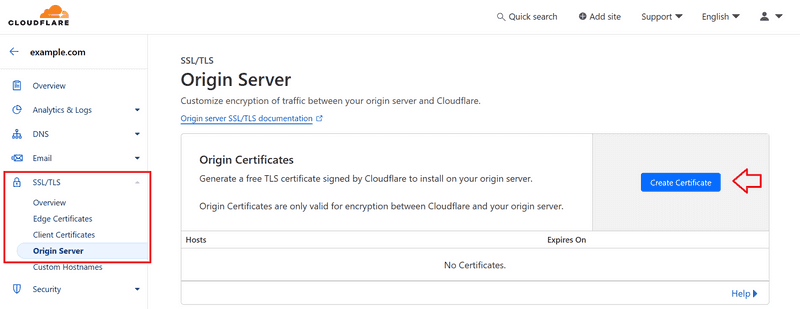
You must have a certificate of origin from Cloudflare Create and list it /etc/nginx/ssl, that is cf.crt and cf.key Put it.
You can create an origin certificate in the Cloudflare dashboard by selecting your domain and going to SSL/TLS » Origin Server » Create Certificate.
You can adapt the configuration below (e.g. /etc/nginx/sites-available/default) to your website's needs.
server {
listen 443 ssl;
server_name <example.com>;
access_log /var/log/nginx/host.access.log main;
ssl_certificate /etc/nginx/ssl/cf.crt;
ssl_certificate_key /etc/nginx/ssl/cf.key;
location / {
root /usr/share/nginx/html;
index index.html index.htm;
}
error_page 500 502 503 504 /50x.html;
location = /50x.html {
root /usr/share/nginx/html;
}
}
Step 2.1 – Reload NGINX
At this point, we reload NGINX to apply the changes and point the domain to the server.
systemctl reload nginx
Once NGINX is reloaded, you can point the domain to the server by adding an A record in the Cloudflare dashboard. Make sure the proxy status is set to “Proxied” to enable Cloudflare’s L7 protection, otherwise the server will be exposed to the internet.
Step 3 – 60% of the way there
We are now 60% of the way there. The website is now protected by Cloudflare's L7 protection, but the server is still exposed to the internet and an attacker can bypass Cloudflare and attack the server directly.
In the next steps, we will lock down the server ports and only allow Cloudflare IP ranges to access the server.
We can use iptables to achieve this, but we'll go a step further and use Hetzner Cloud Firewall to lock down the server ports.
Step 4 – Setting up Hetzner Cloud Firewall
In this step, we will set up Hetzner Cloud Firewall to lock down the server ports and only allow Cloudflare IP ranges to access the server.
You can do this through the Hetzner Cloud Console, by selecting your project and clicking the “Firewalls” tab. However, Cloudflare’s IP ranges are dynamic and can change over time. For this reason, we will use the Hetzner Cloud API to automate this process.
First, you need to do a few things in the Hetzner cloud console:
- Generate an API token by going to «Security» » «API tokens» and clicking «Generate API token.» Make sure you give it read and write permissions.
- Make a note of the firewall ID. You can find it in the URL when you are on the firewall page:
- Make sure that a firewall is applied on the server, otherwise it is useless.
Back on your server, save the following script in a file, e.g. firewall.py. This script will whitelist the Cloudflare IP range in the Hetzner Cloud Firewall.
Note: The script below will overwrite any existing firewall rules you have specified, so make sure your firewall doesn't contain any other important rules. If it does, you may want to add them to the script, such as opening an SSH port.
import requests
import json
HETZNER_API_TOKEN = "YOUR_HETZNER_API_TOKEN"
HETZNER_FIREWALL_ID = "YOUR_HETZNER_FIREWALL_ID"
def get_cloudflare_ips():
response = requests.get('https://www.cloudflare.com/ips-v4')
if response.status_code == 200:
return response.text.strip().split('\n')
else:
print("Failed to retrieve Cloudflare IP ranges")
return []
def whitelist_ips_in_hetzner(ip_ranges):
headers = {
'Authorization': f'Bearer {HETZNER_API_TOKEN}',
'Content-Type': 'application/json',
}
payload = {
"rules": [
{
"direction": "in",
"source_ips": ip_ranges,
"port": "443",
"protocol": "tcp",
"description": "Accept port 443"
},
#{
# "direction": "in",
# "source_ips": ["0.0.0.0/0","::/0"],
# "port": "22",
# "protocol": "tcp",
# "description": "Accept SSH connections"
#}
]
}
response = requests.post(f'https://api.hetzner.cloud/v1/firewalls/{HETZNER_FIREWALL_ID}/actions/set_rules', headers=headers, data=json.dumps(payload))
if 200 <= response.status_code < 203:
print("IPs whitelisted successfully in Hetzner Firewall")
else:
print("Failed to whitelist IPs in Hetzner Firewall", response.json())
if __name__ == "__main__":
cloudflare_ips = get_cloudflare_ips()
whitelist_ips_in_hetzner(cloudflare_ips)
Step 5 – Run and automate the script
- Install Python
To run the script, you need to install Python on the server. If you don't have Python installed yet, you can install it by running:
apt install python3 -y
- Run the script.
Once you have Python installed, you can run the script with:
python3 firewall.py
You should wait for an output like “IPs successfully whitelisted in Hetzner Firewall.” Otherwise, you can check the error message and troubleshoot.
- Automate
Once the script has successfully run, you can automate it by adding it to a cron job, so that the script runs every 24 hours and updates the Hetzner Cloud Firewall with the Cloudflare IP range.
You can add a cron job by running crontab -e and adding the following line to the file.
* 0 * * * /usr/bin/python3 /path/to/firewall.py
Step 6 – Tightening the protection on Cloudflare’s side
Log in to your Cloudflare dashboard.
- Go to the “SSL/TLS” tab
To ensure that the website is always served over HTTPS and that the communication between Cloudflare and the server is encrypted and secure:
- Enable "Always use HTTPS" – Enable "HTTPS automatic rewrite" – Set SSL/TLS encryption mode to "Full (Strong)".
Go to the “Security” tab
To ensure that the website is protected from bots, hotlinks, and other attacks:
- Enable “Browser Integrity Check” – Enable “Hotlink Protection” – Enable “Bot Fight Mode”
Note that this is not a one-size-fits-all solution and you should always keep an eye on your Cloudflare dashboard and change the settings according to your website's needs.
- You can also enable «Rate Limiting» to further protect your website from attacks, and luckily, Cloudflare offers a free tier for this feature (including one rule).
- You can also use Cloudflare's caching feature to cache static website content and reduce server load.
And once again, you should monitor traffic and change the settings according to your website's needs.
There is also this script: https://github.com/guided-hacking/cfautouam
You can use this script to automatically turn Cloudflare into “attack mode” when the server is using too much CPU or RAM. This can be useful for protecting the server from attacks, but that is beyond the scope of this tutorial.
Result
In this tutorial, you learned how to protect a website with Cloudflare's L7 protection, securing the server and website from attacks without exposing ports to the internet. You also automated the process of updating Hetzner's cloud firewall with Cloudflare's IP range, hardening the protection on the Cloudflare side.