Introduction
Hashnode is a free-to-use content publishing platform and developer community designed to keep tech enthusiasts engaged. It provides a space for users to create and share blog posts and build a community around various areas of technology. HashNode aims to simplify the creation and maintenance of a developer-friendly and SEO-optimized technical blog, offering features like custom domains, a built-in editor, and seamless integration with popular version control systems like GitHub. Their newest offering, Headless Hashnode, lets you build a blog from scratch using Hashnode’s innovative GraphQL APIs. You can build a blog from scratch or use their Next.js starter kit.
In this tutorial, we will set up Hashnode headless on DigitalOcean Droplets.
Introduction to HeadLess HashNode
A Headless Content Management System, or CMS, is an architecture that separates the content management and presentation layers. With a traditional CMS, content is authored, stored, and displayed in one system, but with a headless architecture, content storage and presentation can be handled separately, which creates space for designers and developers to experiment with how the blog looks to its consumers.
Headless Hashnode is a purpose-built CMS that helps users build personal or corporate blogs so they can play around with their domain using Hashnode's WYSIWYG editor, AI, and SEO optimization tools without worrying about content and analytics tracking while hosting.
Start
Prerequisites:
- An account on DigitalOcean
- An account on Hashnode.
Using DigitalOcean Droplets
DigitalOcean Droplets are simple, scalable, and reliable virtual machines that can be easily deployed in less than a minute.
To get started, go to your DigitalOcean control panel and click the green «Create» button in the top right of the page. From the drop-down menu, select «Droplets,» which will also be the first option.

In the next window, you will need to specify your preferences for region, image and size, and other details. It is strongly recommended to choose the region closest to your potential readers, even if the data center is already selected for you.
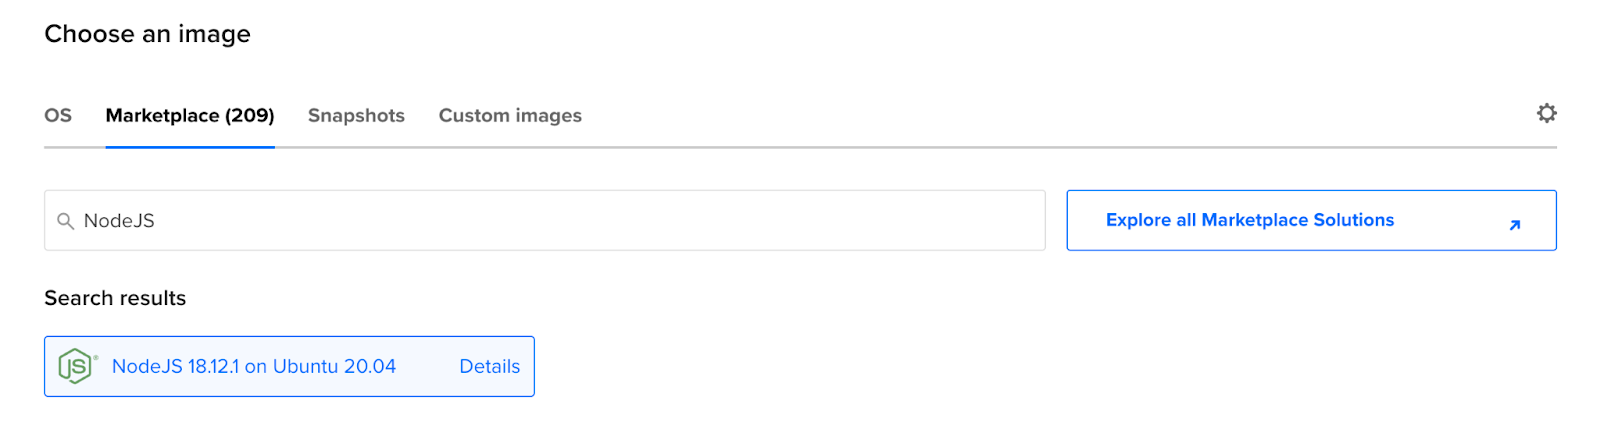
In the next option that reads «Images,» go to the Marketplace tab and search for NodeJS on Ubuntu. DigitalOcean’s Marketplace features a collection of ready-to-deploy tools and resources called 1-Click Apps. Instead of manually downloading all the dependencies, you can go to the Marketplace and run a 1-Click App that comes with pre-configured images and settings and all the packages and dependencies you need for your project. Your screen should look like this:
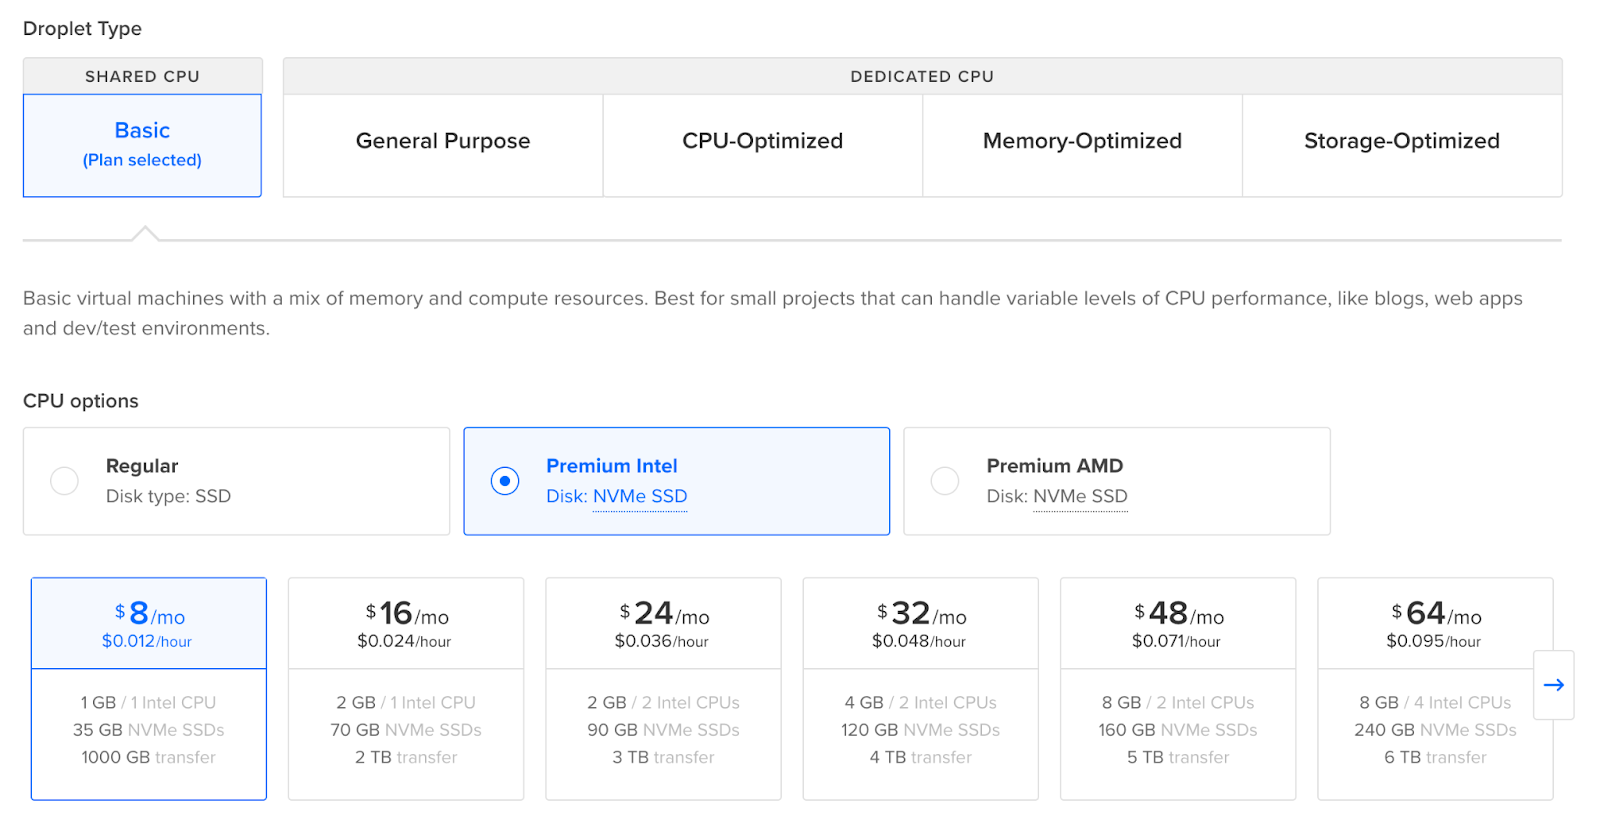
In the next window, you can choose the size of the droplet. Choose the best one for you or your company, considering the number of blogs you plan to post in the future. Ideally, if you want to run this implementation at a production level, we recommend using at least a 25 GB SSD hard drive. We recommend choosing a premium droplet for faster performance, which supports Intel, AMD processors, and NVMe SSDs. You can choose a premium droplet based on your needs, just like a standard droplet.
Once done, you need to choose an authentication method. You can log in to your Droplet via SSH key or password. For this tutorial, we’ll go with a password, so add whatever string you choose and make a note of it. For the next section, you can add enhanced metrics monitoring and alerting at no cost by checking the box next to the option, and you’re all set. Make sure you add a simpler Hostname for your Droplet and look at all the details before clicking “Create Droplet.”.

It takes about a minute to provision a Droplet. Once you're done, click the "Get Started" link to get an overview of the Marketplace app and see what's included.
Droplet setup
To launch your Droplet, accept incoming connections and redirect them to the application in your local terminal:
ssh root@YOUR-DROPLET-IP«Replace "YOUR-DROPLET-IP" with the IP address of your Droplet in the control panel. Enter the password when prompted.
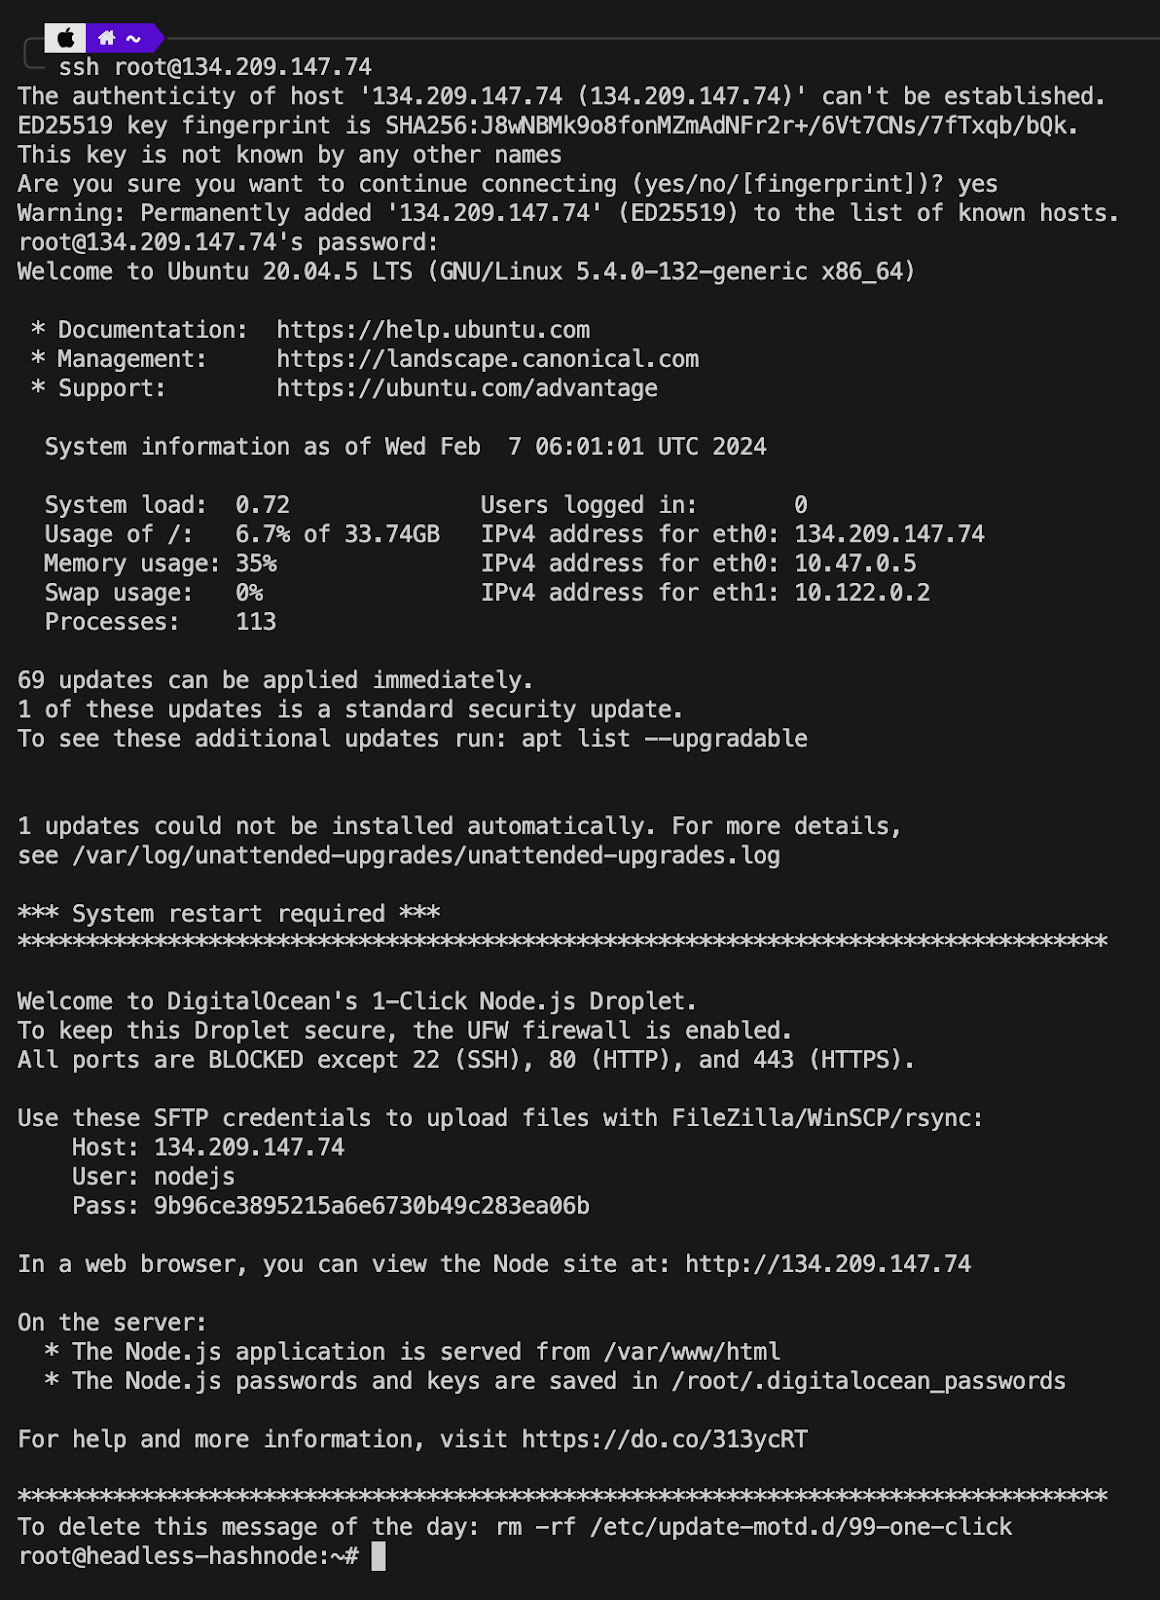
The next step is to update and upgrade the packages in the Droplet, and for that, run the following commands:
sudo apt update && sudo apt upgrade -y
curl -fsSL https://get.pnpm.io/install.sh | sh - to install pnpm.
To remove the default page shown in the Droplet and occupying port 3000, use the following commands.
cd /var/www
rm -r html
cd ~
cd /etc/nginx/sites-enabled/
rm -r default
If the changes don't reflect within 5 minutes, you may need to power down your Droplet and power it back up. If this happens, you'll need to SSH into your Droplet again in your local terminal. For the next steps, we'll use Node.js, npm, and Nginx, which are already installed on the Droplet. Nginx is the tool that handles all the routing to our Next.js application.
Nginx configuration
Create a new Nginx configuration file using the following command:
sudo nano /etc/nginx/sites-available/hashnode
Paste the following configuration, replacing server_name with your Droplet IP address:
server {
listen 80;
server_name YOUR_IP_ADDRESS;
location / {
proxy_pass http://localhost:3000;
proxy_http_version 1.1;
proxy_set_header Upgrade $http_upgrade;
proxy_set_header Connection 'upgrade';
proxy_set_header Host $host;
proxy_cache_bypass $http_upgrade;
}
}
Once done, save and close the file. Now we need to create a symbolic link to enable the settings using the following:
sudo ln -s /etc/nginx/sites-available/hashnode /etc/nginx/sites-enabled/To test your Nginx configuration for syntax errors, you can run the following:
sudo nginx -tThe ideal output should be like this:

Now we are ready to restart Nginx and we can do so using the command:
sudo service nginx restartHeadless Hashnode Installation
Go to the directory on the right:
cd /var/wwwClone the Headless Hashnode Github repository:
git clone https://github.com/hashnode/starter-kitChoose a template and navigate to its directory. In this tutorial, we will use the Personal theme:
cd starter-kit/packages/blog-starter-kit/themes/personalCopy the environment variables file:
cp .env.example .env.localThen edit the environment variables file:
nano .env.localYou need to change the environment variables to point to your Hashnode account. Change NEXT_PUBLIC_HASHNODE_PUBLICATION_HOST to your endpoint and NEXT_PUBLIC_MODE to production. The file will look like this:

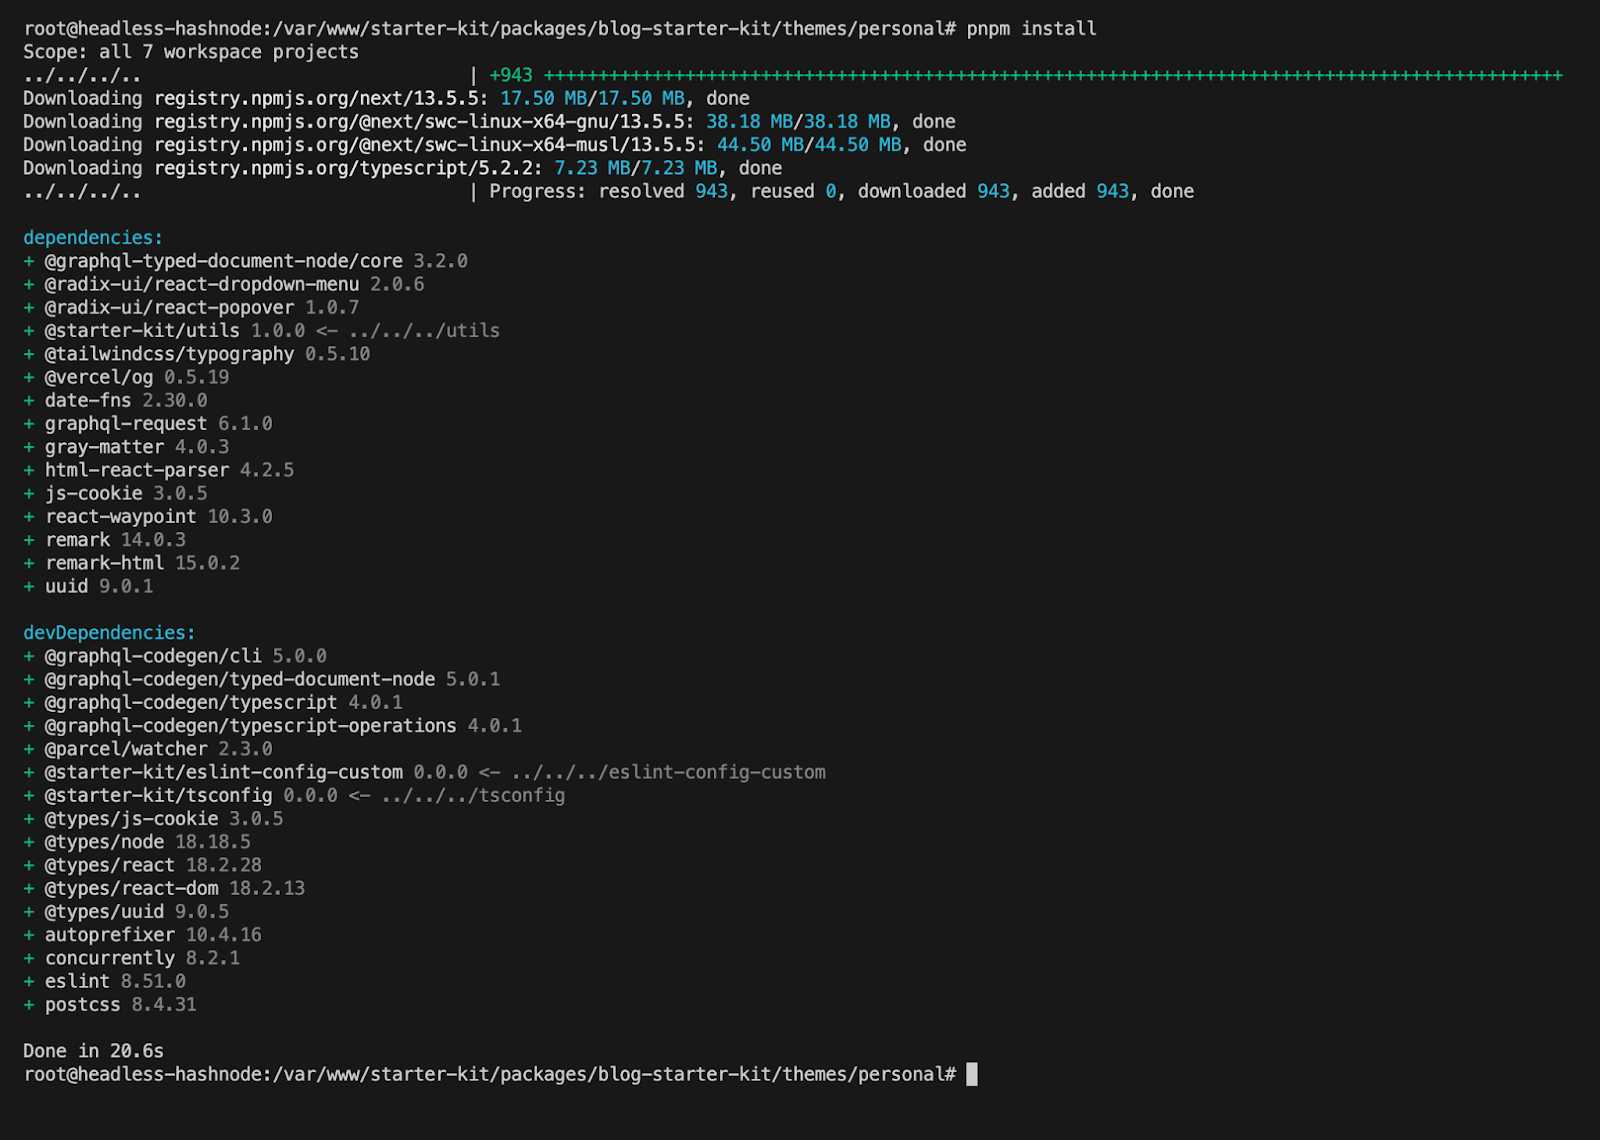
To install the dependencies, run the following:
pnpm installYour screen should look like the following:
With everything in place, you can now run the following command to deploy Headless Hashnode to your Droplet. Note that the compilation will take a minute. Your terminal should look something like this:
pnpm dev
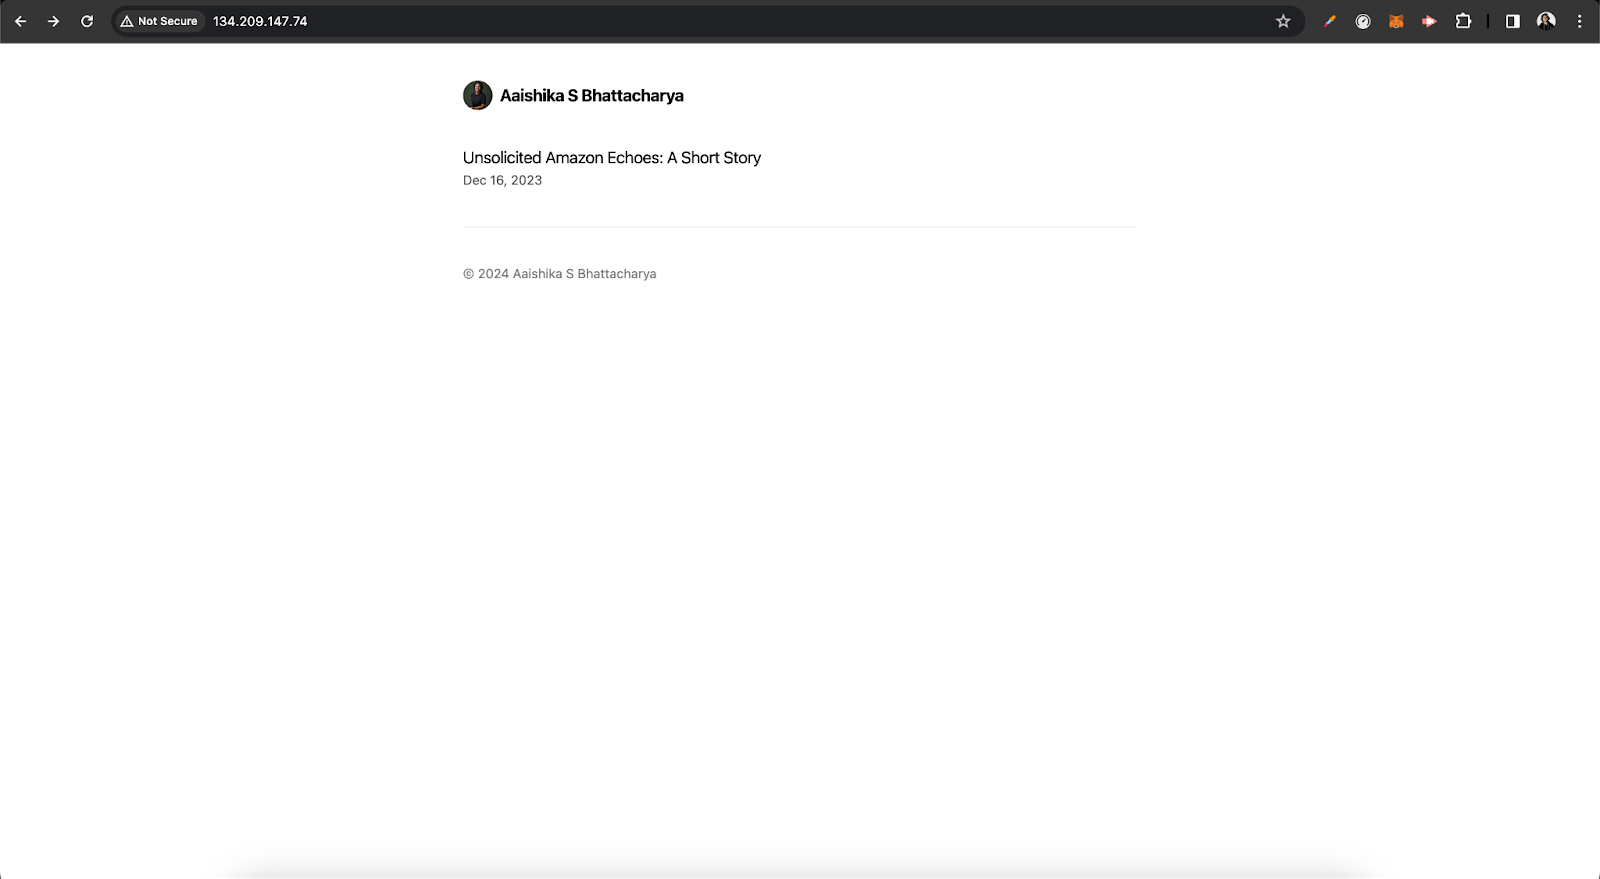
Once compiled, you can visit your Droplet IP address to see your Headless Hashnode site up and running!
With this, we have deployed Hashnode headless on a DigitalOcean Droplet using a reverse proxy provided by Nginx!
Setting up a PM2 process manager
Sometimes, the run command we are running may stop because the server has been restarted or needs to install an update. We will use the PM2 tool to ensure that our application is always running. PM2 will restart even if the application crashes.
With the Node.js Marketplace Image, PM2 is pre-installed. To ensure that your application always runs using PM2:
cd /var/www/starter-kit
pm2 start npm --name "hashnode" --start
To ensure PM2 starts at boot, run the following commands. This will create a script that you can copy and paste into your terminal to start PM2 at boot and save those settings.
pm2 startup
pm2 save
Result
Headless CMS tools are great for customizing user interfaces, and Hashnode facilitates a highly scalable and flexible tool. To improve the security and SEO of your blog, consider setting up SSL certificates using Let's Encrypt and implementing HTTPS connections. If you want to add your own domain name, remember to configure your DNS settings. Point your domain's A record to your Droplet IP address so you can access the application using your domain name. Sign up for an account today. We can't wait to see your blogs with DigitalOcean!