


How to install Linux, Apache, MySQL, PHP (LAMP) on Ubuntu 16.04
Introduction
LAMP is a collection of open source software that is usually installed together to enable a server to host dynamic websites and web applications. The term stands for Lamp Operating System. Linux It is powered by Apache web server. Site data is stored in MySQL database and dynamic content is processed by PHP.
In this guide, we will install a LAMP stack on an Ubuntu 16.04 server. Ubuntu will fulfill our first requirement: a Linux operating system.
Prerequisites
Before you begin with this guide, you'll need to set up a separate, non-root user account with sudo privileges on your server. You can learn how to do this by completing steps 1 through 4 in our initial server setup for Ubuntu 16.04 tutorial.
Step 1 – Install Apache and Configure Firewall
The Apache web server is one of the most popular web servers in the world. It is well documented and has been widely used throughout much of the web's history, making it a great default choice for website hosting.
We can install Apache easily using Ubuntu package manager. The package manager allows us to install most of the software without any hassle from the repository maintained by Ubuntu. You can learn more about how to use apt here.
For the result, we can start by typing these commands:
sudo apt-get update  $
sudo apt-get install apache2  $
Since we are using the sudo command, this operation will be performed with root privileges. You will be asked for your regular user password to confirm your intention.
Once you enter your password, apt will tell you which packages it plans to install and how much additional disk space they will take up. To continue, type y and press ENTER and the installation will proceed.
Setting Global ServerName to suppress syntax warnings
Next, we'll add a line to the /etc/apache2/apache2.conf file to suppress a warning message. While harmless, if you don't set ServerName globally, you'll get the following warning when checking your Apache configuration for syntax errors:
sudo apache2ctl configtest $Output
AH00558: apache2: Could not reliably determine the server’s fully qualified domain name, using 127.0.1.1. Set the ‘ServerName’ directive globally to suppress this message
Syntax OKOpen the main configuration file by editing its text:
sudo nano /etc/apache2/apache2.conf $Inside, at the bottom of the file, add the ServerName directive, which points to your main domain name. If you don't have a domain name associated with your server, you can use the public IP address of your server:
Note: If you don't know your server's IP address, go to the How to Find Your Server's Public IP Address section to find it.
Save and close the file when you are finished.
Next, check for syntax errors by typing:
sudo nano apache2ctl configtest $Since we added the global ServerName directive, all you should see is this:
Output
Syntax OK
Restart Apache to implement your changes:
sudo nano systemctl restart apache2 $Now you can start configuring the firewall.
Configure the firewall to allow web traffic
Next, assuming you followed the initial server setup instructions to enable the UFW firewall, make sure your firewall allows HTTP and HTTPS traffic. You can make sure that UFW has an application profile for Apache like this:
sudo nano ufw app list $Output
Available applications:
Apache
Apache Full
Apache Secure
OpenSSHIf you look at the full Apache profile, it should show that it is enabling traffic on ports 80 and 443:
$  sudo ufw app info “Apache Full”


Output
Profile: Apache Full
Title: Web Server (HTTP,HTTPS)
Description: Apache v2 is the next generation of the omnipresent Apache web
server.

Ports:
۸۰,۴۴۳/tcp
Allow inbound traffic for this profile:
$ sudo ufw allow in “Apache Full”You can do a quick check to make sure everything went according to plan by visiting your server's public IP address in your web browser (if you don't have this information, see the note under the next heading to find out what your public IP address was before):
http://your_server_IP_addressYou will see the default Ubuntu 16.04 Apache web page, which is there for informational and testing purposes. It should look something like this:
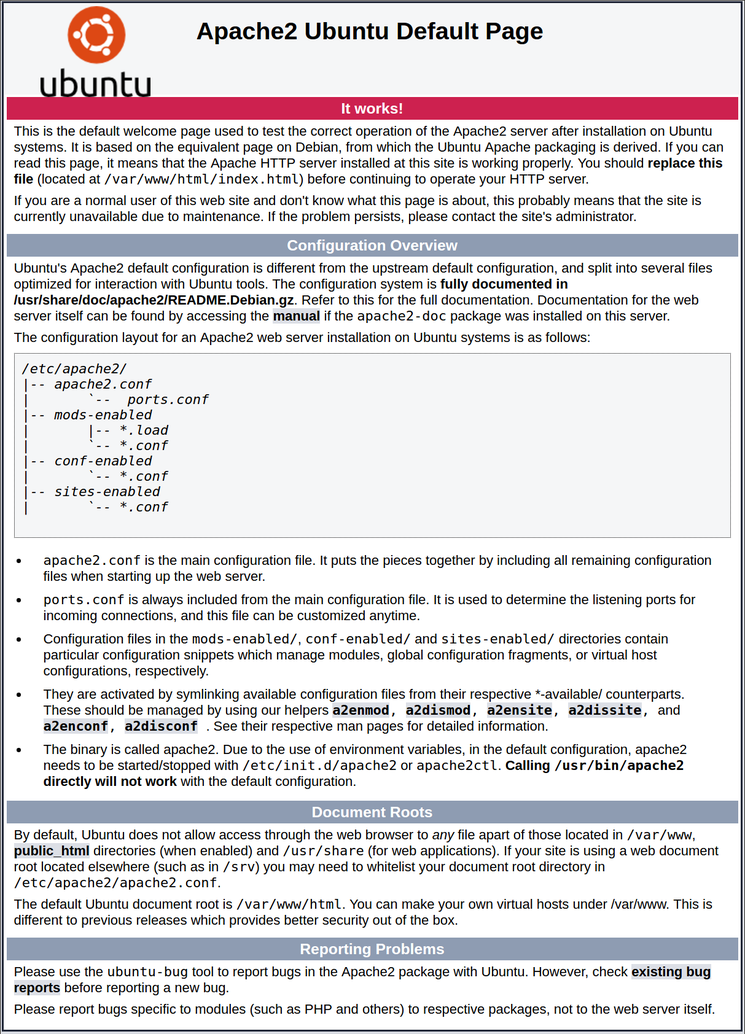
If you see this page, your web server is now properly installed and accessible through your firewall.
Finding your server's public IP address
If you don't know what your server's public IP address is, there are a few ways you can find it. Typically, this is the address you use to connect to your server via SSH.
From the command line, you can find this in a few ways. First, you can use the iproute2 tool to get your address by typing:
$ ip addr show eth0 | grep inet | awk ‘{ print $2; }’ | sed ‘s/\/.*$//’This will give you two or three lines. They are all valid addresses, but your computer may only be able to use one of them, so try each one.
An alternative method is to use the curl tool to contact an external party to tell them how they see your server. You can do this by asking a specific server for your IP address:
Regardless of the method you use to get your IP address, you can type it into your web browser's address bar to access your server.
Step 2 – Install MySQL
Now that we have our web server set up, it's time to install MySQL. MySQL is a database management system. Basically, it allows databases to store, organize, and access information.
Once again, we can use apt to get and install our software. This time, we'll also install some other helper packages that will help us communicate our components with each other:
$ sudo apt-get install mysql-serverNote: In this case, you don't need to run sudo apt-get update before the command. This is because we just ran it in the above commands to install Apache. The package list on our computer should already be up to date.
Again, you will be shown a list of packages that will be installed, along with the amount of disk space they will take up. Enter Y to continue.
During installation, your server will ask you to choose and confirm a password for the MySQL “root” user. This is an administrative account in MySQL that has elevated privileges. Think of it as similar to the root account for the server itself (although the account you are configuring now is a special MySQL account). Make sure this is a strong and unique password and do not leave it blank.
Once the installation is complete, we want to run a simple security script that removes some dangerous defaults and slightly locks down access to our database system. Start the interactive script by running the following:
$ mysql_secure_installationYou will be prompted to enter the password you set for the MySQL root account. Next, you will be asked if you want to configure the VALIDATE PASSWORD PLUGIN.
Warning: Enabling this feature is a bit like a judgment call. When enabled, passwords that do not meet the specified criteria will be rejected by MySQL with an error. This can cause problems if you use a weak password in conjunction with software that automatically configures MySQL credentials, such as the Ubuntu packages for phpMyAdmin. Disabling validation is safe, but you should always use strong, unique passwords for database authentication.
Answer y for yes or anything else without activating.
VALIDATE PASSWORD PLUGIN can be used to test passwords
and improve security. It checks the strength of password
and allows the users to set only those passwords which are
secure enough. Would you like to setup VALIDATE PASSWORD plugin?

Press y|Y for Yes, any other key for No:
You will be asked to select a password validation level. Keep in mind that if you enter 2 for the strongest level, you will receive an error when trying to set a password that does not contain numbers, uppercase and lowercase letters, special characters, or is based on common dictionary words.
There are three levels of password validation policy:

LOW Length >= 8
MEDIUM Length >= 8, numeric, mixed case, and special characters
STRONG Length >= 8, numeric, mixed case, special characters and dictionary               file

Please enter 0 = LOW, 1 = MEDIUM and 2 = STRONG: 1
If you have password verification enabled, a strong password will be displayed for the existing root password and you will be asked if you want to change it. If you are happy with your current password, enter n for “no” at the prompt:
For the rest of the questions, you should press Y and press Enter at each prompt. This will remove some anonymous users and the test database, disable remote root login, and load these new rules so that MySQL immediately honors the changes we made.
At this point, your database system is now up and running and we can continue.
Step 3 – Installing PHP
PHP is the part of our setup that processes code to display dynamic content. It can execute scripts, connect to MySQL databases to retrieve information, and deliver the processed content to our web server for display.
We can once again use the apt system to install our components. We are also going to add some helper packages so that the PHP code can run on the Apache server and talk to our MySQL database:
$ sudo apt-get install php libapache2-mod-php php-mcrypt php-mysqlThis should install PHP without any problems. We'll test this in a moment.
In most cases, we want to change the way Apache serves files when a directory is requested. Currently, if a user requests a directory from the server, Apache first looks for a file called index.html. We want to tell our web server to prefer PHP files, so we first have Apache look for an index.php file.
To do this, type this command to open the dir.conf file in a text editor with root privileges:
$ sudo nano /etc/apache2/mods-enabled/dir.confIt will look like this:
We want to move the PHP directory file highlighted above to the first position after the DirectoryIndex specification, like this:
When you're done, save the file and close it by pressing Ctrl-X. You'll need to save it by typing Y and then pressing Enter to confirm where to save the file.
After this, we need to restart the Apache web server for our changes to be recognized. You can do this by typing this:
$ sudo systemctl restart apache2We can also check the status of the apache2 service using systemctl:
$ sudo systemctl status apache2Sample Output
● apache2.service – LSB: Apache2 web server
Loaded: loaded (/etc/init.d/apache2; bad; vendor preset: enabled)
Drop-In: /lib/systemd/system/apache2.service.d
└─apache2-systemd.conf
Active: active (running) since Wed 2016-04-13 14:28:43 EDT; 45s ago
Docs: man:systemd-sysv-generator(8)
Process: 13581 ExecStop=/etc/init.d/apache2 stop (code=exited, status=0/SUCCESS)
Process: 13605 ExecStart=/etc/init.d/apache2 start (code=exited, status=0/SUCCESS)
Tasks: 6 (limit: 512)
CGroup: /system.slice/apache2.service
├─۱۳۶۲۳ /usr/sbin/apache2 -k start
├─۱۳۶۲۶ /usr/sbin/apache2 -k start
├─۱۳۶۲۷ /usr/sbin/apache2 -k start
├─۱۳۶۲۸ /usr/sbin/apache2 -k start
├─۱۳۶۲۹ /usr/sbin/apache2 -k start
└─۱۳۶۳۰ /usr/sbin/apache2 -k start
Apr 13 14:28:42 ubuntu-16-lamp systemd[1]: Stopped LSB: Apache2 web server.
Apr 13 14:28:42 ubuntu-16-lamp systemd[1]: Starting LSB: Apache2 web server…
Apr 13 14:28:42 ubuntu-16-lamp apache2[13605]: * Starting Apache httpd web server apache2
Apr 13 14:28:42 ubuntu-16-lamp apache2[13605]: AH00558: apache2: Could not reliably determine the server’s fully qualified domain name, using 127.0.1.1. Set the ‘ServerNam
Apr 13 14:28:43 ubuntu-16-lamp apache2[13605]: *
Apr 13 14:28:43 ubuntu-16-lamp systemd[1]: Started LSB: Apache2 web server.Install PHP modules
To increase PHP performance, we can optionally install additional modules.
To see the available options for PHP modules and libraries, you can enter the search results for apt-cache into less, a pager that allows you to scroll through the output of other commands:
$ apt-cache search php- | lessUse the arrow keys to move up and down and q to exit.
The results are all the optional components you can install. It gives you a brief description for each:
libnet-libidn-perl – Perl bindings for GNU Libidn
php-all-dev – package depending on all supported PHP development packages
php-cgi – server-side, HTML-embedded scripting language (CGI binary) (default)
php-cli – command-line interpreter for the PHP scripting language (default)
php-common – Common files for PHP packages
php-curl – CURL module for PHP [default]
php-dev – Files for PHP module development (default)
php-gd – GD module for PHP [default]
php-gmp – GMP module for PHP [default]
…
:
To get more information about what each module does, you can search the internet or you can look at the long package description by typing:
$ apt-cache show package_nameThere will be a lot of output, with a field called Description-en that provides a longer explanation of the module's functionality.
For example, to find out what the php-cli module does, we can type this:
$ apt-cache show php-cliAlong with a wealth of other information, you'll find something like this:
Output
…
Description-en: command-line interpreter for the PHP scripting language (default)
This package provides the /usr/bin/php command interpreter, useful for
testing PHP scripts from a shell or performing general shell scripting tasks.
.
PHP (recursive acronym for PHP: Hypertext Preprocessor) is a widely-used
open source general-purpose scripting language that is especially suited
for web development and can be embedded into HTML.
.
This package is a dependency package, which depends on Debian’s default
PHP version (currently 7.0).
…
If, after research, you decide that you want to install a package, you can do so using the apt-get install command, just as we would for our other software.
If we decide that php-cli is what we need, we can type:
$ sudo apt-get install php-cliIf you want to install more than one module, you can do so by listing each one, separated by a space, followed by the apt-get install command, like this:
$ sudo apt-get install package1 package2 …At this point, your LAMP framework is installed and configured. We still need to test our PHP.
Step 4 – Test PHP processing on your web server
To test that our system is properly configured for PHP, we can create a very basic PHP script.
We'll call this script info.php. In order for Apache to find the file and serve it correctly, it needs to be stored in a very specific folder called the web root.
In Ubuntu 16.04, this directory is located at /var/www/html/. We can create the file in that location by typing:
$ sudo nano /var/www/html/info.phpThis will open a blank file. We want to put the following text, which is valid PHP code, inside the file:
When you're done, save and close the file.
Now we can test whether our web server can properly display the content generated by the PHP script. To test this, we just need to visit this page in our web browser. You will again need the public IP address of your server.
The address you want to visit will be:
http://your_server_IP_address/info.phpThe page you come to should look something like this:
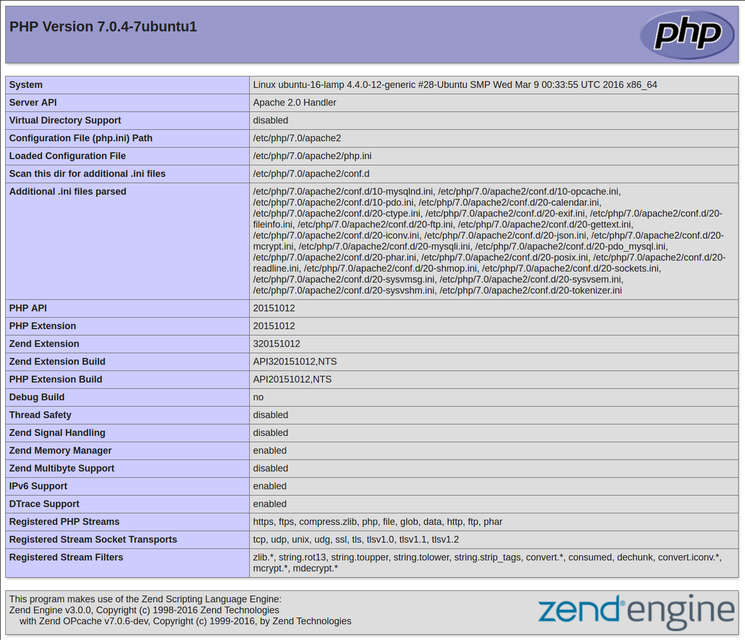
The page you come to should look something like this:
This page basically gives you information about your server from a PHP perspective. It is useful for debugging and ensuring that your settings are being applied correctly.
If this was successful, your PHP will work as expected.
You'll probably want to delete this file after this experiment because it could actually give away information about your server to unauthorized users. To do this, you can type:
$ sudo rm /var/www/html/info.phpYou can always recreate this page if you need to access the information again.


2 comments
Thanks very nice blog!
If someone needs an expert view regarding running a blog then I advise him/her
to pay a quick visit to this webpage, keep up the nice job.