TensorFlow
TensorFlow It is a machine learning and deep learning library published by Google, and Google has used this library in various places to provide its users with a better user experience. One example is when you start a search and Google automatically completes your text.

Three groups of people use machine learning: 1. Researchers 2. Data scientists 3. Programmers To meet the needs of these people, the Google Brain team has created the TensorFlow library. TensorFlow can run on different CPUs and GPUs and can be used with different languages such as C++, Python or Java. TensorFlow can be used on servers and even on mobile phones.
History of TensorFlow
As the volume of data increased, deep learning began to overtake deep learning algorithms, and Google came to the conclusion that it could enhance its services with these deep neural networks and began building a framework called TensorFlow that could help developers and researchers work together on AI models simultaneously.
When the project was sufficiently developed and scalable, it was released publicly in 2015. However, the stable version was not released until 2017.
The important feature of TensorFlow is that it is open source and licensed by Apache, so you can easily use it, edit it, and publish your own distribution. You can even earn money from it without having to pay Google. .
TensorFlow Architecture
The TensorFlow architecture has three parts: 1. Data preprocessing 2. Model building 3. Model training and estimation. The reason for this naming is TensorFlow because it receives multidimensional arrays as input, whose names are tensor And then you can run a series of graphs of operations on your data, which are flowchart Yes.
Where is it performed?
There are two phases to using this library:
Development phase: There is a time when you train the model, and this phase is usually done on your laptop or system.
Implementation phase: Once the training is complete, you can run your model anywhere, from desktops to servers and even mobile phones.
So training and running the model can be done on different machines.
In addition to using CPUs, you can also run TensorFlow on GPUs.
In matrix calculations, because the same operator is performed on a large amount of information, this type of calculation is compatible with the structure of GPUs, as discovered by Stanford researchers in late 2010.
Another point is that this library is written in C++, so it is very fast. Of course, you can use it with other languages, such as Python.
An important feature of TensorFlow is TensorBoard, which allows you to see what TensorFlow is doing.
TensorFlow components
Tensor
A tensor is an array of N-dimensional matrices that can represent various types of information. Each value in the tensor holds information of the same shape.
Tensors can be the input or output of a calculation.
Graph
In TensorFlow, all operations are performed within a graph. Each graph is a collection of computations that are performed sequentially. Each computation is known as an op node, which is connected to each other.
Now why the graph?
- Can run on different systems.
- The graph can be saved for later use.
- All calculations in the graph are performed by connecting tensors together.
- In short, in graphs, each edge is a value (tensor) and each node is an operator (such as addition).
Why is TensorFlow famous?
TensorFlow is the best because it is built for everyone to use and uses APIs that can be used at different scales with deep learning architectures such as RNN, CNN. Because it is based on graph computing, it has the ability to visualize neural networks inside TensorBoard, which is very useful for debugging. And overall, TensorFlow is built for scalability during deployment.
The good news is that it has the largest community among the various deep learning frameworks on GitHub.
How many algorithms are supported by TensorFlow?
- Linear Regression: tf.estimator.LinearRegressor
- Classification: tf.estimator.LinearClassifier
- Deep classification: tf.estimator.DNNClassifier
- Deep learning wipe and deep: tf.estimator.DNNLinearCombinedClassifier
- Booster tree regression: tf.estimator.BoostedTreesRegressor
- Boosted tree classification: tf.estimator.BoostedTreesClassifier
A few simple examples
- 12import numpy as np
- import tensorflow as tf
In the two lines above, we import the numpy and tensorflow libraries.
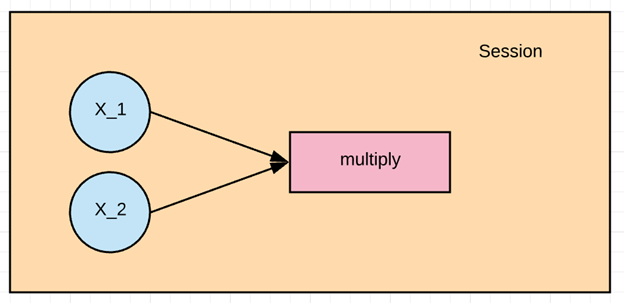
In this example, we want to multiply X_1 and X_2. First, we need to create the graph and then run a TensorFlow session to calculate the result.
Let's get started.
Step 1: Define the variable
The first step is to create the input nodes X_1, X_2. In TensorFlow, we need to specify what type of node we are going to create, here we select the placeholder type.
placeholder:
This type assigns a new value to the tensor every time we perform a calculation.
- X_1 = tf.placeholder(tf.float32, name = “X_1”)
- X_2 = tf.placeholder(tf.float32, name = “X_2”)
As you can see, we entered the type of this node as float and its name as variable name.
Step 2: Define the calculation
- 1multiply = tf.multiply(X_1, X_2, name = “multiply”)
With the line above, we are creating a vertex that acts as the operator of the multiplication operator.
Which is the input of the vertices that we want to multiply and we named it multiply.
So now we've created our first graph.
Step 3: Execute the operation
To execute the operation, we need to create a session. This session is created using tf.Session() and executed when we use run.
When we are going to run the multiplication, we need to give the input the values of the tensors x1 and x2. This is done by assigning feed_dict. In this example, the values 1 to 3 are assigned to x1 and 4 to 6 to x2. And we print the result.
- X_1 = tf.placeholder(tf.float32, name = “X_1”)
- X_2 = tf.placeholder(tf.float32, name = “X_2”)
- 1multiply = tf.multiply(X_1, X_2, name = “multiply”)
- with tf.Session() as session:
- result = session.run(multiply, feed_dict={X_1:[1,2,3], X_2:[4,5,6]})
- print(result)
- [ 4. 10. 18.]
Different ways to import data into TensorFlow
Well, one of the first steps before training the model is to import data, which has two modes:
- Entering data into RAM: There is a simple way to enter data into a memory array, for example, by writing a line of code in Python.
- Using TensorFlow Data Pipeline: TensorFlow has a set of APIs that help you take in data, perform a series of operations on it, and then feed it to your algorithm. This method is very effective, especially when the data is very large. For example, images are huge and do not fit in RAM. Here, the data pipeline takes care of your RAM management.
The question now is which one to use.
If your data is less than 10 GB, you can easily use the first method, for example, a famous library for this is pandas. Otherwise, for example, if you have 30 GB of data and your RAM is 12 GB, you naturally cannot use this method and you should go to the pipeline API. The pipeline batches the data and each batch is entered into the pipeline and used to learn the model. Using the pipeline allows you to use parallel processing. This means that TensorFlow can train the model on several different CPUs at the same time.
In short, if your data is small, load it completely into RAM, for example with pandas. Otherwise, or if you want to use multiple CPUs, use the TensorFlow pipeline.
Creating a pipeline in TensorFlow
Step 1) Create data
We generate two random numbers with the numpy library.
- 123import numpy as np
- x_input = np.random.sample((1,2))
- print(x_input)
- 1[[0.8835775 0.23766977]]
Step 2) Create a placeholder
In this step, we create a placeholder named X as an array with two members of type float.
- using a placeholder #
- x = tf.placeholder(tf.float32, shape=[1,2], name = 'X')
Step 3: Create the dataset
At this point, we need to define the dataset into which we will place the placeholder value x.
- 1tf.data.Dataset.from_tensor_slices
- 1dataset = tf.data.Dataset.from_tensor_slices(x)
Step 4: Build the pipeline
In this step we need to initialize the pipeline, the first step is to create an iterator that will iterate over the data. With the get_next method we get the next value, in this example there is a batch that has only two values.
- 12iterator = dataset.make_initializable_iterator()
- get_next = iterator.get_next()
Step 5: Run the calculation
In the final step, we run a session whose input is an iterator and input values created by numpy, and for each, we print its value.
- with tf.Session() as session:
- # feed the placeholder with data
- sess.run(iterator.initializer, feed_dict={ x: x_input })
- print(sess.run(get_next))
- 1[0.8835775 0.23766978]
Summary
TensorFlow is the most famous deep learning library that you can use to build any deep learning framework. Google Brain developed this project to bridge the gap between research teams and development teams and Google uses it in almost all its projects. One of the main reasons to use TensorFlow is the ease of scalability during deployment. TensorFlow can be used from powerful servers to Android and iOS phones.
TensorFlow works in a session, where each session is defined by a graph with different calculations.
As a simple example in TensorFlow, multiplication is as follows:
1. Variable definition
- X_1 = tf.placeholder(tf.float32, name = “X_1”)
- X_2 = tf.placeholder(tf.float32, name = “X_2”)
2. Definition of calculation
- 1multiply = tf.multiply(X_1, X_2, name = “multiply”)
3. Execution of operations
- with tf.Session() as session:
- result = session.run(multiply, feed_dict={X_1:[1,2,3], X_2:[4,5,6]})
- print(result)
A common practice in TensorFlow is to create a pipeline to load data into RAM, which is done with the following steps:
1. Data creation
- import numpy as np
- x_input = np.random.sample((1,2))
- print(x_input)
2. Create a placeholder
- 1x = tf.placeholder(tf.float32, shape=[1,2], name = 'X')
3. Definition of the dataset method
- 1dataset = tf.data.Dataset.from_tensor_slices(x)
4. Pipeline construction
- 1iterator = dataset.make_initializable_iterator() get_next = iteraror.get_next()
5. Program execution
- with tf.Session() as session:
- sess.run(iterator.initializer, feed_dict={ x: x_input })
- print(sess.run(get_next))