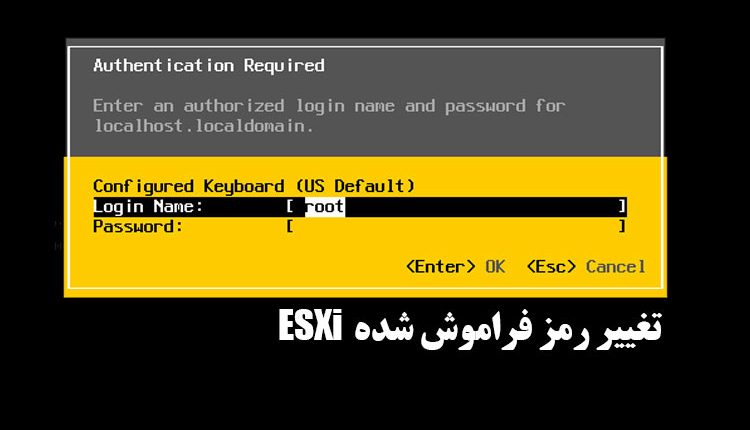
How to recover a forgotten root password in ESXi 7.x and ESXi 8.x
If you forget the root password for ESXi, VMware recommends that you reinstall ESXi. In small environments that do not have automated rollouts and central profiles, you will need to configure everything manually. Alternatively, you can use an unofficial method to reset the password. If you are managing ESXi through vCenter, you can reset the password using a privileged account in vCenter. Also, having the ESXi host as a member of an AD domain can be a big help. If these options are not available, you cannot reset the password of a standalone host because the system stores the password hash in an encrypted configuration file that cannot be decrypted without root access. For this reason, the old method of booting the host from Linux and directly editing the configuration file no longer works after ESXi 6.x.
Alternative solution using virtual hosting
The method here involves setting up a second (virtual) host and transferring the key from the main host to it. This allows you to extract the configuration and change the password hash in the SQLite database. To do this, you need to mount the boot media of both the physical and virtual hosts externally, as you cannot overwrite the configuration file while the system is running and the system will reject the changes on the next boot. A Linux system is suitable for accessing the ESXi configuration; using a live CD is the easiest way.
Installing a virtual ESXi
To edit the ESXi configuration of a physical host, you need another ESXi host with the exact same version for which you have not forgotten the password.
Create a new virtual machine, select Other as the guest operating system, and select the ESXi version you want to install.
Then go to the Customize Settings page, in the Virtual Hardware => CPU section, enable the Expose hardware-assisted virtualization to the guest OS option.
Finally, mount the ESXi installation ISO file as a DVD drive and enable the Connect at power on option. You must first upload this file to the ESXi host via Storage => Datastore Browser => Upload.
Taking a backup of state.tgz
The next step is to backup the state.tgz file on the physical host. This file stores persistent configuration data that the host needs to restore its state on the next boot.
This file contains the hash of the forgotten password and the key used to encrypt the local.tgz file inside it.
If you booted the host from USB (not recommended by VMware), disconnect it and connect it to a Windows computer. If the host boots from the internal disk, boot it into a Linux environment via the external drive and mount partition 6, which is formatted FAT, to /mnt, for example:
mount /dev/sdb6 /mnt
Then the file /mnt/bootbank/state.tgz to a local disk (if writable) or to a network drive using standard Linux tools such as SCP-1811 Or ftp Copy. It is also recommended to make a backup copy of this file.
Copy state.tgz to virtual ESXi
Next, copy the backup file to the directory /tmp Migrate the virtual ESXi host, for example with SCP-1811. If the file is on a Windows computer, the command might look like this:
scp "C:\temp\state.tgz" [email protected]:/tmp/state.tgzسپس به دایرکتوری /tmp در هاست هدف بروید و فایل state.tgz را استخراج کنید:
tar -zxvf state.tgzوارد کردن کلید به state.tgz در ESXi مجازی
در مرحله بعد، فایل state.tgz مربوط به هاست مجازی را کپی، رمزگشایی و ویرایش میکنید تا کلید هاست فیزیکی را در آن جای دهید. برای این کار دستورات زیر را در shell هاست مجازی وارد کنید:
cp /bootbank/state.tgz /tmp/state.tgz
cd /tmp
tar -xzf state.tgz
rm state.tgz
vmtar -x local.tgz -o local.tar
tar -xf local.tar
rm local.tar
cp /tmp/encryption.info etc/vmware/
vmtar -c local.tar etc/vmware -o local.tgz
mv local.tgz state-mod.tgz
این دستورات فایل state.tgz رمزگذاری شده هاست مجازی را استخراج، رمزگشایی و بسته تنظیمات محلی (local.tgz) اصلاحشده ایجاد میکنند.

ویرایش فایل پیکربندی در هاست هدف
بعد، فایل /tmp/state-mod.tgz را به کامپیوتر خود کپی کنید:
scp [email protected]:/tmp/state-mod.tgz "C:\temp\state-mod.tgz"سپس هاست مجازی را خاموش کنید تا بتوانید درایو VMDK آن را آزاد کنید.
مونت کردن VMDK هاست هدف در یک VM لینوکس
اکنون فایل VMDK این VM را به یک VM لینوکس متصل کنید و آن را روشن کنید. در ترمینال سیستم مهمان دستور
fdisk -lباید دو پارتیشن bootbank شماره 5 و 6 را نمایش دهد.

انتقال state-mod.tgz به VM لینوکس و جایگزینی state.tgz
برای انتقال فایل state-mod.tgz که قبلاً ساختید، از کامپیوتر ویندوز (مسیر C:\temp) به ماشین لینوکس (دایرکتوری /home/thomas) با آدرس IP 10.0.7.140، میتوانید از دستور زیر در ترمینال یا پاورشل ویندوز استفاده کنید:
توضیحات:
scpابزار امن کپی فایل بین سیستمها است.[email protected]یعنی نام کاربریthomasروی ماشین لینوکس با آدرس IP مذکور./home/thomas/state-mod.tgzمسیر مقصد فایل در لینوکس است.
بعد از اجرای این دستور، سیستم از شما پسورد کاربر thomas را میپرسد و پس از وارد کردن آن، انتقال فایل آغاز میشود.
اگر در ویندوز از ترمینال معمولی استفاده میکنید و دستور scp شناسایی نمیشود، باید OpenSSH Client را نصب یا از ابزارهایی مانند PuTTY (pscp) استفاده کنید.
اگر خواستید میتوانم راهنمای استفاده از این ابزارها هم برایتان بنویسم.
scp "C:\temp\state-mod.tgz" [email protected]:/home/thomas/state-mod.tgzسپس پارتیشنهای bootbank را مانت کرده و فایل state.tgz را با state-mod.tgz جایگزین کنید:
sudo su
mkdir -p /bootbank1
mkdir -p /bootbank2
mount /dev/sdc5 /bootbank1
mount /dev/sdc6 /bootbank2
cp /home/thomas/state-mod.tgz /bootbank1/state.tgz
cp /home/thomas/state-mod.tgz /bootbank2/state.tgz
umount /bootbank1
umount /bootbank2
سپس فایل VMDK را از VM لینوکس جدا کرده و هاست مجازی را دوباره راهاندازی کنید. حالا پیکربندی با کلید رمزگشایی شده هاست فیزیکی بارگذاری میشود.
در این مرحله، فایل state.tgz هاست فیزیکی که قبلاً کپی کردهاید را به دایرکتوری /tmp هاست مجازی منتقل کنید.
سپس فایل local.tgz.ve داخل آن را رمزگشایی کنید:
cd /tmp
cp /bootbank/state.tgz ./
tar -xzf state.tgz
rm state.tgz
vmtar -x local.tgz.ve -o local.tgz
جایگزینی هش پسورد در پایگاه داده پیکربندی ESXi
اکنون کار اصلی یعنی جایگزینی هش پسورد را انجام دهید. ابتدا فایل local.tgz را استخراج کنید:
tar -zxvf local.tgzپس از استخراج، سه دایرکتوری .ssh، etc/ و var/ در /tmp خواهید داشت. پایگاه داده پیکربندی مربوطه در مسیر زیر است:
/tmp/var/lib/vmware/configstore/backup/current-store-1در این دیتابیس باید هش پسورد root فراموش شده را با هش جدیدی که میدانید جایگزین کنید. چون فایل یک پایگاه داده SQLite است، میتوانید با ابزار sqlite3 آن را ویرایش کنید. هش کنونی پسورد root را میتوانید با دستور زیر ببینید:
/usr/lib/vmware/sqlite/bin/sqlite3 /tmp/var/lib/vmware/configstore/backup/current-store-1 "select * from config where Component='esx' and ConfigGroup = 'authentication' and Name = 'user_accounts' and Identifier = 'root'"
برای تولید هش جدید، میتوانید از دستور زیر استفاده کنید:
openssl passwd -6یا از یک ژنراتور آنلاین استفاده کنید.
سپس هش جدید را به صورت زیر وارد دیتابیس کنید:
/usr/lib/vmware/sqlite/bin/sqlite3 /tmp/var/lib/vmware/configstore/backup/current-store-1 "update config set UserValue='"name":"root","password_hash":"$6$s6ic82Ik$ER28x38x.1umtnQ99Hx9z0ZBOHBEuPYneedI1ekK2cwe/jIpjDcBNUHWHw0LwuRYJWhL3L2ORX3I5wFxKmyki1","description":"Administrator"' where Component='esx' and ConfigGroup = 'authentication' and Name = 'user_accounts' and Identifier = 'root'"
بازسازی state.tgz برای هاست فیزیکی
بعد از جایگزینی هش پسورد، باید فایل state.tgz را دوباره از اجزای اصلی که در /tmp استخراج کردهاید، بازسازی کنید. فایل جدید شامل دیتابیس اصلاح شده خواهد بود:
vmtar -c etc .ssh var -o local.tgz
vmtar -c local.tgz -o local.tgz.ve
tar -czf state-recover.tgz local.tgz.ve
فایل state-recover.tgz را باید به VM لینوکس منتقل کنید. اگر ESXi روی یک USB نصب شده، میتوانید به سادگی آن را در VM لینوکس مانت کنید. اما اگر ESXi به صورت عادی از دیسک بوت میشود، هاست را از USB با توزیع لینوکسی مثل Ubuntu بوت کنید.
سپس همانند مرحله 5، پارتیشنها را مانت کنید و فایل state.tgz را با state-recover.tgz جایگزین کنید:
sudo su
mkdir -p /bootbank1
mkdir -p /bootbank2
mount /dev/sdb5 /bootbank1
mount /dev/sdb6 /bootbank2
cp /root/state-recover.tgz /bootbank1/state.tgz
cp /root/state-recover.tgz /bootbank2/state.tgz
umount /bootbank1
umount /bootbank2
وقتی هاست فیزیکی با این پیکربندی جدید بوت شود، باید بتوانید دوباره با کاربر root وارد شوید.
نکته: اگر پسورد root هاست ESXi را فراموش کنید و نتوانید از طریق vCenter یا اکانت AD ریست کنید، تنها گزینه رسمی، نصب مجدد است. اما یک روش غیررسمی وجود دارد که با استفاده از هاست دوم، پیکربندی هاست اول را ویرایش میکند.