
Introduction
In this tutorial, I will walk you through the process of installing Dify, an open source LLMOps platform, on a Linux server (Ubuntu, Debian, or CentOS). I will also set up automatic backups using Restic and S3-compatible object storage (e.g. Cloudflare R2). By the end of this tutorial, you will have a fully functional Dify instance running on your server with regular backups.
Dify is a powerful tool that allows you to create, deploy, and manage AI applications. The platform provides a simple user interface for building AI applications without the need for extensive coding knowledge, and integrates various AI models and services.
This setup gives you a robust environment for developing and running AI applications.
Prerequisites
Before you begin, you will need the following:
- A Linux server (Ubuntu, Debian, or CentOS) and access to a user with sudo permissions.
- A domain name that points to your server's IP address.
- An SSL certificate for your domain (e.g. through Cloudflare).
To generate an SSL certificate with Cloudflare, first sign up and:
- Purchase a domain or point your existing domain to Cloudflare name servers.
- Generate the SSL certificate by selecting your domain and going to SSL/TLS » Origin Server » Create Certificate.
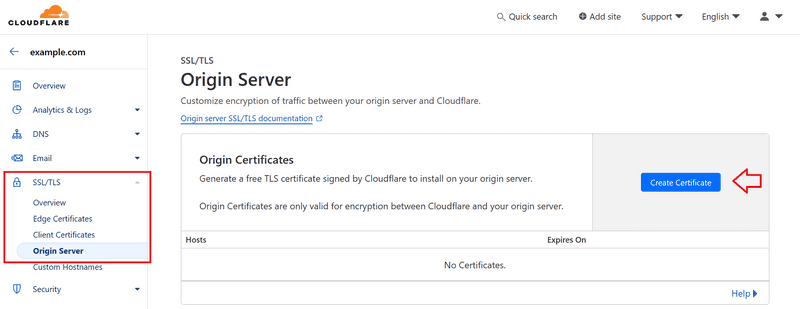
Cloudflare SSL Certificate
We will use Ubuntu as the example operating system, but the steps will be similar for Debian and CentOS.
Step 1 – Preparing the Server
First, we'll update the system, install Docker and Docker Compose, and set up Git. This command will do all of that for us:
sudo apt update -y && \
sudo apt upgrade -y && \
sudo apt-get install -y apt-transport-https ca-certificates curl software-properties-common gnupg lsb-release && \
curl -fsSL https://download.docker.com/linux/ubuntu/gpg | sudo gpg --dearmor -o /usr/share/keyrings/docker-archive-keyring.gpg && \
echo "deb [arch=$(dpkg --print-architecture) signed-by=/usr/share/keyrings/docker-archive-keyring.gpg] https://download.docker.com/linux/ubuntu $(lsb_release -cs) stable" | sudo tee /etc/apt/sources.list.d/docker.list > /dev/null && \
sudo apt-get update -y && \
sudo apt-get install -y docker-ce && \
sudo usermod -aG docker $USER && \
sudo curl -L https://github.com/docker/compose/releases/download/v2.26.1/docker-compose-`uname -s`-`uname -m` -o /usr/local/bin/docker-compose && \
sudo chmod +x /usr/local/bin/docker-compose && \
sudo apt install git -y
This command performs the following actions:
- Updates the system package list and updates installed packages.
- Installs the required dependencies.
- Adds the GPG key and the official Docker repository.
- Installs Docker and Docker Compose.
- Adds your user to the Docker group.
- Installs Git.
To check, you can run the following command:
docker --version && docker compose version && git version
You may need to log out and log back in for the groups to update.
Step 2 – Clone the Dify repository
Now we clone the Dify repository:
cd ~ && git clone https://github.com/langgenius/dify.git
This command will download the Dify source code to your server.
Step 3 – Configure Dify
Next, we set up the configuration file:
cd ~/dify/docker
cp .env.example .env
nano .env
These commands:
- Redirects to the Dify Docker directory.
- Create a copy of the sample environment file.
- Open the new .env file in the nano text editor.
In the .env file, set the following variables according to your needs:
- Updating domain variables:
APP_WEB_URL=your_domain_name
NGINX_HTTPS_ENABLED=true- Update certificate variables:
- If you are using your own certificate, you can keep the default values and add the relevant key files in the next step.
- If you are using a Cloudflare certificate, update the values of the certificate variables as follows:
- Update certificate variables:
NGINX_SSL_CERT_FILENAME=cert.pem
NGINX_SSL_CERT_KEY_FILENAME=key.pem- Update other variables:
Also check the other variables in the .env file and adjust them according to your needs.
After making changes, press Ctrl+S to save the file and press Ctrl+X to exit the nano editor.
Step 4 – Set up SSL certificates
Now we will add the SSL certificate.
If you are using your own certificate, you can include it in the dify.crt and dify.key files.
If you are using a Cloudflare certificate, you need to include it in the cert.pem and key.pem files.
Personal certificate
Create two new files:
nano ~/dify/docker/nginx/ssl/dify.crt
nano ~/dify/docker/nginx/ssl/dify.key
Copy and paste your certificate and key into these files. Then save and exit the editor (Ctrl+S, Ctrl+X).
Cloudflare Certificate
Add the Cloudflare certificate like this:
nano ~/dify/docker/nginx/ssl/cert.pem
nano ~/dify/docker/nginx/ssl/key.pem
Copy the contents of the Cloudflare certificate into these files. Then save and exit the editor (Ctrl+S, Ctrl+X).
Step 5 – Deploy Dify
Now we are ready to deploy Dify:
cd ~/dify/docker docker
compose up -d
This command starts all the containers needed by Dify. The -d option runs the containers in detached mode (in the background).
After a minute or so, you should be able to see your Dify instance by visiting your domain in a browser.
To check the status of the containers, you can run the following command:
docker ps -aStep 6 – Set up automatic backups
After deploying Dify, let's set up automated backups using Restic and S3-compatible object storage (e.g. Cloudflare R2). First, we need to switch to the root user:
sudo su
cd ~
Step 6.1 – Installing Restic
The above commands will take us to the root directory. Now, let's install Restic:
sudo apt update
sudo apt install restic
Step 6.2 – Prepare S3-compatible bucket
If you haven't created your bucket yet, create a new bucket from your provider or an R2 bucket in your Cloudflare account. Note the following information:
- Bucket name
- ID access key
- Secret access key
- Endpoint URL
Step 6.3 – Create a backup script
We create a new directory and set up the backup script:
mkdir -p /root/restic
nano /root/restic/backup.sh
Copy and paste the following content into the file:
#!/bin/bash
# Set environment variables for Restic
export RESTIC_REPOSITORY="s3:YOUR_S3_ENDPOINT_URL/YOUR_BUCKET_NAME"
export AWS_ACCESS_KEY_ID="YOUR_ACCESS_KEY_ID"
export AWS_SECRET_ACCESS_KEY="YOUR_SECRET_ACCESS_KEY"
export RESTIC_PASSWORD_FILE="/etc/restic-password"
# Set the backup source
# Replace "YOUR_USER" with the user that installed Dify
BACKUP_SOURCE="/home/YOUR_USER/dify/docker/volumes"
# Perform the backup
restic backup $BACKUP_SOURCE
# Prune old snapshots (keep last 7 daily, last 4 weekly, and last 12 monthly backups)
restic forget --keep-daily 7 --keep-weekly 4 --keep-monthly 12 --prune
# Check the repository for errors
restic check
Replace the initial values with the actual information from your S3 bucket and replace “YOUR_USER” with the user who installed Dify. Then save the file and exit the editor (Ctrl+S, Ctrl+X).
Step 6.4 – Setting up the Restic repository
We set the environment variables and start the repository:
export RESTIC_REPOSITORY="s3:YOUR_S3_ENDPOINT_URL/YOUR_BUCKET_NAME"
export AWS_ACCESS_KEY_ID="YOUR_ACCESS_KEY_ID"
export AWS_SECRET_ACCESS_KEY="YOUR_SECRET_ACCESS_KEY"
restic init
We store the password in a new file for the cronjob:
echo "YOUR_PASSWORD" > /etc/restic-password
chmod 600 /etc/restic-password
Step 6.5 – Set up daily backups
Open the cron file and add the following line at the end of the file:
crontab -e 0 3 * * * /root/restic/backup.sh > /root/restic/backup.log 2>&1This command sets a daily backup at 3 a.m. Save the file and exit the editor.
Step 7 – Check the settings
To ensure the settings are correct:
- Run the backup script manually:
/root/restic/backup.sh- Visit the Restic repository to check out the photos:
restic snapshotsStep 8 – Future Dify Updates
To update Dify in the future, run these commands:
cd ~/dify/docker
docker compose down
git pull origin main
docker compose pull
docker compose up -d
These commands stop current containers, load new changes, download updated images, and start new containers.
Result
Congratulations! You have successfully installed Dify on your Linux server, set up SSL certificates, and configured automatic backups. Now your Dify instance is ready to use, and daily backups ensure the safety of your data.