Introduction
Consul by HashiCorp is a versatile tool that performs multiple functions in a modern DevOps environment. It is widely used for service discovery, health checks, load balancing, and, most notably, as a distributed key-value (KV) store. The KV store in Consul is suitable for storing dynamic configuration data, feature flags, secrets, and metadata in a fully available and consistent manner across your infrastructure, so that it can be dynamically accessed by services in a distributed system. Using Docker to configure Consul’s KV store allows for rapid deployment and isolated environments, making it ideal for testing and development.
This tutorial will guide you through the process of setting up and configuring a KV Consul store using Docker. By the end, you will have a fully functional Docker console instance with KV pairs configured and available. This setup is essential for dynamic service configuration and state management in distributed systems.
Prerequisites
Before you begin, make sure you have the following:
- A DigitalOcean Cloud account.
- A server running Ubuntu and a non-root user with sudo privileges and an enabled firewall.
- Docker is installed on your Ubuntu droplet.
- Introduction to the Linux command line
- Basic knowledge of Docker commands and container management.
Step 1 – Pulling the Consul Docker Image
Let's grab the official console image from Docker Hub. This image is maintained by HashiCorp and includes everything you need to run the console.
Log in to your Ubuntu Droplet console and run:
docker pull hashicorp/consul:latest
Output
latest: Pulling from hashicorp/consul
c8bcd218a73d: Pull complete
5f1ac8227c2a: Pull complete
c51fd79d429a: Pull complete
91eff479bde6: Pull complete
4dfcc18e51db: Pull complete
3e2a8bf39bf9: Pull complete
bd9ddc54bea9: Pull complete
2054d291fb84: Pull complete
Digest: sha256:e244c64df77ab3586f177f1692e98575086eb40343dc82a6320f5e79543490eb
Status: Downloaded newer image for hashicorp/consul:latest
docker.io/hashicorp/consul:latest
Step 2 – Run Consul Container
Now that the console image is loaded, you can launch a new console container. This container will act as your console server and allow you to interact with the KV store.
To start the container, run:
docker run -d --name=consul-server -e
Output
CONSUL_BIND_INTERFACE=eth0 -p 8500:8500 -p 8600:8600/udp hashicorp/consul
c893b6707686bce8434213975a75c936b834cf25fc84d10b407a11c4fa8ca8ba
Here's what this command does:
- -d runs the container in detached mode (in the background).
- --name=consul-server assigns a name to the container.
- -e CONSUL_BIND_INTERFACE=eth0 Sets the network interface that the console should bind to. This is necessary for proper network communication.
- -p 8500:8500 maps the Consul web interface and API port to the host.
- -p 8600:8600/udp maps the DNS service port for service discovery.
This step is very important because it starts the Consul service, which you will use to configure the KV store.
Step 3 – Confirm console installation
To ensure that the console is working properly, you need to verify the container status and access the console interface.
First, run docker ps to list all running containers and check that the Consul container is running.
❯ docker ps
CONTAINER ID IMAGE COMMAND CREATED STATUS PORTS NAMES
c893b6707686 hashicorp/consul "docker-entrypoint.s…" 51 seconds ago Up 50 seconds 8300-8302/tcp, 8600/tcp, 8301-8302/udp, 0.0.0.0:8500->8500/tcp, 0.0.0.0:8600->8600/udp consul-server
Now, check if the console is available, open a web browser and go to http://localhost:8500. You should see the Consul interface.
This verification step is important to confirm that your console instance is running without any issues before saving data to the KV store (step 5).
Step 4 – Configure Firewall (Optional)
If your console instance requires external access (for example, from other nodes in a cluster), you must configure your firewall settings to allow traffic on the necessary ports.
For example, if you are running Consul on a cloud instance, you may need to allow inbound traffic to ports 8500 (HTTP API) and 8600 (DNS). The specific commands will vary based on your firewall solution (UFW, iptables, etc.).
This step ensures that your console instance is accessible from other machines, which is essential for distributed configurations.
Step 5 – Storing key-value pairs
With Consul running, you can now use the KV store to store configuration data. You can add key-value pairs using the Consul CLI or the web interface.
To store a key-value pair via CLI, run:
docker exec -it consul-server consul kv put config/db_host
192.168.1.100
Success! Data written to: config/db_host
docker exec -it consul-server consul kv put config/db_port 3306
Success! Data written to: config/db_portHere's what this command does:
- -it – Launches an interactive terminal from the local system to the container.
- consul kv put – The kv put command saves data to the given path.
- config/db_host – The path to store the value.
- 192.168.1.100 – value.
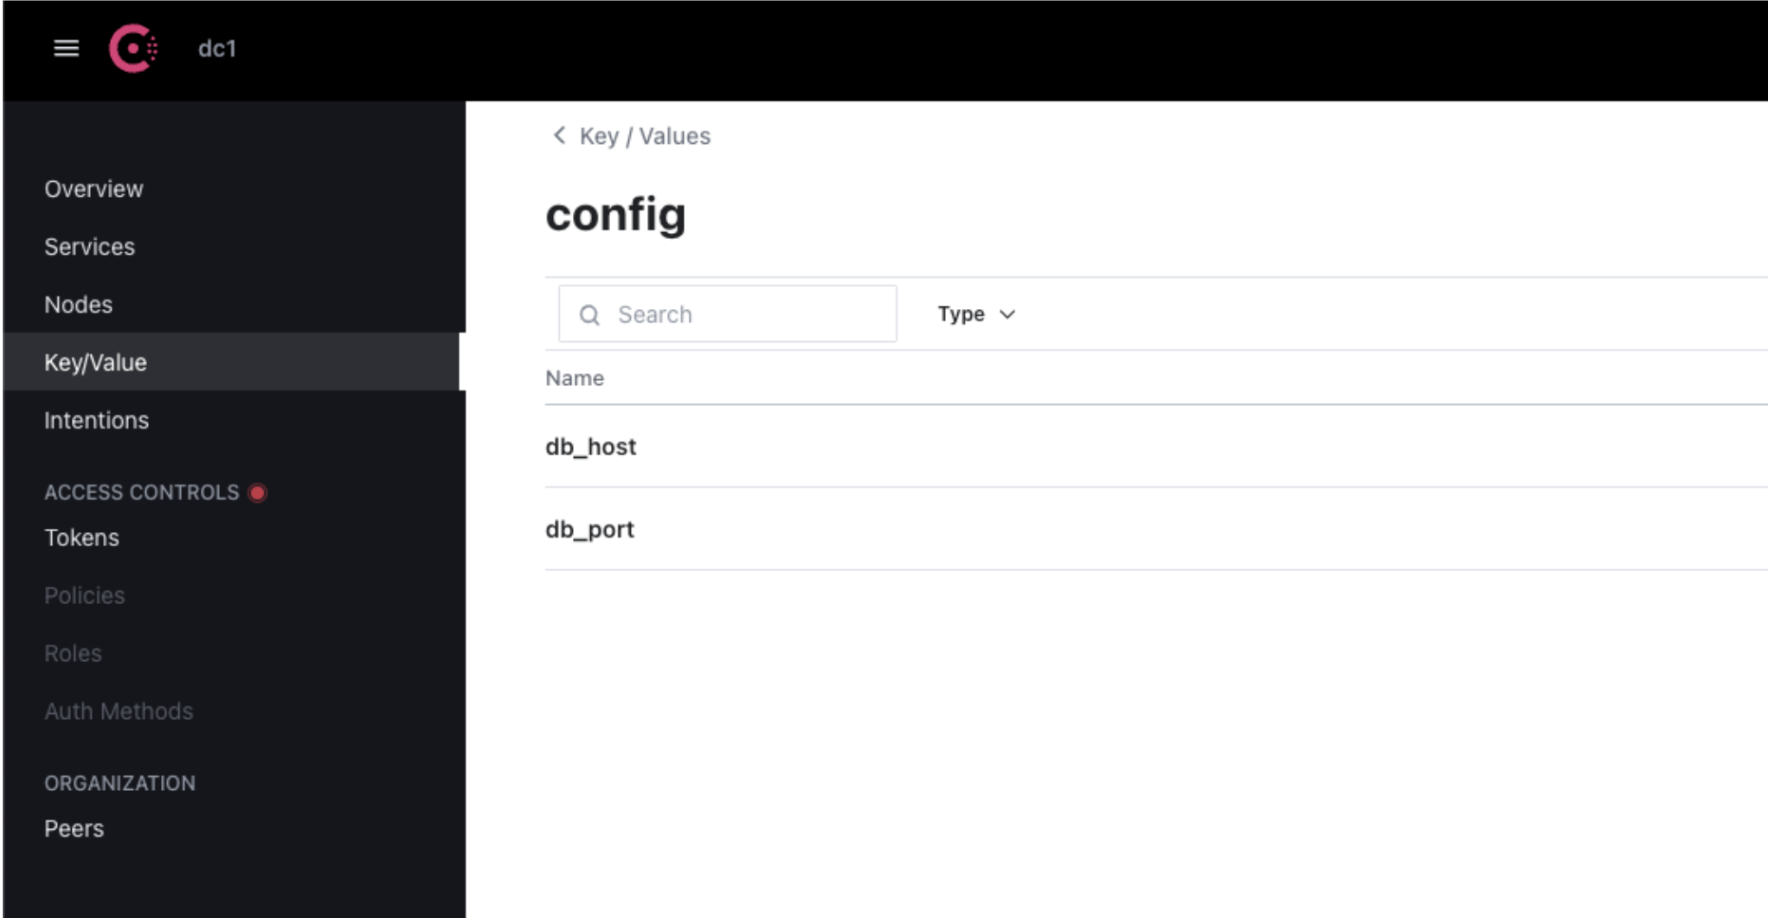
Using the web interface,
- Go to Consul UI (http://localhost:8500).
- Click on the “Key/Value” tab.
- Create a new key by clicking “Create”.
- Enter the key (for example, config/db_host) and value (for example, 192.168.1.100).
These commands and actions store critical configuration data that your services can access dynamically at runtime.
Step 6 – Retrieve key-value pairs
Once you have saved a few KV pairs, you will want to restore them to make sure they were saved correctly.
Using the CLI, retrieve a value using the following command:
docker exec -it consul-server consul kv get config/db_host
192.168.1.100
Using the web interface,
- Go to the "Key/Value" tab in the Consul UI.
- Find the key you created and click on it to see the stored value.
Restoring KV pairs is an essential step to verify that your data is properly stored and accessible.
Step 7 – Persistent data using Docker volumes
By default, Docker containers are ephemeral, meaning that any data stored inside them is lost if the container is deleted. To persist your Consul KV data, you need to use Docker volumes.
Stop and exit the current console container:
docker stop consul-server
docker rm consul-server
Now, check the containers and you will notice that the concealer is no longer working.
docker ps
CONTAINER ID IMAGE COMMAND CREATED STATUS PORTS NAMES
Attach a new console container with the Docker volume:
docker run -d --name=consul-server -e
Output
CONSUL_BIND_INTERFACE=eth0 -p 8500:8500 -p 8600:8600/udp -v consul_data:/consul/data hashicorp/consul
2d2a7d3ff1911c2283e70506d68391a5cbf9c935a2ae447bfb8fa21481989ef1
docker ps
Output
CONTAINER ID IMAGE COMMAND CREATED STATUS PORTS NAMES
2d2a7d3ff191 hashicorp/consul "docker-entrypoint.s…" 5 seconds ago Up 4 seconds 8300-8302/tcp, 8600/tcp, 8301-8302/udp, 0.0.0.0:8500->8500/tcp, 0.0.0.0:8600->8600/udp consul-server
The -v consul_data:/consul/data option mounts a Docker volume on the container and ensures that your KV storage is restarted across the container.
Step 8 – Automatically launch the console (optional)
For production deployments, you may want to automate the deployment of your Consul container using Docker Compose. Docker Compose simplifies multi-container Docker applications and makes it easy to manage services.
Create a docker-compose.yml file with the following content:
services:
consul:
image: hashicorp/consul:latest
environment:
- CONSUL_BIND_INTERFACE=eth0
volumes:
- consul_data:/consul/data
ports:
- "8500:8500"
- "8600:8600/udp"
restart: always
volumes:
consul_data:
Then run:
docker-compose up -d
Output
[+] Running 2/2
✔ Network work_default Created 0.0s
✔ Container consul-server Started 0.1s
docker ps
Output
WARN[0000] /Users/anandhkumar/work/docker-compose.yml: the attribute `version` is obsolete, it will be ignored, please remove it to avoid potential confusion
NAME IMAGE COMMAND SERVICE CREATED STATUS PORTS
work-consul-1 hashicorp/consul:latest "docker-entrypoint.s…" consul 40 seconds ago Up 11 seconds 8300-8302/tcp, 8600/tcp, 8301-8302/udp, 0.0.0.0:8500->8500/tcp, 0.0.0.0:8600->8600/udp
This command automatically starts Consul and ensures that it restarts in case of failure, making it more robust for production use.
Step 9 – Cleaning
After you're done with your console instance, you need to clean up your Docker environment to free up resources.
Let's stop and remove the console container:
docker stop consul-server
docker rm consul-server
docker ps
output
CONTAINER ID IMAGE COMMAND CREATED STATUS PORTS NAMESIf you're done with the console, you can also remove the Docker image:
docker rmi hashicorp/consul
output
hashicorp/consul@sha256:e244c64df77ab3586f177f1692e98575086eb40343dc82a6320f5e79543490eb
Deleted: sha256:eff8ccb509560987755a70df8d6c0b9410538d503d99498ae1ea9f48066b0439
Deleted: sha256:b5e6402bbb78eb061d538505a30300ef7f612104eaf0f11b17839a9b29bc5603
Deleted: sha256:1c61ada2ad8074615120d13bd805260d766ae8424cafbda4bded529d6a204d6f
Deleted: sha256:9b36da670e2a59f1d81c6e3c9d55906c576b384df51272977e5a9caea7131e74
Deleted: sha256:8c6e52c441c246f60ca146b71204b7d6511df75fa87a0dc0a0f91141964e8fd9
Deleted: sha256:1fce18208235de2be3c419764ec1d469229af5387447d21649c841632c653cef
Deleted: sha256:68e0a114c9c35b9aa8cac31fa32b27f886361bc85fcc63f34e882e9128f33a14
Deleted: sha256:3da5b888208a9b19694bfeaf8c74a432b50f44542d717c9e1f3ab273e505855a
Deleted: sha256:dea73e9287e6e2f3b7f9fcac4f20767d7badeefa24e52f990f1674e98abfa1a3
Deleted: sha256:201fa22d1f4c7d6e7ec43135c63b2260f303f4864f5eb43569faaa1731628799
Cleaning helps keep the development environment tidy and ensures that Docker resources are not consumed unnecessarily.
Result
In this tutorial, you learned how to set up and configure Consul's KV store using Docker. You covered installing Docker, running the Consul container, configuring the KV store, persisting data with Docker volumes, and cleaning up your environment. With these steps, you can now use Consul to dynamically manage configuration data across your distributed systems, leveraging the power of Docker for easy deployment and management.