Introduction
The LAMP stack is a group of open source software that is usually installed together to enable a server to host dynamic websites and web applications. The term stands for Linux operating system with Apache web server. The site data is stored in a MariaDB database and dynamic content is processed by PHP.
Although this software stack typically includes MySQL as the database management system, some Linux distributions – including Debian – use MariaDB as an alternative to MySQL.
In this guide, you will install a LAMP stack on a Debian 10 server using MariaDB as the database management system.
Prerequisites
To follow this tutorial, you will need a Debian 10 server with an active non-root sudo account and a basic firewall.
Step 1 – Install Apache and Update Firewall
The Apache web server is one of the most popular web servers in the world. It is well documented and has been widely used throughout much of the web's history, making it a great default choice for website hosting.
Start by updating the package manager cache. If this is your first time using sudo in this session, you will be prompted to provide your user password to verify that you have the appropriate privileges to manage system packages with apt:
sudo apt updateThen install Apache with the following command:
sudo apt install apache2This command will ask you to confirm the installation of Apache. Confirm by pressing Y and then ENTER. After the installation is complete, you will need to configure your firewall settings. Assuming you followed the initial server setup instructions to install and enable the UFW firewall, make sure your firewall allows HTTP and HTTPS traffic.
In Debian 10, UFW comes loaded with application profiles that you can use to configure your firewall settings. See the full list of application profiles by running:
sudo ufw app listWWW profiles are used to manage the ports used by web servers:
Output
Available applications:
. . .
WWW
WWW Cache
WWW Full
WWW Secure
. . .
If you check the WWW Full profile, it shows that it is enabling traffic on ports 80 and 443:
sudo ufw app info "WWW Full"Output
Profile: WWW Full
Title: Web Server (HTTP,HTTPS)
Description: Web Server (HTTP,HTTPS)
Ports:
80,443/tcpInbound HTTP and HTTPS traffic is allowed for this profile:
sudo ufw allow in "WWW Full"You can verify that everything went according to plan by visiting your server's public IP address in your web browser:
http://your_server_ipThis returns the default Debian 10 Apache web page, which is there for informational and testing purposes:
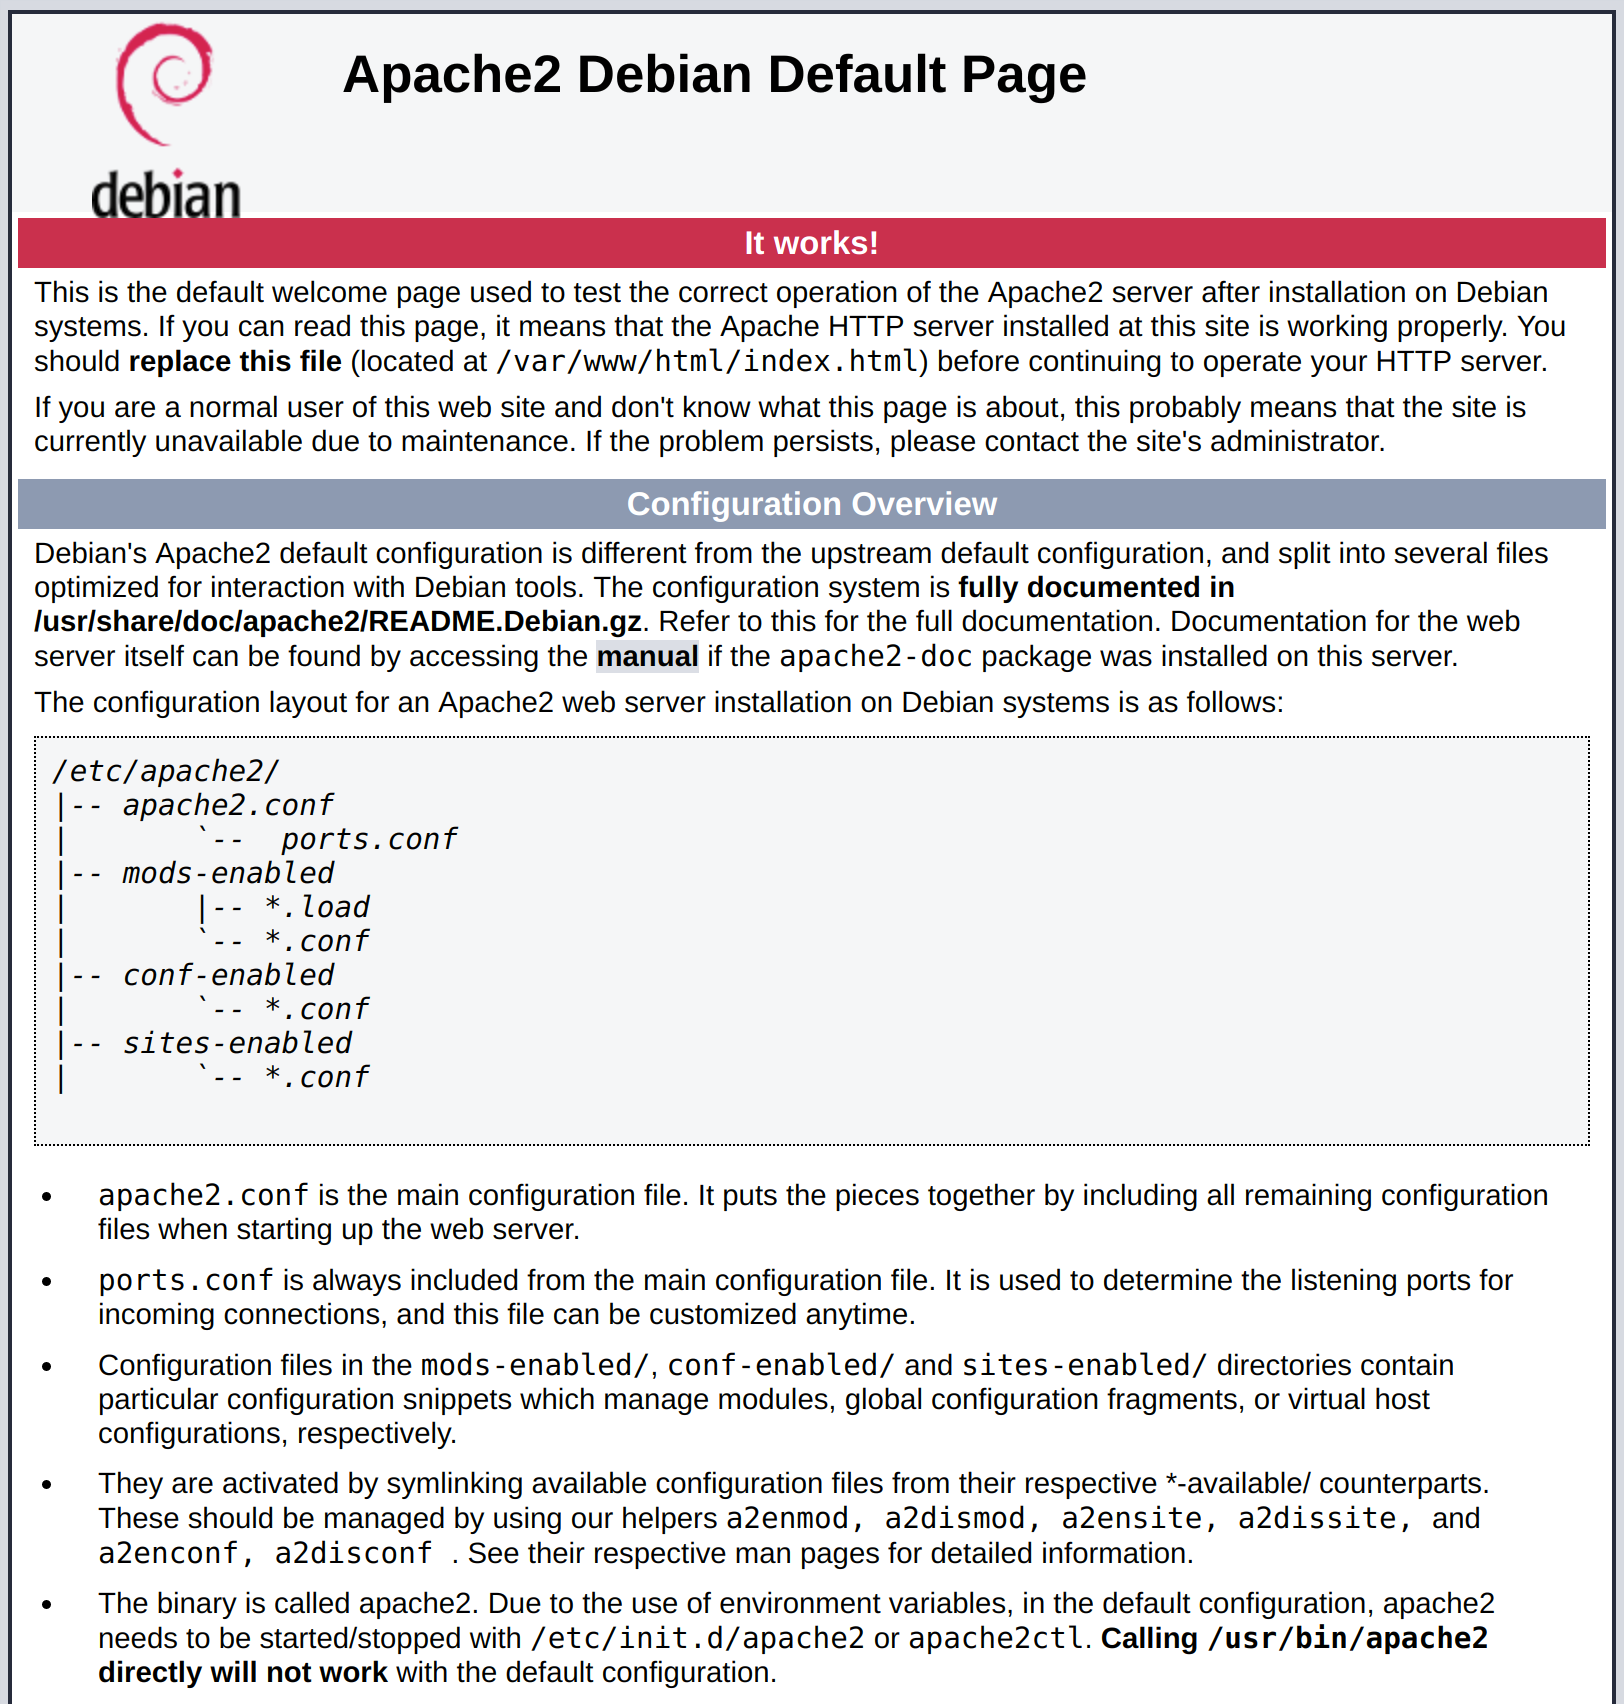
If your browser returns this page, your web server is now properly installed and accessible through your firewall.
How to find your server's public IP address
If you don't know what your server's public IP address is, there are a few ways you can find it. Typically, this is the address you use to connect to your server via SSH.
There are a few different ways to do this from the command line. First, you can use the iproute2 tool to get your IP address by running the following:
ip addr show eth0 | grep inet | awk '{ print $2; }' | sed 's/\/.*$//'This will go back two or three lines. They are all valid addresses, but your computer may only be able to use one of them, so try each one.
An alternative way to use the tool curl It is for contacting an external party to tell you how it sees your server. You can run the following command to ask a specific server what your IP address is:
Since Debian 10 has curl It is not default, you need to install it first:
sudo apt install curlThen run the following command to ask a specific server what your IP address is:
curl http://icanhazip.comRegardless of the method, type your IP address into your web browser to verify that your server is running the default Apache page.
Step 2 – Install MariaDB
Now that you have a web server, you need to install a database system so you can store and manage data for your site.
In Debian 10, the MySQL-server meta-package, traditionally used to install MySQL server, was replaced by default-MySQL-server. This meta-package references MariaDB, a fork of the original MySQL server by Oracle, and is now the default MySQL-compatible database server available in Debian-based package management repositories.
However, for long-term compatibility, it is recommended to install MariaDB using the actual application package, mariadb-server, instead of using the meta package.
To install MariaDB software, run:
sudo apt install mariadb-serverOnce the installation is complete, it is recommended to run a security script that comes pre-installed with MariaDB. This script will remove some insecure default settings and lock down access to your database system. Start the interactive script by running the following:
sudo mysql_secure_installationThis script will guide you through a series of commands where you can make changes to your MariaDB configuration. The first prompt will ask you to enter the current database root password. This should not be confused with the system root. The database root user is an administrative user with full privileges on the database system. Since you have recently installed MariaDB and have not yet made any configuration changes, this password will be blank, so press ENTER at the prompt.
The next prompt asks if you want to set a database root password. Since MariaDB uses a special authentication method for the root user that is usually more secure than using a password, you don't need to set one now. Press N and then ENTER.
From there, you can press Y and then ENTER to accept the defaults for all subsequent questions. This will remove anonymous users and the test database, disable remote root login, and load these new rules so that MariaDB immediately honors the changes you made.
When you are done, log in to the MariaDB console:
sudo mariadbThis will connect to the MariaDB server as the administrative database user root, which is inferred using sudo when running this command. You should get the following output:
Output
Welcome to the MariaDB monitor. Commands end with ; or \g.
Your MariaDB connection id is 42
Server version: 10.3.36-MariaDB-0+deb10u2 Debian 10
Copyright (c) 2000, 2018, Oracle, MariaDB Corporation Ab and others.
Type 'help;' or '\h' for help. Type '\c' to clear the current input statement.
MariaDB [(none)]>
Note that you do not need to provide a password to connect as the root user. This works because the default authentication method for the MariaDB administrative user is the unix_socket password instead. While this may seem like a security concern at first, it makes the database server more secure because the only users allowed to log in as the MariaDB root user are system users with sudo privileges, which can be done from the console or through a running application with the same privileges. In practical terms, this means that you cannot use the administrative database root user to connect from your PHP application.
For increased security, it's best to set up dedicated user accounts with less extensive privileges for each database, especially if you plan to host multiple databases on your server.
You can exit the MariaDB console with the following:
exitYour MariaDB server is now installed and secured. Next, you will install PHP, the final component in the LAMP stack.
Step 3 – Install PHP
You have Apache installed to serve your content and MariaDB to store and manage your data. PHP is part of your setup that processes the code to display dynamic content to the end user. It can execute scripts, connect to your MariaDB databases to retrieve information, and deliver the processed content to your web server for display.
In addition to the php package, you need php-mysql, a PHP module that allows PHP to communicate with MySQL-based databases such as MariaDEB. You also need libapache2-mod-php to enable Apache to handle PHP files. The core PHP packages are automatically installed as dependencies.
To install these packages, run the following command:
sudo apt install php libapache2-mod-php php-mysqlOnce the installation is complete, you can verify your PHP version with the following command:
php -vOutput
PHP 7.3.31-1~deb10u2 (cli) (built: Dec 15 2022 09:39:10) ( NTS )
Copyright (c) 1997-2018 The PHP Group
Zend Engine v3.3.31, Copyright (c) 1998-2018 Zend Technologies
with Zend OPcache v7.3.31-1~deb10u2, Copyright (c) 1999-2018, by Zend TechnologiesIn most cases, you will want to change the way Apache serves files. Currently, if a user requests a directory from the server, Apache first looks for a file called index.html. To instruct the web server to prioritize PHP files over others, you can configure Apache to first look for an index.php file.
To do this, run the following command to open the dir.conf file in your favorite text editor with root privileges. In this example, we'll use nano:
sudo nano /etc/apache2/mods-enabled/dir.confThe content will be as follows:
<IfModule mod_dir.c>
DirectoryIndex index.html index.cgi index.pl index.php index.xhtml index.htm
</IfModule>
Move the PHP directory file to the first position after the DirectoryIndex specification, as shown below:
<IfModule mod_dir.c>
DirectoryIndex index.php index.html index.cgi index.pl index.xhtml index.htm
</IfModule>
When you're done, save and close the file. If you're using nano, you can do this by pressing CTRL+X, then Y, and ENTER to confirm.
Now reload the Apache configuration:
sudo systemctl reload apache2You can check the status of the apache2 service with systemctl status:
sudo systemctl status apache2Sample Output
● apache2.service - The Apache HTTP Server
Loaded: loaded (/lib/systemd/system/apache2.service; enabled; vendor preset:
Active: active (running) since Fri 2023-01-20 22:21:24 UTC; 2min 12s ago
Docs: https://httpd.apache.org/docs/2.4/
Process: 13076 ExecStart=/usr/sbin/apachectl start (code=exited, status=0/SUCC
Process: 13097 ExecReload=/usr/sbin/apachectl graceful (code=exited, status=0/
Main PID: 13080 (apache2)
Tasks: 6 (limit: 4915)
Memory: 13.7M
CGroup: /system.slice/apache2.service
├─13080 /usr/sbin/apache2 -k start
├─13101 /usr/sbin/apache2 -k start
├─13102 /usr/sbin/apache2 -k start
├─13103 /usr/sbin/apache2 -k start
├─13104 /usr/sbin/apache2 -k start
└─13105 /usr/sbin/apache2 -k startAt this point, your LAMP stack is fully operational, but before you can test your setup with a PHP script, it's a good idea to set up a suitable Apache virtual host to hold your website files and folders. You'll set this up in the next step.
Step 4 – Create a virtual host for your website
When using the Apache web server, you can create virtual hosts (similar to server blocks in Nginx) to encapsulate configuration details and host more than one domain from a single server. In this section, you set up a domain called your_domain, but you should replace it with your domain name.
By default, Apache serves its content from the directory located at /var/www/html, using the configuration in /etc/apache2/sites-available/000-default.conf. Instead of changing the default website configuration file, you want to create a new virtual host to test your PHP environment. Virtual hosts allow you to host multiple websites on a single Apache server. You also create a directory structure in /var/www for your_domain , leaving /var/www/html as the default directory in case a client request doesn't match any other site.
Start by creating the root web directory for your_domain as follows:
sudo mkdir /var/www/your_domainNext, assign ownership of the directory with the environment variable $USER, which will refer to the current user on your system:
sudo chown -R $USER:$USER /var/www/your_domainNext, open a new configuration file in the Apache sites-available directory using your favorite text editor. Nano is used in the following example:
sudo nano /etc/apache2/sites-available/your_domain.confThis will create a new empty file. Add the following bare-bones configuration with your domain name:
<VirtualHost *:80>
ServerName your_domain
ServerAlias www.your_domain
ServerAdmin webmaster@localhost
DocumentRoot /var/www/your_domain
ErrorLog ${APACHE_LOG_DIR}/error.log
CustomLog ${APACHE_LOG_DIR}/access.log combined
</VirtualHost>
With this VirtualHost configuration, you are telling Apache to serve your_domain using /var/www/your_domain as the web root directory. If you want to test Apache without a domain name, you can remove or comment out the ServerName and ServerAlias options by adding a pound character (#) at the beginning of each option line.
When finished, save and close the file.
Now use a2ensite to activate this virtual host:
sudo a2ensite your_domainYou may want to disable the default website installed with Apache. This is necessary if you are not using a custom domain name, as in this case Apache will overwrite your virtual host's default settings. To disable the default Apache website, run:
sudo a2dissite 000-defaultTo ensure that your configuration file does not contain syntax errors, you can run:
sudo apache2ctl configtestFinally, reload Apache for these changes to take effect:
sudo systemctl reload apache2Next, you will create a PHP script to test that PHP is properly installed and configured on your server.
Step 5 – Test PHP processing on your web server
Now that you have a custom location to host your website files and folders, create a PHP test script to verify that Apache is able to handle and process requests for PHP files.
Start by creating a new file called info.php inside your custom web root folder:
nano /var/www/your_domain/info.phpThis will open a blank file. Add the following text, which is valid PHP code, to the file:
<?php
phpinfo();
When you're done, save and close the file.
To test the script, go to your web browser and access your server's domain name or IP address, then enter the name of the script, which in this case is info.php:
http://your_domain/info.phpHere is an example of a default PHP web page:
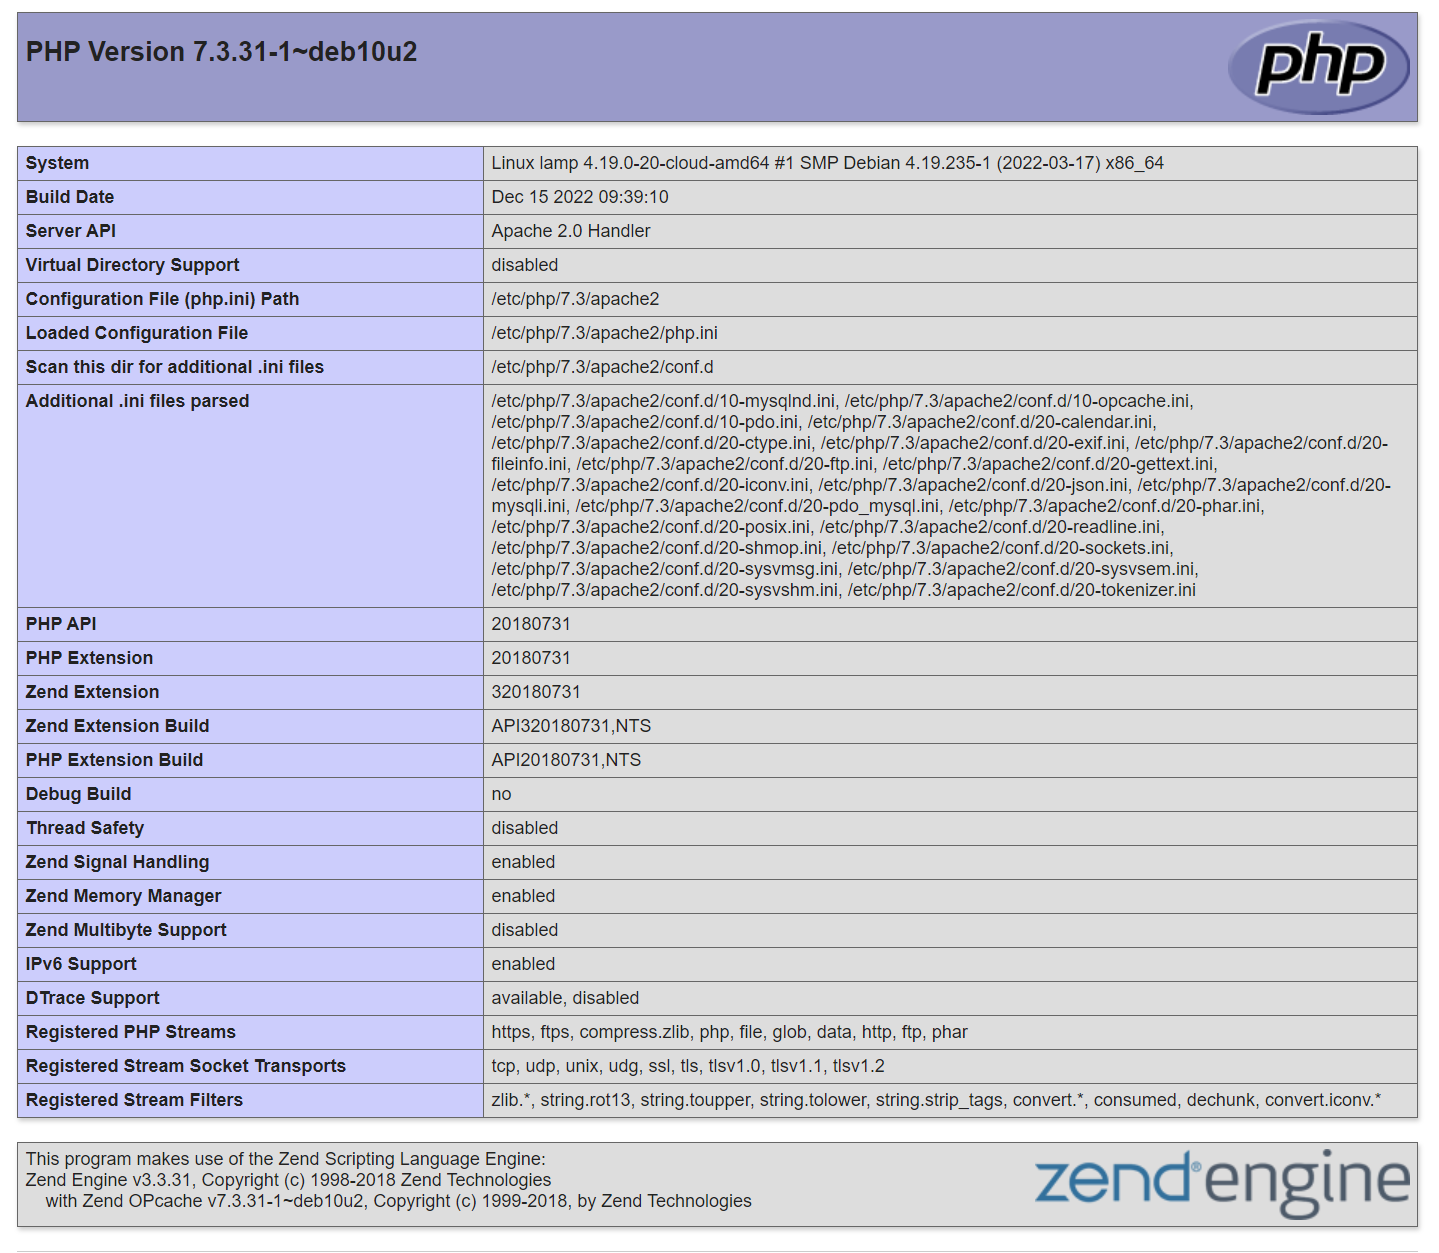
This page provides basic information about your server from a PHP perspective. It is useful for debugging and ensuring that your settings are being applied correctly.
If you get this page in your browser, your PHP installation is working as expected.
After reviewing the information about your PHP server through that page, it is best to delete the file you created as it contains sensitive information about your PHP environment and Debian server. You can use rm to do this:
sudo rm /var/www/your_domain/info.phpYou can always recreate this page if you need to access the information again.
Step 6 – Testing the Database Connection from PHP (Optional)
If you want to test whether PHP can connect to MariaDB and execute database queries, you can create a test table with test data and query its contents from a PHP script. Before doing this, you need to create a new MariaDB database and user that is properly configured to access it.
First, connect to the MariaDB console using the root account:
sudo mariadbTo create a new database, run the following command from your MariaDB console:
CREATE DATABASE example_database;
Now create a new user and give them full privileges on the custom database you created.
The following command creates a new user named example_user that authenticates with a password. We define this user's password as password, but you should replace this value with a secure password of your choice:
CREATE USER 'example_user'@'%' IDENTIFIED BY 'password';Next, grant this user permission to use the example_database database:
GRANT ALL ON example_database.* TO 'example_user'@'%';This gives the user example_user full privileges to the database example_database, while preventing the user from creating or modifying other databases on your server.
Next, clear the privileges to ensure they are saved and available in the current session:
FLUSH PRIVILEGES;After this, exit the MariaDB shell:
exitYou can test whether the new user has the appropriate permissions by logging into the MariaDB console again, this time using custom user credentials:
mariadb -u example_user -pNote the -p flag in this command, which prompts you to enter the password used when creating example_user. Once you are logged in to the MariaDB console, verify that you have access to example_database:
SHOW DATABASES;This will give you the following output:
Output
+--------------------+
| Database |
+--------------------+
| example_database |
| information_schema |
+--------------------+
2 rows in set (0.000 sec)
Then create a test table named todo_list. From the MariaDB console, run the following statement:
CREATE TABLE example_database.todo_list (
item_id INT AUTO_INCREMENT,
content VARCHAR(255),
PRIMARY KEY(item_id)
);
Insert a few rows of data into the test table. Repeat the following command several times using different values to populate your test table:
INSERT INTO example_database.todo_list (content) VALUES ("My first important item");To verify that the data was successfully saved to your table, run:
SELECT * FROM example_database.todo_list;You will get the following output:
+---------+--------------------------+
| item_id | content |
+---------+--------------------------+
| 1 | My first important item |
| 2 | My second important item |
| 3 | My third important item |
| 4 | and this one more thing |
+---------+--------------------------+
4 rows in set (0.000 sec)
After verifying that you have valid data in your test table, you can exit the MariaDB console:
exitNow you can create the PHP script that will connect to MariaDB and query your content. Create a new PHP file in the root directory of your custom web using your favorite editor. Nano is used in this example:
nano /var/www/your_domain/todo_list.phpThe following PHP script connects to the MariaDB database, searches the contents of the todo_list table, and displays the results in a list. It throws an exception if there is a problem connecting to the database.
Add this content to your todo_list.php script, remembering to replace the example_user and password values with your own values:
<?php
$user = "example_user";
$password = "password";
$database = "example_database";
$table = "todo_list";
try {
$db = new PDO("mysql:host=localhost;dbname=$database", $user, $password);
echo "<h2>TODO</h2><ol>";
foreach($db->query("SELECT content FROM $table") as $row) {
echo "<li>" . $row['content'] . "</li>";
}
echo "</ol>";
} catch (PDOException $e) {
print "Error!: " . $e->getMessage() . "<br/>";
die();
}
Save and close the file when you are finished editing.
You can now access this page in your web browser by visiting your website's domain name or public IP address followed by /todo_list.php:
http://your_domain/todo_list.phpThis web page will show the visitor the content you included in your test table:

This means that your PHP environment is ready to connect and interact with your MariaDB server.
Result
In this guide, you have created a flexible foundation for delivering PHP websites and applications to your visitors using Apache as the web server and MariaDB as the database system.
As an immediate next step, you should ensure that connections to your web server are secure by serving them over HTTPS. You can use Let's Encrypt to do this. You can also read our guide on how to install and use Composer for dependency and package management in PHP.