Introduction
When working on a project with multiple developers, it can be frustrating when one person pushes to a repository and then another starts making changes to an older version of the code. Mistakes like this make it worthwhile to set up a script to keep your repositories in sync. You can also apply this method to a production environment to make hotfixes and other changes quickly.
While there are other solutions to complete this specific task, writing your own script is a flexible option that leaves room for future customization.
GitHub lets you configure webhooks for your repositories, which are events that send HTTP requests when events occur. For example, you can use a webhook to notify you when someone creates a pull request or pushes new code.
In this guide, you will create a Node.js server that listens to a GitHub webhook notification whenever you or someone else pushes code to GitHub. This script automatically updates a repository on a remote server with the latest version of the code, eliminating the need to log in to the server to make new commits.
Prerequisites
- A set up Ubuntu server including a non-root user with sudo privileges and a firewall.
- Git is installed on your local machine.
- Node.js and npm are installed on the remote server using the official PPA.
- A repository on Github that contains your project code.
Step 1 – Set up Webhook
We'll start by configuring a hook for your repository. This step is important because without it, Github won't know what events to send when something happens, or where to send them. First, we'll create the webhook, and then we'll create a server that will respond to its requests.
Log in to your GitHub account and navigate to the repository you want to monitor. Click the Settings tab in the menu bar at the top of your repository page, then click Webhooks in the left navigation menu. Click Add Webhook in the right corner and enter your account password when prompted. You should see a page that looks like this:
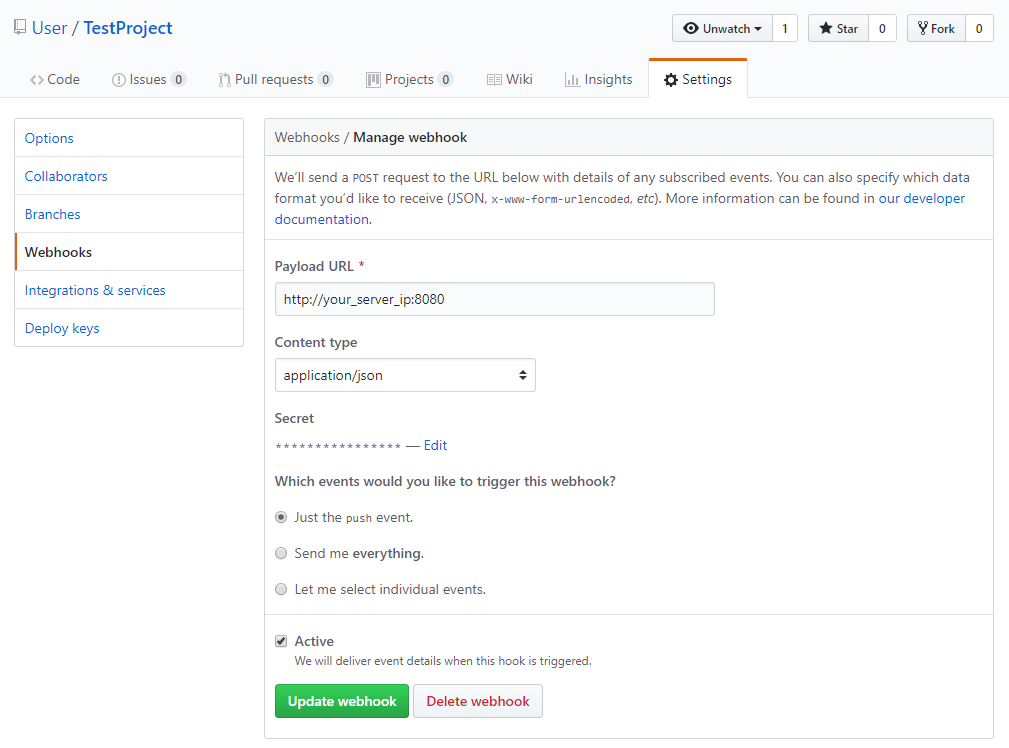
- In the Payload URL field, enter http://your_server_ip:8080. This is the address and port of the Node.js server that we will write soon.
- Change the content type to application/json. The script we are writing expects JSON data and cannot understand other data types.
- For Secret, enter a secret password for this webhook. You will use this secret on your Node.js server to authenticate requests and ensure they are sent from GitHub.
- To specify which events you want to trigger this webhook, just select the push event. We only need the push event because that's when the code is updated and needs to be synchronized with our server.
- Select the Active checkbox.
- Review the fields and click Add webhook to create it.
The ping will fail initially, but rest assured that your webhook is now configured. Now let's clone the repository to the server.
Step 2 – Clone the repository to the server
Our script can update a repository, but it can't initialize the repository, so we'll do that now. Log in to your server:
ssh sammy@your_server_ipMake sure you are in your home directory. Then use Git to clone your repository. Be sure to replace your GitHub username with sammy and your Github project name with hello_hapi.
cd
git clone https://github.com/sammy/hello_hapi.git
This will create a new directory containing your project. You will use this directory in the next step.
With your project cloned, you can create the webhook script.
Step 3 – Create Webhook Script
Let's create our own server to listen for webhook requests from GitHub. We'll write a Node.js script that starts a web server on port 8080. The server listens for webhook requests, verifies the secret we specified, and pulls the latest version of the code from GitHub.
Go to your main menu:
cd ~Create a new directory for your webhook script called NodeWebhooks:
mkdir ~/NodeWebhooksThen go to the new directory:
cd ~/NodeWebhooksCreate a new file called webhook.js in the NodeWebhooks directory.
nano webhook.jsAdd these two lines to the script:
/* Your codevar secret = "your_secret_here";
var repo = "/home/sammy/hello_hapi";... */
The first line defines a variable to hold the secret created in step 1, which verifies that the requests are coming from GitHub. The second line defines a variable that holds the full path to the repository you want to update on your local disk. This should point to the repository you checked out in step 2.
Next, add these lines that import the http and crypto libraries into the script. We'll use these to create our web server and the secret hash so we can compare it to what we get from GitHub:
let http = require('http');
let crypto = require('crypto');
Next, add the child_process library so you can run shell commands from your script:
const exec = require('child_process').exec;Next, add this code to define a new web server that will handle GitHub webhook requests and, if a request is valid, push down the new version of the code:
http.createServer(function (req, res) {
req.on('data', function(chunk) {
let sig = "sha1=" + crypto.createHmac('sha1', secret).update(chunk.toString()).digest('hex');
if (req.headers['x-hub-signature'] == sig) {
exec('cd ' + repo + ' && git pull');
}
});
res.end();
}).listen(8080);
The http.createServer() function starts a web server on port 8080 that listens for incoming requests from Github. For security purposes, we verify that the secret included in the request matches the one we specified when creating the webhook in step 1. This secret is sent in the x-hub-signature header as a SHA1 hashed string, so we hash our secret and compare it to what GitHub sends us.
If the request is valid, we run a shell command to update our local repository using git pull.
The completed script looks like this:
const secret = "your_secret_here";
const repo = "~/your_repo_path_here/";
const http = require('http');
const crypto = require('crypto');
const exec = require('child_process').exec;
http.createServer(function (req, res) {
req.on('data', function(chunk) {
let sig = "sha1=" + crypto.createHmac('sha1', secret).update(chunk.toString()).digest('hex');
if (req.headers['x-hub-signature'] == sig) {
exec('cd ' + repo + ' && git pull');
}
});
res.end();
}).listen(8080);
If you followed the initial server setup guide, you need to allow this web server to communicate with the external web by allowing traffic on port 8080:
sudo ufw allow 8080/tcpNow that our script is in place, let's make sure it works properly.
Step 4 – Webhook Testing
We can test our webhook using node to run it on the command line. Start the script and leave the process open in your terminal:
cd ~/NodeWebhooks
nodejs webhook.js
Return to your project page on Github.com. Click the Settings tab in the menu bar at the top of your repository page, and then click Webhooks in the left navigation menu. Click Edit next to the webhook you set up in Step 1. Scroll down to see the Recent Commits section, as shown in the image below:
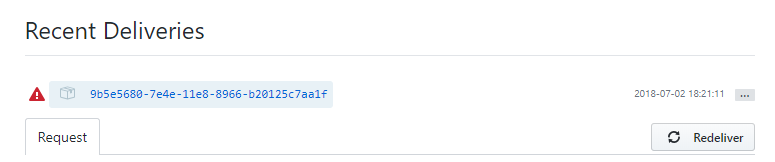
Press the three dots on the right to bring up the Redelive button. While the node server is running, click Redelive to resend the request. After confirming that you want to send the request, you will see a successful response. This is indicated by a 200 OK response code after the ping is redelivered.
Now we can ensure that our script runs in the background and starts on boot. Using CTRL+C will stop the node webhook server.
Step 5 – Install Webhook as a Systemd Service
systemd is Ubuntu's task manager for controlling services. We will start a service that will allow us to start our webhook script at boot time and use systemd commands to manage it like any other service.
Start by creating a new service file:
sudo nano /etc/systemd/system/webhook.service
Add the following configuration to the service file that tells systemd how to run the script. This tells Systemd where to find our node script and describes our service.
Make sure to replace Sami with your username.
[Unit]
Description=Github webhook
After=network.target
[Service]
Environment=NODE_PORT=8080
Type=simple
User=sammy
ExecStart=/usr/bin/nodejs /home/sammy/NodeWebhooks/webhook.js
Restart=on-failure
[Install]
WantedBy=multi-user.target
Enable the new service to start at system boot:
sudo systemctl enable webhook.serviceNow start the service:
sudo systemctl start webhookMake sure the service is started:
sudo systemctl status webhookYou will see the following output indicating that the service is active:
Output
● webhook.service - Github webhook
Loaded: loaded (/etc/systemd/system/webhook.service; enabled; vendor preset: enabled)
Active: active (running) since Fri 2018-08-17 19:28:41 UTC; 6s ago
Main PID: 9912 (nodejs)
Tasks: 6
Memory: 7.6M
CPU: 95ms
CGroup: /system.slice/webhook.service
└─9912 /usr/bin/nodejs /home/sammy/NodeWebhooks/webhook.js
You can now push new commits to your repository and see the changes on your server.
From your desktop device, emulate the repository:
git clone https://github.com/sammy/hello_hapi.gitChange one of the files in the repository. Then commit the file and push your code to GitHub.
git add index.js
git commit -m "Update index file"
git push origin master
The webhook will be activated and your changes will appear on your server.
Result
You've set up a Node.js script that automatically deploys new commits to a remote repository. You can use this process to set up additional repositories that you want to monitor. You can even configure it to deploy a website or application to production when you push your repository.