Introduction
Helm is a package manager for Kubernetes that allows developers and operators to easily configure and deploy applications on Kubernetes clusters.
Helm packages are called charts, and they contain templates of resource definitions that deploy and configure given applications with minimal user effort. With templates, you can manage the chart, its settings, and its behavior by passing variable definitions without changing the actual chart. Helm automatically manages customized resource definitions, as well as changes to pre-deployed definitions. The deployed chart, with possible customizations, is called a release.
In this tutorial, you'll set up Helm 3 and learn how to install, upgrade, restore, and manage charts and versions. You'll also learn to create and package your own charts, as well as set up chart repositories, which host charts that you can install immediately.
Prerequisites
- A Kubernetes cluster with role-based access control (RBAC) enabled.
- The kubectl command line tool is installed on your local machine and configured to connect to your cluster.
- You can test your connection with the following command:
kubectl cluster-info- If you don't get any errors, you are connected to the cluster. If you are accessing multiple clusters with kubectl, make sure you have selected the correct cluster context by running the following:
kubectl config get-contexts- The output lists the available settings:
Output CURRENT NAME CLUSTER AUTHINFO NAMESPACE * do-fra1-helm3-example do-fra1-helm3-example do-fra1-helm3-example-admin- Here, the asterisk (*) indicates that we are connected to the do-fra1-helm3-example cluster. To switch clusters, run:
kubectl config use-context context-name- Once you are connected to the correct cluster, continue to Step 1 to begin installing Helm.
Step 1 – Install Helm 3
In this section, you will install Helm 3 using the officially provided shell script.
Start by going to /tmp, where you can find the installation script by running:
cd /tmpDownload the script with the following command:
curl -fsSL -o get_helm.sh https://raw.githubusercontent.com/helm/helm/master/scripts/get-helm-3You can check get_helm.sh in your text editor to make sure it is safe.
Make it executable by setting its permissions to the following:
chmod u+x get_helm.shFinally, run it to install Helm 3:
./get_helm.shYou will get output similar to the following:
Output
Downloading https://get.helm.sh/helm-v3.5.2-linux-amd64.tar.gz
Verifying checksum... Done.
Preparing to install helm into /usr/local/bin
helm installed into /usr/local/bin/helm
You have installed Helm 3 on your machine. Now you will be introduced to chart repositories and how to use them.
Step 2 – Setting up chart repositories
Helm charts are stored in chart repositories that can be hosted by anyone. By default, Helm 3 is not preconfigured with any repositories. Previous versions of Helm included a central chart repository. However, the design of Helm 3 was intentionally geared toward chart developers managing their own repository, allowing for greater freedom and faster releases. This means that for every chart you want to use, you need to make sure you add the hosting repository to your Helm installation.
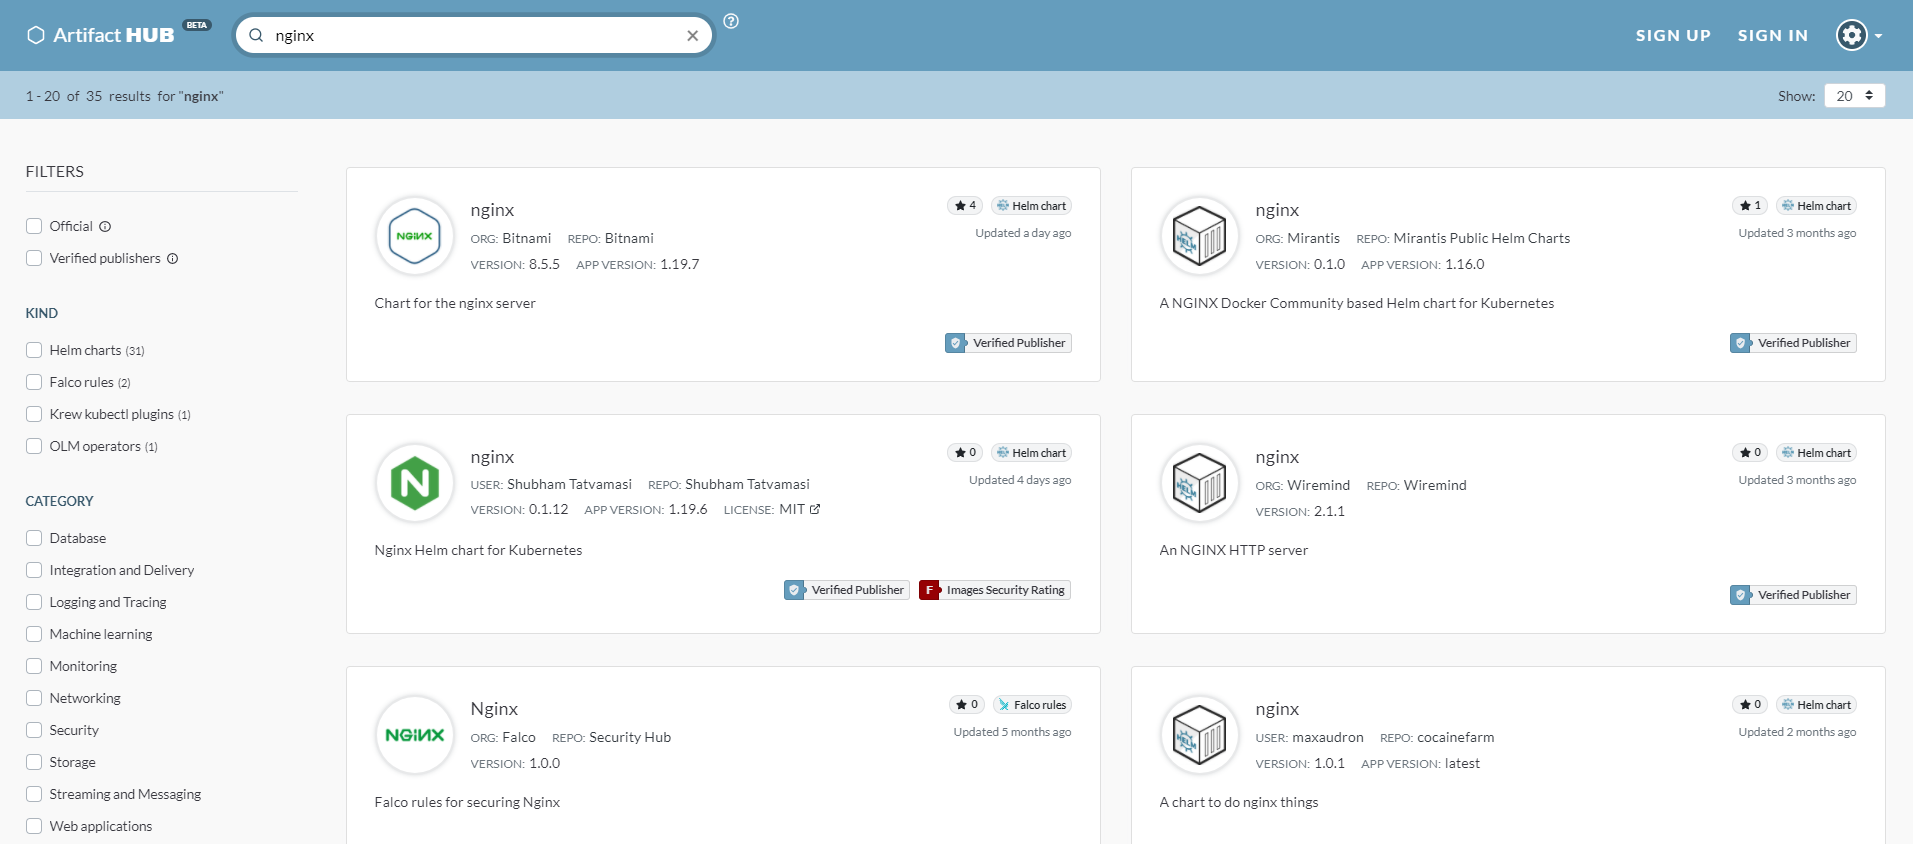
To help you find the right repository, you can use ArtifactHub.io, an open source website managed by CNCF that catalogs Helm charts and their repositories. It also tracks popular and useful charts that other CNCF projects use, so it's different from the stable repository that previous versions of Helm worked from. It's a great resource for common projects, like Nginx logs or monitoring tools.
You can search for the chart you want to install from the main page. Nginx search will show all the indexed charts related to it.
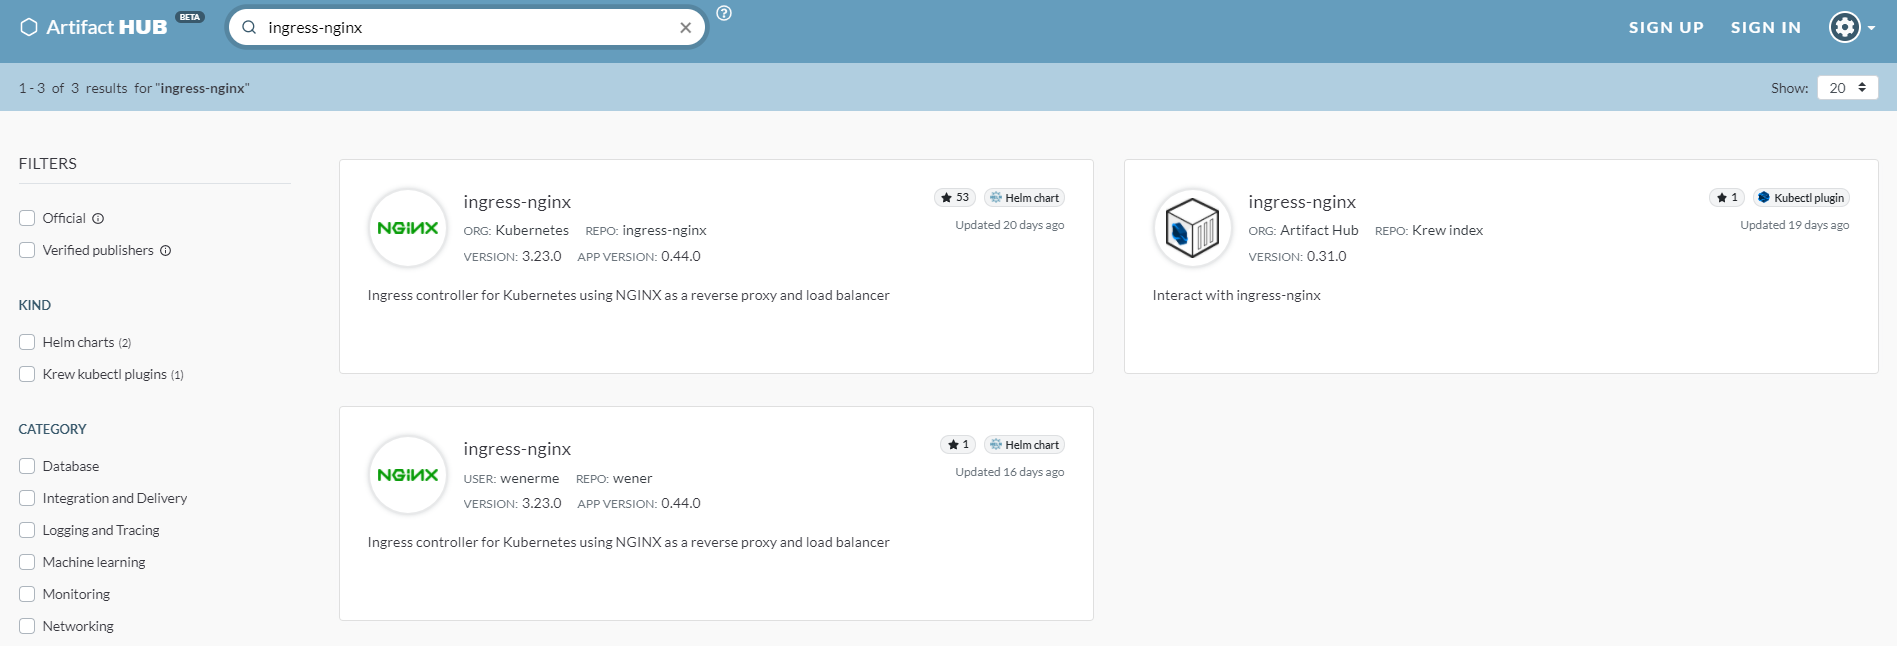
You will install the community version managed by the Kubernetes team. Search for ingress-nginx to find it in your results. Select it to access the page.
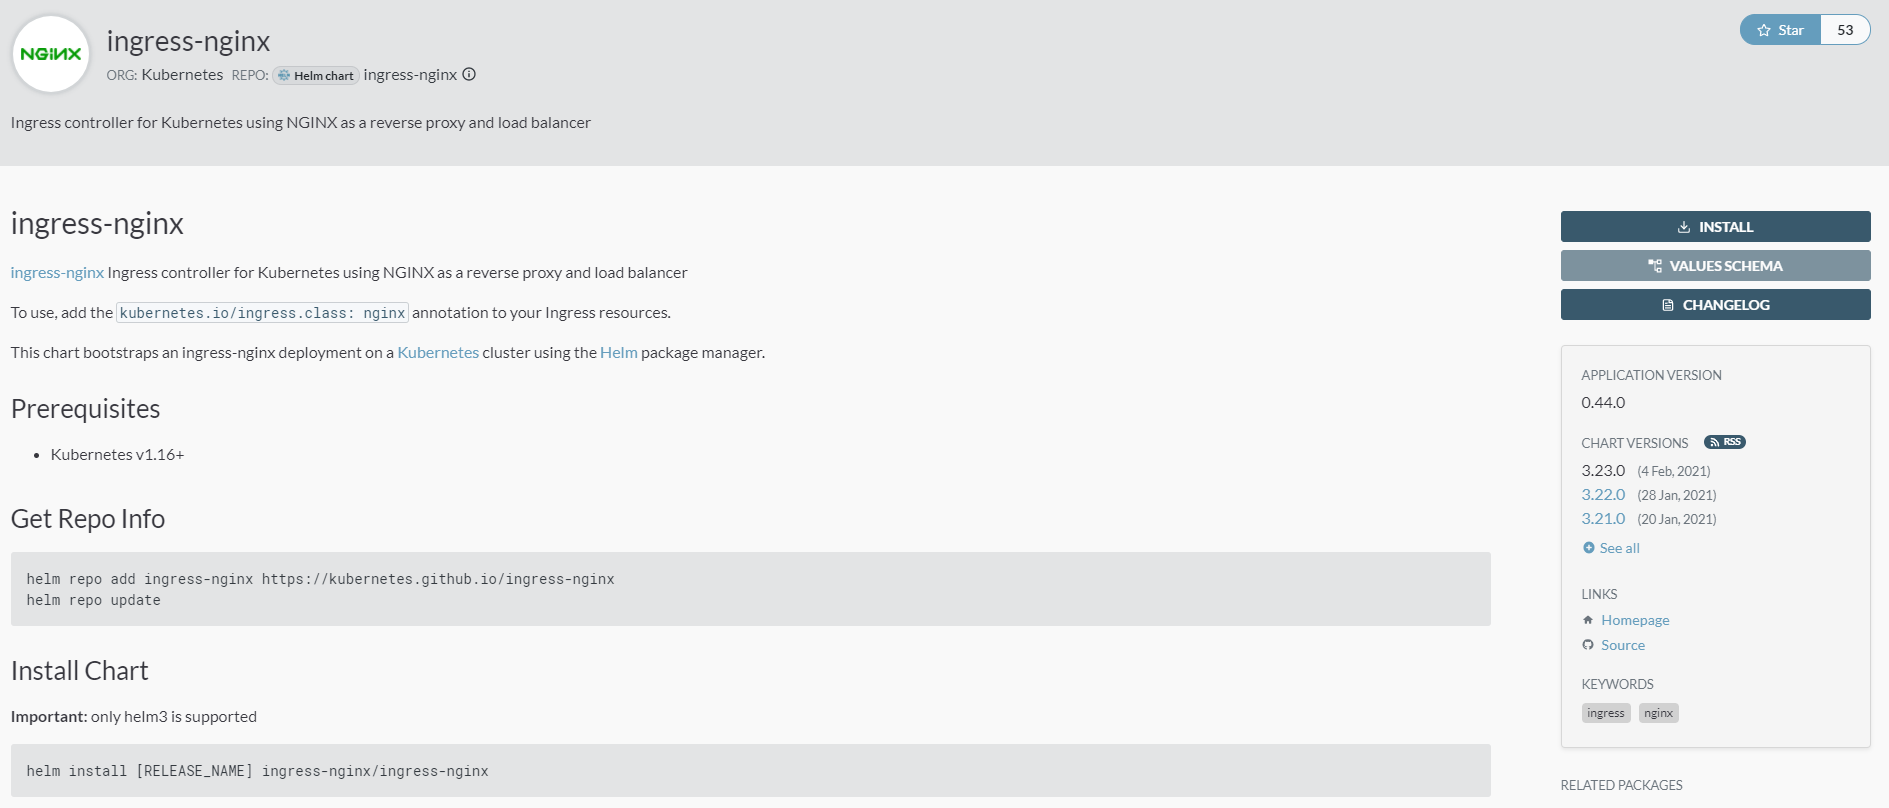
Each chart should have a description detailing the task, along with instructions for adding its repository to the chart installation and installation. Otherwise, you can still get the necessary instructions by pressing the INSTALL button on the right side of the page.
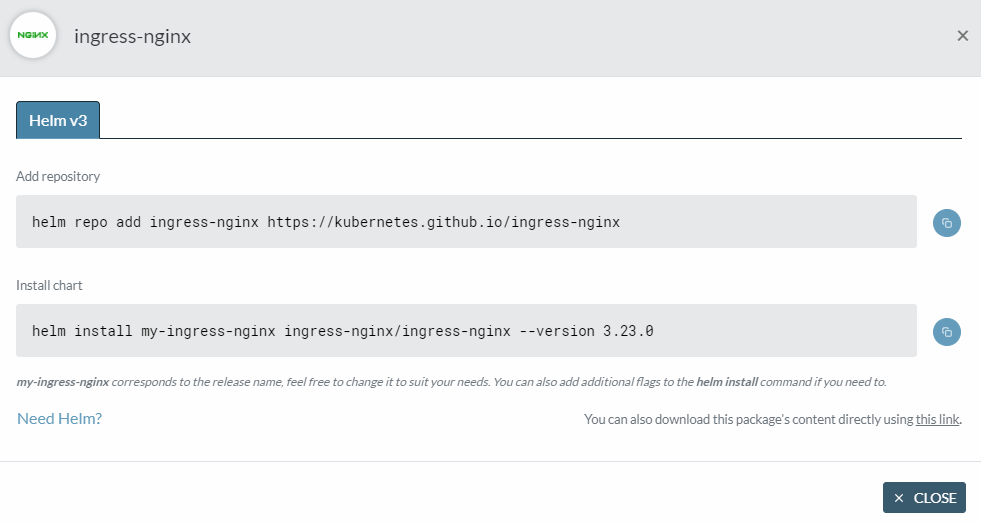
You can click the blue button next to the command to copy it. For the first command, do this and run it:
helm repo add ingress-nginx https://kubernetes.github.io/ingress-nginxTo add a repository to Helm, you run helm repo add . The parameters it accepts are the name of the repository and its location.
The output will be:
Output
"ingress-nginx" has been added to your repositories
When you add a new repository, you need to tell Helm what it contains by running:
helm repo updateYou will receive the following output indicating that the update was successful:
Output
Hang tight while we grab the latest from your chart repositories...
...Successfully got an update from the "ingress-nginx" chart repository
Update Complete. ⎈Happy Helming!⎈
At this point, you've become familiar with ArtifactHub and what it offers. You've also added a new repository to your Helm installation. Next, you'll install the Helm chart.
Step 3 – Installing Helm Chart
In the previous section, you added the ingress-nginx graph repository. Now you will install it on your cluster.
Each chart has configuration variables that you can set to change its behavior. These variables are stored in a file called values.yaml that is part of the chart. Unless you have downloaded the chart to your device, you will need to run the following command to view it:
helm show values chart_nameTo display the available variables for ingress-nginx, replace chart_name:
helm show values ingress-nginx/ingress-nginxThe output will be long and will show the contents of values.yaml for ingress-nginx.
To install the chart, you can use the install command:
helm install release_name repository/chart_nameA release is a deployed instance of the graph and here you call it ingress-nginx.
This command installs the chart with default values for the variables on your cluster. If you want to change some of them, you can pass new variable values using –set:
helm install ingress-nginx/ingress-nginx --set variable_name=variable_value
You can repeat –set for as many variables as you need. Since we won't customize it now, install it as is by running:
helm install ingress-nginx ingress-nginx/ingress-nginxThe output will be similar to the following:
Output
NAME: ingress-nginx
LAST DEPLOYED: Wed Feb 24 10:12:37 2021
NAMESPACE: default
STATUS: deployed
REVISION: 1
TEST SUITE: None
NOTES:
The ingress-nginx controller has been installed.
It may take a few minutes for the LoadBalancer IP to be available.
You can watch the status by running 'kubectl --namespace default get services -o wide -w ingress-nginx-controller'
...
Note that NAME matches the version name you specified. Helm also lists common information, such as the release status and the namespace it is deployed to. The NOTES section varies between charts and usually contains quick start tips or warns about some common issues when using the chart's resources. Here, it mentions that the Load Balancer is being created and may take some time to complete.
To check the deployed charts, use the command list:
helm listYou will notice that ingress-nginx is the only deployed graph currently:
Output
NAME NAMESPACE REVISION UPDATED STATUS CHART APP VERSION
ingress-nginx default 1 2021-02-24 10:12:37.281049711 +0000 UTC deployed ingress-nginx-3.23.0 0.44.0
You can find the services it has in its cluster by running the following:
kubectl get servicesThe output will be similar to this:
Output
NAME TYPE CLUSTER-IP EXTERNAL-IP PORT(S) AGE
ingress-nginx-controller LoadBalancer 10.245.211.81 46.101.68.67 80:30704/TCP,443:30700/TCP 7m19s
ingress-nginx-controller-admission ClusterIP 10.245.50.17 <none> 443/TCP 7m19s
kubernetes ClusterIP 10.245.0.1 <none> 443/TCP 83m
Now that you have deployed a version to your cluster, you will change its configuration during deployment.
Step 4 – Upgrade a version
Once a version is running, you don't have to destroy it and re-create it again when you need to change its configuration. You can use the upgrade command to upgrade the version with a new version of the chart or to set new settings.
The ingress-nginx diagram shows the controller.replicaCount variable, which controls the number of deployed controller pods. By default, it is set to one, which you can verify by listing the available pods:
kubectl get podsYou will notice that there is only one:
Output
NAME READY STATUS RESTARTS AGE
ingress-nginx-controller-7fc74cf778-kjtst 1/1 Running 0 12m
If you want more to be deployed for redundancy (for example, three), you can upgrade the version and set the variable to 3 by running:
helm upgrade ingress-nginx ingress-nginx/ingress-nginx --set controller.replicaCount=3 --reuse-valuesYou also pass --reuse-values , which instructs Helm to place your changes on top of the deployed version and preserve the previous configuration.
In the output, Helm makes corrections to indicate that the version has been upgraded:
Output
NAME: ingress-nginx
LAST DEPLOYED: Wed Feb 24 12:07:54 2021
NAMESPACE: default
STATUS: deployed
REVISION: 2
TEST SUITE: None
NOTES:
...
You can list the available pods by running the following:
kubectl get podsInstead of one, you will find three pods listed:
Output
NAME READY STATUS RESTARTS AGE
ingress-nginx-controller-7fc74cf778-4hk9g 1/1 Running 0 18s
ingress-nginx-controller-7fc74cf778-kjtst 1/1 Running 0 22m
ingress-nginx-controller-7fc74cf778-wz595 1/1 Running 0 18s
Next, you will revert the changes and delete the publication altogether.
Step 5 – Restore and delete a copy
When you upgrade a version, its revision number increases. Internally, Helm stores all versions of a version, allowing you to revert to a previous version if needed.
To revert the number of pods back to just one, you can rerun the upgrade command and manually adjust the number as this is a small change. However, when working with larger graphs with many variables, manual reverting is not possible and should be automatic.
To restore a version, use the restore command:
helm rollback release_name release_revisionYou can use it to revert changes you made to ingress-nginx, going back to version 1:
helm rollback ingress-nginx 1You will receive the following output indicating that the operation was successful:
Output
Rollback was a success! Happy Helming!
You can check the current version by listing the versions:
helm listYou will notice that the revision is now 3 and not 1:
Output
NAME NAMESPACE REVISION UPDATED STATUS CHART APP VERSION
ingress-nginx default 3 2021-02-24 12:43:21.523664768 +0000 UTC deployed ingress-nginx-3.23.0 0.44.0
Helm considers every change, including a rollback, as a new revision in a release. By checking the number of deployed pods by running:
kubectl get podsYou will notice that there is only one:
Output
NAME READY STATUS RESTARTS AGE
ingress-nginx-controller-7fc74cf778-kjtst 1/1 Running 0 41m
To delete a version and all its revisions, you can use helm delete:
helm delete release_nameSince you will no longer need it, remove ingress-nginx by running the following command:
helm delete ingress-nginxThe output will be:
Output
release "ingress-nginx" uninstalled
You can list the versions to check that none exist:
helm listThe output table will have no rows:
Output
NAME NAMESPACE REVISION UPDATED STATUS CHART APP VERSION
Now that the version has been deleted, you can reuse its name for future deployments.
Step 6 – (Optional) Create Custom Charts
In this optional step, you will learn how to create a custom chart, where to place resource definitions, and how to package it for further distribution.
You will create a new chart called sample-chart. To create it, run the following command:
helm create example-chartThis will create a new directory called example-chart with the following files and structure:
charts/
templates/
├─ tests/
│ ├─ test-connection.yaml
├─ deployment.yaml
├─ hpa.yaml
├─ ingress.yaml
├─ NOTES.txt
├─ service.yaml
├─ serviceaccount.yaml
├─ _helpers.tpl
Chart.yaml
values.yaml
The resource definitions that your graph installs on the target clusters are in the template directory. The default ones that Helm created as a starting point deploy an Nginx ingress controller. Even though their file extension is YAML, they use Go's formatting syntax to remain configurable through exposed variables that you can pass. You can view the contents of service.yaml by running:
cat example-chart/templates/service.yamlYou will notice that it has formatting instructions for producing values surrounded by double parentheses:
OutputapiVersion: v1
kind: Service
metadata:
name: {{ include "mychart.fullname" . }}
labels:
{{- include "mychart.labels" . | nindent 4 }}
spec:
type: {{ .Values.service.type }}
ports:
- port: {{ .Values.service.port }}
targetPort: http
protocol: TCP
name: http
selector:
{{- include "mychart.selectorLabels" . | nindent 4 }}
Referenced variables are exposed to the user and defined in values.yaml. Helm NOTES text is stored in NOTES.txt after deployment and is also formatted. Chart metadata, such as the name, version, and version of the software being deployed, is specified in Chart.yaml:
apiVersion: v2
name: mychart
description: A Helm chart for Kubernetes
...
type: application
...
version: 0.1.0
...
appVersion: "1.16.0"
To check what Helm is deploying, you can pass –dry-run and –debug to helm install by pointing to the chart directory:
helm install example-chart --dry-run --debug ./example-chartThe output will be long and will include all the final resource definitions that will be applied to your cluster. While you are working on your graph, you can use the upgrade command to push new versions to Kubernetes.
When the time is up for sharing the chart, you can make it available for distribution by running:
helm package ./example-chartThe output will be:
Output
Successfully packaged chart and saved it to: .../example-chart-0.1.0.tgz
The packaged chart can be installed just like the ones in the added repositories:
helm install example-chart example-chart-0.1.0.tgzAt this point, you have created and deployed a custom chart. You have also packaged it and become familiar with its structure.
Result
You now know how to use Helm to install and upgrade software deployed to your Kubernetes cluster. You've added chart repositories and learned why they're important and how ArtifactHub can help you find them. You've also created a new custom chart and learned about release revisions and how to revert if necessary.