Introduction
The point-to-point messaging pattern is a commonly used communication model in modern web and cloud architectures. It is designed to enable asynchronous interactions between different components, e.g. serverless functions or microservices, allowing them to exchange messages without requiring an immediate response.
In this pattern, the component that sends the message is called the producer, while the component that receives and processes the message is called the consumer. The producer and consumer can be located in the same system or in different systems, making it a flexible and scalable approach to communication.
Similar to how emails are delivered to recipients, messages are sent from a producer to a specific consumer. This allows for efficient and reliable communication even in complex distributed systems. It is typically used in scenarios where the producer knows exactly which consumer should receive the message, but the producer does not need to receive an immediate response.
The point-to-point messaging pattern effectively facilitates communication and coordination between components, improving the overall performance, reliability, and scalability of modern web and cloud architectures.
What we will build
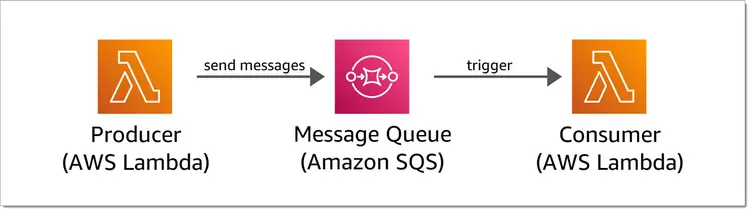
In this step-by-step tutorial, we will implement this pattern using two AWS Lambda functions and an Amazon SQS queue.
In this step-by-step tutorial, we will implement a simple example using two AWS Lambda functions and an Amazon SQS queue.
You will build the sample using TypeScript and the AWS Cloud Development Kit (AWS CDK).
The example will consist of three components:
- A producer who can send messages to the consumer
- A consumer that can receive messages from the producer.
- A message queue that creates a communication channel between the producer and the consumer.
In addition to implementing this pattern, we will also highlight the power of the AWS Cloud Development Kit (CDK) to define entire infrastructure as code. If you want to learn more about AWS CDK, take a look at the AWS CDK Developer Guide.
By the end of this tutorial, you will have a thorough understanding of the individual components of queue-based point-to-point messaging, have successfully implemented asynchronous communications between two Lambda functions using SQS, and have gained hands-on experience building infrastructure. Code with CDK
But before we start coding, let's take a quick look at the advantages and disadvantages of the asynchronous point-to-point messaging pattern.
Advantages and disadvantages of the asynchronous point-to-point messaging paradigm
Benefits
- Loose coupling: The asynchronous point-to-point messaging pattern promotes loose coupling between applications, allowing them to communicate independently without the need for tight integration. This flexibility makes it easier to scale and modify individual components without affecting the entire system.
- Scalability: This pattern allows for efficient horizontal scaling, as multiple consumer applications can be added to handle workloads asynchronously. This enables the system to handle high volumes of concurrent messages and requests more effectively.
- Reliability: In asynchronous messaging, if a message is not delivered or processed, it can be retried or sent to an error queue for later processing, increasing the reliability of the system.
- Fault tolerance: Asynchronous messaging provides fault tolerance by separating the producers and consumers of messages. If one application or component crashes, messages can be stored for later processing once the system comes back online, ensuring that no data is lost.
Disadvantages
- Complexity: Implementing the asynchronous point-to-point messaging pattern can be more complex compared to other integration patterns and requires additional message handling logic.
- Message dependencies and possible duplication: Managing dependencies between messages and ensuring correct message deletion can be challenging in an asynchronous messaging system. It requires careful design and implementation to handle potential issues such as message ordering, message duplication, and message processing dependencies.
- Increased latency: Asynchronous messaging introduces a delay between sending a message and receiving a response, as messages may take longer to process. This latency can impact real-time interactions and may not be suitable for applications that require immediate feedback.
When making architectural decisions, it is always important to consider these trade-offs and choose the communication pattern that best fits your specific requirements and constraints. Many modern applications rely on multiple integration patterns, including asynchronous point-to-point messaging, as well as synchronous request-response communication, and event-driven communication.
But now, let's start the tutorial and learn how to implement this pattern using AWS Lambda and Amazon SQS.
A note about resource costs when coding: This tutorial uses only the minimum amount of resources, all of which are included in the free tier offered by AWS for the first 12 months after each account is created:
- A few kilobytes of code will be stored in Amazon S3, which provides 5 GB of free storage.
- We call SQS a few times, which offers 1 million free requests per month.
- We will call two functions in AWS Lambda, which also offers 1 million free invocations per month.
So if you follow the step by step guide, you will definitely stay in the free tier. I have also added a section at the end that will help you delete all the resources created during this tutorial.
Prerequisites
If you have the CLI and CDK installed, you should see the versions for your installations. If not, you will get an error telling you that the command cannot be found.
Before you start this tutorial, you will need the following:
- AWS account
- AWS Cloud Development Kit (AWS CDK)
This tutorial requires at least version 2 of the AWS CLI and AWS CDK.
You can determine the AWS CLI version by running the following command in the terminal:
aws --version
And the AWS CDK version by running the following command:
cdk --version
Step 1 – Create the CDK application
1.1 – Launch the CDK program
First, you need to take care of the initial setup and let the CDK automatically generate the code that will build the project.
From the command line, create a directory for the project, cd into the directory, and initialize the project:
mkdir point-to-point-example
cd point-to-point-example
cdk init app --language typescript
This creates the main file structure for the project and installs the required packages.
Now is a good time to open the project in your favorite IDE and take a look at the generated project and specifically the following two files:
point-to-point-example/
├── bin/
│ └── point-to-point-example.ts
├── lib/
│ └── point-to-point-example-stack.ts
└── ...
File bin\point-to-point-example.ts The entry point for the CDK program. We will not need to examine this file again in this tutorial.
File lib\point-to-point-example-stack.ts It is where the main stack of the program is defined. This file is where we spend most of our time.
As we move forward through this tutorial, we will introduce the infrastructure of our application to the class. PointToPointExampleStack In this file we will add. Open it in your editor and take a look:
import * as cdk from 'aws-cdk-lib';
import { Construct } from 'constructs';
// import * as sqs from 'aws-cdk-lib/aws-sqs';
export class PointToPointExampleStack extends cdk.Stack {
constructor(scope: Construct, id: string, props?: cdk.StackProps) {
super(scope, id, props);
// The code that defines your stack goes here
// ...
}
}
1.2 – Bootstrap the environment
The first time you deploy an AWS CDK application to an environment, that is, a specific AWS account and region, you need to boot the environment with a CDKToolkit stack. This stack deploys an S3 bucket that is used to store templates and assets during the actual application deployment process.
To bootstrap the environment, make sure you are still in the example point-to-point directory and run the following command:
cdk bootstrap
This will take a while and will be completed when you see the following output on your command line:
✅ Environment aws://[account_id]/[region] bootstrapped.
1.3 – Deploy the initial stack
To deploy the stack, make sure you are still in the example point-to-point directory and run the following command:
cdk deploy
This command compiles the application into an AWS CloudFormation template and deploys it to your AWS account.
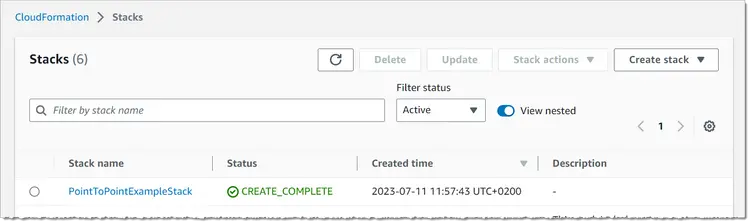
Now open the stack details and explore. In the Resources tab you will see that it has not deployed anything, except for a resource called CDKMetadata, which is just some initial configuration details for our stack.
Step 2 – Create the SQS queue
Once everything is set up, you can create your first real resource, which will be an SQS queue.
2.1 – Add the queue to the stack
To start, file lib\point-to-point-example-stack.ts Open.
Depending on the version of the CDK template, it may have already added some import statements including aws-cdk-lib/aws-sqs in a comment. If so, remove the comment symbols // in front of import * as sqs from 'aws-cdk-lib/aws-sqs' , otherwise add it yourself, so that the first three lines of the file look like this:
import * as cdk from 'aws-cdk-lib';
import { Construct } from 'constructs';
import * as sqs from 'aws-cdk-lib/aws-sqs';
Now the comments in class. PointToPointExampleStack Delete and replace the following code and save your changes:
const queue = new sqs.Queue(this, 'Queue', {
queueName: 'MyQueue',
});
2.2 – Deploy the queue
To deploy the queue, run the following command in your project directory:
cdk deploy
You can now monitor the deployment process in the terminal output and it should be complete after a minute or two.
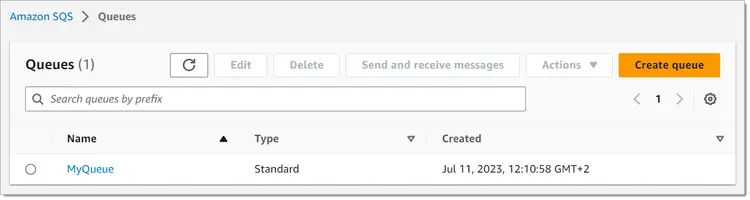
Once the deployment is complete, go to your SQS queues list in the AWS Management Console and find a queue called SqsTutorialStack-Queue:
2.3 – Check the Deployed queue
Go to the SQS dashboard in the AWS Management Console and look at the list of queues. If you can't find your queue, make sure you're in the correct region.

Step 3 – Create the Producer function and connect it to the queue
3.1 – Write the source code of the generator function
We'll use JavaScript for the Lambda function and store the source code in its own folder inside the CDK application. We'll later reference this folder from our CDK stack so that it can automatically package, upload, and deploy the contents to AWS.
Make sure you are in the project directory and create the following directories and the file itself:
mkdir lambda-src
mkdir lambda-src/producer
touch lambda-src/producer/send_message_to_sqs.js
Your project directory structure should now look like this:
point-to-point-example/
├── bin/
│ └── point-to-point-example.ts
├── lambda-src/
│ └── producer/
│ └── send_message_to_sqs.js
├── lib/
│ └── point-to-point-example-stack.ts
└── ...
New file created. lambda-src/producer/send_message_to_sqs.js Open it in your editor and add the following code:
const sqs = require("@aws-sdk/client-sqs");
// Create an Amazon SQS service client
const client = new sqs.SQSClient();
exports.handler = async (event, context) => {
// Create a message, including the function's name from
// its execution context
const myMessage = 'Hello World from ' + context.functionName
// Get the queue URL from the execution environment
const queueUrl = process.env.SQSQueueUrl
// Create a SendMessageCommand containing the message
// and the queue URL
const command = new sqs.SendMessageCommand({
MessageBody: JSON.stringify({ message: myMessage }),
QueueUrl: queueUrl
});
// Send the message and return the result
const result = await client.send(command);
return result;
}
This is a simple Lambda function handler that sends a message to our SQS queue and returns the result.
Note that since we don't necessarily know which queue to use when we build this function, or we might want to change it later without having to change the function code, we retrieve the queue URL from the runtime. This way, we can define it dynamically during the deployment of the Lambda function in the CDK stack.
3.2 – Add the Producer function to the stack
To create a real Lambda function in AWS, you need to add it to the stack. To do this, open lib/point-to-point-example-stack.ts.
First, add another import statement to the top of the file:
import * as lambda from 'aws-cdk-lib/aws-lambda';
Then add the following snippet inside the constructor, under the queue:
const producerFunction = new lambda.Function(this, 'Producer', {
functionName: 'Producer',
runtime: lambda.Runtime.NODEJS_18_X,
code: lambda.Code.fromAsset('lambda-src/producer'),
handler: 'send_message_to_sqs.handler',
environment: {
SQSQueueUrl: queue.queueUrl,
}
});
This creates a function, packages, and contents of the lambda-src/producer directory, and configures the function to use the handler defined in send_message_to_sqs.js when called.
It also dynamically sets the SQSQueueUrl environment variable to the actual URL of the SQS queue so that it can be accessed from within the function using process.env.SQSQueueUrl.
3.3 – Licensing the producer’s performance
Each Lambda function requires a few basic IAM permissions, which the CDK provides by default using a basic execution role.
However, our producer function needs additional permissions to send messages to the queue. Fortunately, in CDK we don't need to manage IAM policies manually. We can use the grantSendMessages method of the SQS queue with our Lambda function.
To do this, add the following line below your producerFunction:
queue.grantSendMessages(producerFunction);
3.4 – Deploy the producer function
To deploy the function along with its source code, run the following command in the project directory:
cdk deploy
This prepares the deployment of any new or modified resources.
If any changes to your stack require creating or modifying IAM permissions, CDK will prompt you to re-examine these changes for security reasons.
In the image below, you can see that CDK wants to make three changes that affect IAM permissions:
- Allow the Lambda service (lambda.amazon.aws) to assume the execution role attached to the Producer function.
- Add the necessary permissions directly to allow the executive role to access and send messages to the SQS queue.
- Add a managed policy with initial permissions to the execution role.

Type y to confirm, and CDK will deploy the new Lambda function along with its IAM role.
3.5 – Test the performance of the producer
After running the function, go to the list of functions in the AWS Lambda dashboard.
The function name is the same as what we defined on the stack: Producer. If you can't find the function, make sure you're in the correct region.
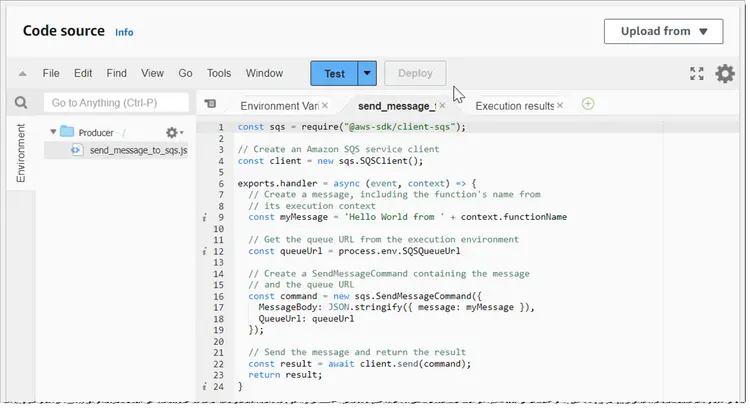
Click on the function name to open its details and go to the source code section.
The file explorer folder on the left contains a file called send_message_to_sqs.js.
Double-click on the file name to open its source, where you can see that it is an exact copy of the file we created in the lambda-src/producer folder in our CDK project.
Now let's configure a test event.
To do this, click the Test button. If you haven't configured a test event yet, this will open the Test Configuration page. Enter a name for the event, for example "test-event," and click Save.
Once the test event is configured, click Test again, which will then directly call the Lambda function.
This will create an Execution Results tab containing the response:
{
"$metadata": {
"httpStatusCode": 200,
"requestId": "cb033b2a-1234-5678-9012-66188359d280",
"attempts": 1,
"totalRetryDelay": 0
},
"MD5OfMessageBody": "b5357af0c1c816b2d41275537cc0d1af",
"MessageId": "4a76e538-1234-5678-9012-749f0f4b9294"
}
Remember the code snippet in the Lambda function?
const result = await client.send(command);
return result;
The JSON object in the above execution results is exactly what SQS returned as a response to client.send(command), including interesting information like “httpStatusCode”: 200, which means the queue successfully received the message.
3.6 – Manually Retrieving Messages from SQS
Currently, the queue is not connected to the consumer, so the message will not be received. However, we can manually retrieve the message.
Go to the SQS dashboard, click on the queue to open its details page, and click the Send and Receive Messages button.
On the next page, go to the Receive Messages section and click the Poll for Messages button, which should show all the messages that are currently flying, including the messages that your builder function sent when you tested it:
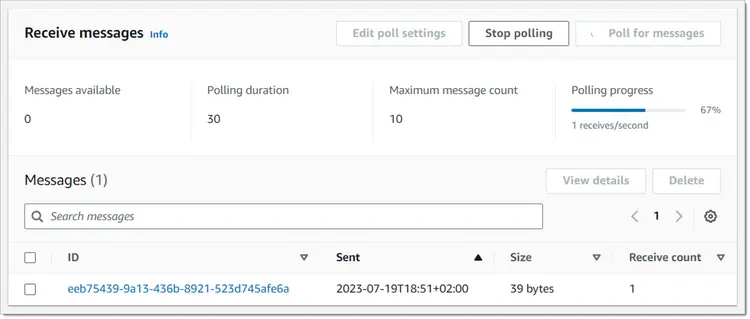
Click on the message ID to open it. It should contain the following body:
{"message":"Hello World from Producer"}
Congratulations! You have successfully deployed and tested a Lambda function that sends messages to an SQS queue.
Next, we create the consumer function and configure it to be called automatically whenever a new message arrives in the queue.
Step 4 – Create the Consumer function and connect it to the queue
4.1 – Write the source code of the consumer function
The consumer function code is stored in its own folder inside lambda-src, so that the CDK can automatically package it and upload it into the new Lambda function.
Make sure you are in the project directory (not in bin/ or lib/) and create the following directory with the source file:
mkdir lambda-src/consumer
touch lambda-src/consumer/receive_message_from_sqs.js
Open lambda-src/consumer/receive_message_from_sqs.js in your editor and enter the following code:
exports.handler = async (event) => {
// Retrieve the message from the event and log it to the console
const message = event.Records[0].body;
console.log(message);
}
This is a very simple Lambda function handler that opens the SQS message and prints it to the report.
4.2 – Add the Consumer function to the stack
To create a real Lambda function in AWS, you need to add it to the stack. To do this, open lib/point-to-point-example-stack.ts.
Add the following snippet inside the producer, below queue.grantSendMessages(producerFunction):
 const consumerFunction = new lambda.Function(this, 'Consumer', {
functionName: 'Consumer',
runtime: lambda.Runtime.NODEJS_18_X,
code: lambda.Code.fromAsset('lambda-src/consumer'),
handler: 'receive_message_from_sqs.handler'
});
This consumer function creates the packages and contents of the lambda-src/consumer directory and configures the function to use the handler defined in receive_message_from_sqs.js when called.
4.3 – Add the SQS queue as an event source to The Consumer
We want this function to be triggered whenever there is a new message in our queue. To do this, we need to add the queue as an event source for the function, and also grant the function all the necessary permissions to consume messages.
First, add another import statement to the top of the file:
import { SqsEventSource } from 'aws-cdk-lib/aws-lambda-event-sources';
Next, add the following two lines below the customersFunction definition:
consumerFunction.addEventSource(new SqsEventSource(queue));
queue.grantConsumeMessages(consumerFunction);
4.4 – Deploying the consumer function
To deploy the function along with its source code, run the following command in the project directory:
cdk deploy
This prepares the deployment of any new or modified resources and — again — prompts you to re-verify the new IAM permissions.
Type y to confirm, and CDK will execute the new Lambda function along with its execution role and attach it to the SQS queue.
Once the deployment is done, everything will be ready and connected. Let's see if it works.
Step 5 – End-to-end testing of the application
To test the application, we manually call the producer function to send another message to the queue. Then we check the execution logs of the consumer function to see if it automatically launched and processed the message.
5.1 – Call the Producer function
Follow the steps mentioned in 3.5 – Test the Producer Function to call the producer function again. Here is a short summary:
- Go to the function list in the AWS Lambda dashboard.
- Open the Producer function by clicking on its name.
- Go to the source code section.
- Click the Test button.
- Make sure the function runs successfully.
5.2 – Check the consumer performance report
Go back to the function list in the AWS Lambda dashboard and this time open the Consumer function.
Scroll down, open a tab called Monitor, inside this tab, open the Logs tab and take a look at Recent Invocations, where you should find a link to the last LogStream of the function.
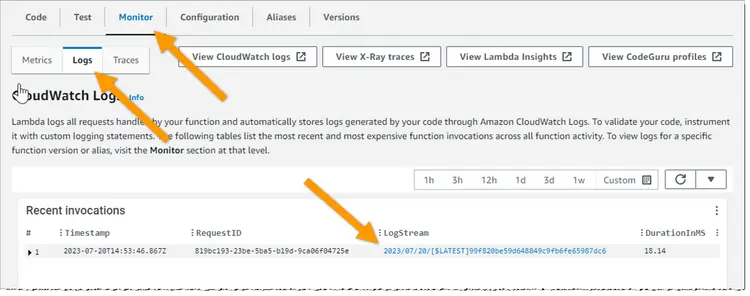
After that, click on the Log Flow link. This will show the log entry itself, which may seem a little confusing if you're not used to the format.
Simply look for the entry right in the middle between these two, starting with START RequestId: … and END Request ID: ….
Click on the arrow to expand the entry where you should find the original message:

Result
Congratulations! You've created everything you need to set up asynchronous point-to-point messaging between two Lambda functions using SQS.
There's a lot more you can do with SQS, such as categorizing messages, ensuring message order, and automatically sending bad messages to a dead-line queue (DLQ). If you want to learn more, check out the Amazon SQS Developer Guide