Introduction
Imagine being able to have a conversation with your unstructured data and easily extract valuable information. In today’s data-driven landscape, extracting meaningful insights from unstructured documents remains a challenge, hindering decision-making and innovation. In this tutorial, we’ll get to know embeddings, explore using Amazon Open Search as a vector database, and integrate the Langchain framework with Large Language Models (LLMs) to build a website with an embedded NLP chatbot. We’ll go over the basics of LLMs to extract meaningful insights from an unstructured document with the help of an open-source Large Language Model. By the end of this tutorial, you’ll have a comprehensive understanding of how to gain meaningful insights from unstructured documents and use the skills to explore and innovate with similar Full-Stack AI-based solutions.
Prerequisites
- You must have an active AWS account. If you don't have one, you can sign up on the AWS website.
- Make sure you have installed the AWS Command Line Interface (CLI) on your local machine, and it should be properly configured with the required credentials and default region. You can configure it using the aws configure command.
- Download and install Docker Engine. Follow the installation instructions for your specific operating system.
What are we going to build?
In this example, we want to mimic a problem that many companies face. Much of today's data is unstructured, but rather unstructured and comes in the form of audio and video transcripts, PDF and Word documents, manuals, scanned notes, social media transcripts, etc. We will use the Flan-T5 XXL model as the LLM. This model can generate summaries and Q&A from unstructured texts. The image below shows the architecture of the different building blocks.

Let's start with the basics.
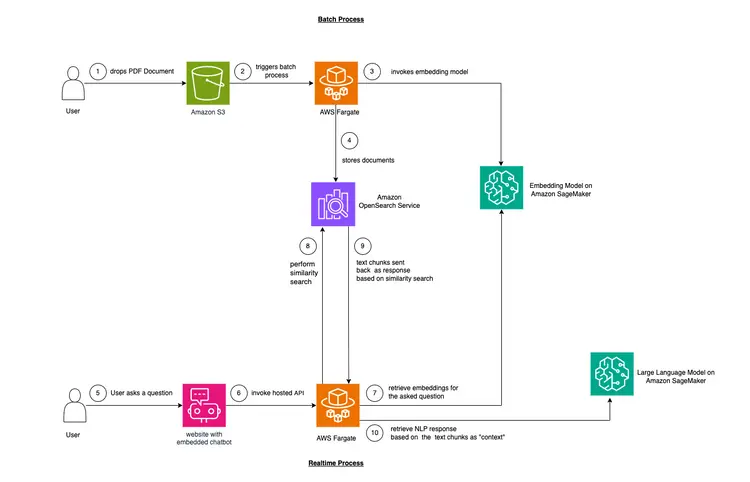
We will use a technique called in-context learning to inject domain or case-specific “Context” into our LLM. In this case, we have an unstructured PDF manual of a car that we want to add as the «Context» for the LLM and we want the LLM to answer questions about this manual. It’s that simple! Our goal is to take it a step further by creating a real-time API that receives questions, sends them to our backend, and is accessible through an open source chatbot embedded in the website. This tutorial will enable us to build the entire user experience and gain insights into the various concepts and tools throughout the process.
- The first step to provide in-text learning is to ingest the PDF document and convert it into text chunks, generate vector representations of these text chunks called “embeddings,” and finally store these embeddings in a vector database.
- Vector databases enable us to perform «similarity searches» against the text embeddings they store.
- Amazon SageMaker JumpStart provides one-click deployment solution templates to set up infrastructure for open source, pre-trained models. We will use Amazon SageMaker JumpStart to deploy the Embedding model and the Large Language model.
- Amazon OpenSearch is a search and analysis engine that can search for the nearest neighbors of points in a vector space, making it suitable as a vector database.
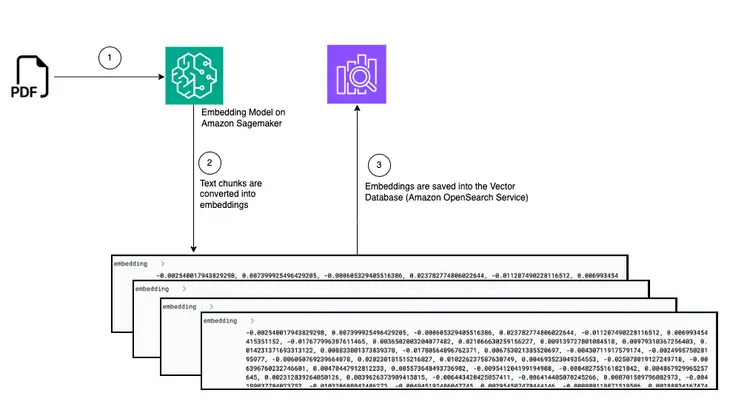
Chart: Convert from PDF to embed in vector database
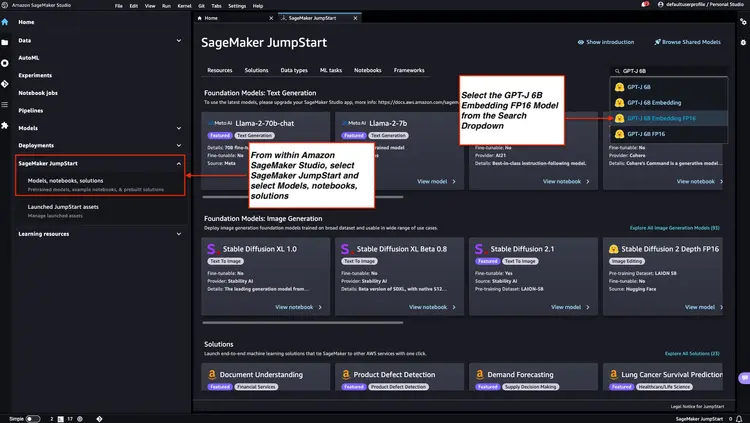
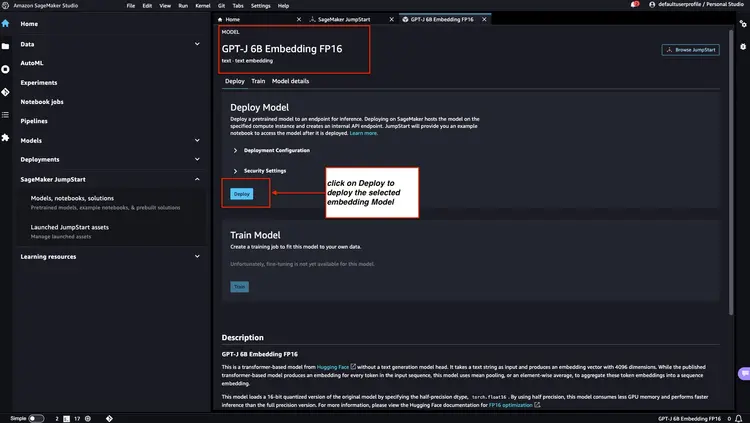
Step 1 - Deploy the GPT-J 6B FP16 Embedding Model with Amazon SageMaker JumpStart
Follow the steps mentioned in the Amazon SageMaker Documentation – Open and use the JumpStart section to launch an Amazon SageMaker JumpStart node from the main menu of Amazon SageMaker Studio. Select Models, notebooks, solutions and select the GPT-J 6B Embedding FP16 embedding model as shown in the image below. Then, click 'Deploy' and Amazon SageMaker JumpStart will take care of setting up the infrastructure to deploy this pre-trained model to the SageMaker environment.
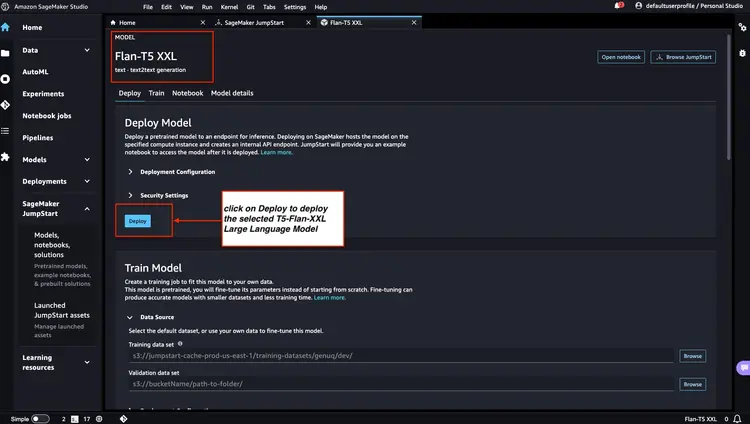
Step 2 - Deploy Flan T5 XXL LLM with Amazon SageMaker JumpStart
Next, in Amazon SageMaker JumpStart, select Flan-T5 XXL LLM, and then click 'Deploy' to begin the automatic infrastructure setup and deploy the model endpoint to the Amazon SageMaker environment.
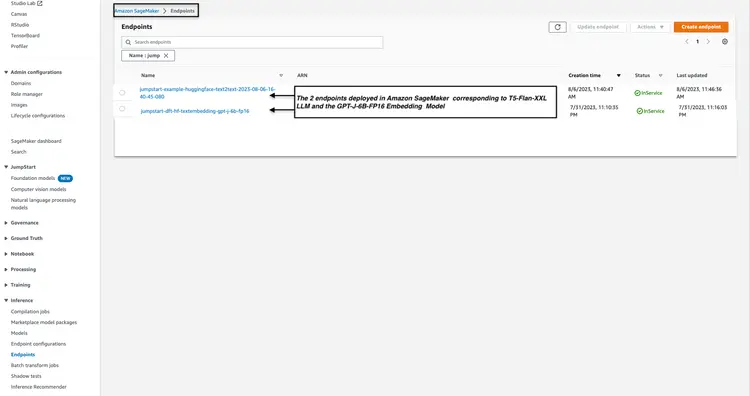
Step 3 - Check the status of the deployed model endpoints
We check the status of the deployed model endpoints from Step 1 and Step 2 in the Amazon SageMaker console and note down their endpoint names, as we will use them in our code. Here is what my console looks like after deploying the model endpoints.
Step 4 – Create Amazon Open Search Cluster
Amazon OpenSearch is a search and analytics service that supports the k-Nearest Neighbors (kNN) algorithm. This capability is invaluable for similarity-based searches and allows us to effectively use OpenSearch as a vector database. To explore further and learn about the versions of Elasticsearch/OpenSearch that support the kNN plugin, please refer to the following link: k-NN Plugin Documentation.
We use the AWS CLI to deploy the AWS CloudFormation template file from the GitHub location. Infrastructure/opensearch-vectordb.yaml We will use the aws command. cloudformation create-stack Run the following to create an Amazon Open Search cluster. You need to replace the values with your own before running the command. username and password Let's do it.
aws cloudformation create-stack --stack-name opensearch-vectordb \
--template-body file://opensearch-vectordb.yaml \
--parameters ParameterKey=ClusterName,ParameterValue=opensearch-vectordb \
ParameterKey=MasterUserName,ParameterValue=<username> \
ParameterKey=MasterUserPassword,ParameterValue=<password>
Step 5 – Build the document capture and embedding workflow
In this step, we will create an ingest and processing pipeline designed to read a PDF document when it is placed in an Amazon Simple Storage Service (S3) bucket. This pipeline will perform the following tasks:
- Extract text from PDF document.
- Convert text fragments to embeddings (vector representations).
- Save embeds in Amazon Open Search.
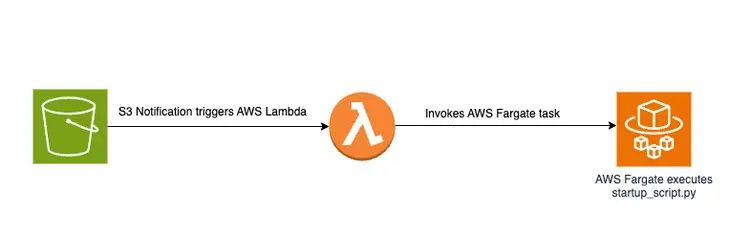
Dropping a PDF file into an S3 bucket will trigger an event-driven workflow that includes an AWS Fargate job. This job will be responsible for converting the text to embeds and inserting them into Amazon Open Search.
Diagrammatic overview
Below is a diagram showing the document transfer pipeline for storing embedded text snippets in the Amazon OpenSearch vector database:
Startup script and file structure
The main logic in the file create-embeddings-save-in-vectordb\startup_script.py This Python script is located at startup_script.py, performs several tasks related to document processing, text embedding, and insertion into an Amazon Open Search cluster. The script downloads a PDF document from an Amazon S3 bucket, then splits the downloaded document into smaller text chunks. For each chunk, the text content is sent to the GPT-J 6B FP16 Embedding model endpoint deployed in Amazon SageMaker (retrieved from the TEXT_EMBEDDING_MODEL_ENDPOINT_NAME environment variable) to create text embeds. The created embeds are placed in the Amazon Open Search index along with other information. The script retrieves configuration and validation parameters from environment variables and makes it consistent across environments. The script is intended to run uniformly in a Docker container.
Build and publish the Docker image
After understanding the code in startup_script.py, we build the Dockerfile from the folder create-embeddings-save-in-vectordb We'll go ahead and push the image to Amazon Elastic Container Registry (Amazon ECR). Amazon Elastic Container Registry (Amazon ECR) is a fully managed container registry that provides high-performance hosting, so we can reliably deploy application images and artifacts anywhere. We'll use the AWS CLI and Docker CLI to build and push the Docker image to Amazon ECR. In all of the commands below, Replace with the correct AWS account number.
Retrieve an authentication token and authenticate the Docker client to the registry in the AWS CLI.
aws ecr get-login-password --region us-east-1 | docker login --username AWS --password-stdin <AWS Account Number>.dkr.ecr.us-east-1.amazonaws.com Build your Docker image using the following command.
docker build -t save-embedding-vectordb .
Once the build is complete, tag the image so we can push the image to this repository:
docker tag save-embedding-vectordb:latest <AWS Account Number>.dkr.ecr.us-east-1.amazonaws.com/save-embedding-vectordb:latest
Run the following command to push this image to the new Amazon ECR repository:
docker push <AWS Account Number>.dkr.ecr.us-east-1.amazonaws.com/save-embedding-vectordb:latest
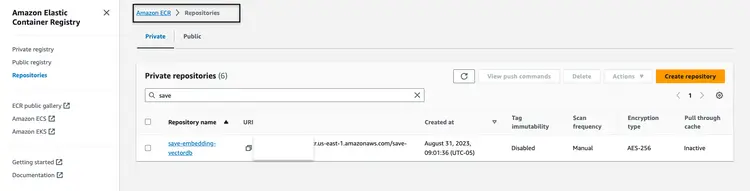
Once the Docker image is uploaded to the Amazon ECR repository, it should look like the following image:
Build an infrastructure for an event-based PDF embedding workflow
We can use the AWS Command Line Interface (AWS CLI) to create a CloudFormation stack for an event-driven workflow with the provided parameters. The CloudFormation template is available in the GitHub repository at Infrastructure/fargate-embeddings-vectordb-save.yaml We need to ignore the parameters to match the AWS environment.
Here are the key parameters to update in the command aws cloudformation create-stack It is stated:
- BucketName: This parameter represents the Amazon S3 bucket where we will drop the PDF documents.
- VpcId and SubnetId: These parameters specify where the Fargate task will run.
- ImageName: This is the name of the Docker image in the Amazon Elastic Container Registry (ECR) for save-embedding-vectordb.
- TextEmbeddingModelEndpointName: Use this parameter to provide the name of the Embedding model deployed in Amazon SageMaker in step 1.
- VectorDatabaseEndpoint: Specify the endpoint address of the Amazon OpenSearch domain.
- VectorDatabaseUsername and VectorDatabasePassword: These parameters are for the credentials required to access the Amazon Open Search cluster created in step 4.
- VectorDatabaseIndex: Set the name of the index in Amazon Open Search where PDF document embeds are stored.
To execute the CloudFormation stack creation, after updating the parameter values, we use the following AWS CLI command:
aws cloudformation create-stack \
--stack-name ecs-embeddings-vectordb \
--template-body file://fargate-embeddings-vectordb-save.yaml \
--parameters \
ParameterKey=BucketName,ParameterValue=car-manuals-12345 \
ParameterKey=VpcId,ParameterValue=vpc-123456 \
ParameterKey=SubnetId,ParameterValue=subnet-123456,subnet-123456 \
ParameterKey=Imagename,ParameterValue=123456.dkr.ecr.us-east-1.amazonaws.com/save-embedding-vectordb:latest \
ParameterKey=TextEmbeddingModelEndpointName,ParameterValue=jumpstart-dft-hf-textembedding-gpt-j-6b-fp16 \
ParameterKey=VectorDatabaseEndpoint,ParameterValue=https://search-cfnopensearch2-xxxxxxxx.us-east-1.es.amazonaws.com \
ParameterKey=VectorDatabaseUsername,ParameterValue=master \
ParameterKey=VectorDatabasePassword,ParameterValue=vectordbpassword \
ParameterKey=VectorDatabaseIndex,ParameterValue=carmanual
By creating the above CloudFormation stack, we set up an S3 bucket and create S3 notifications that launch a Lambda function. This Lambda function in turn starts a Fargate task. The Fargate task creates a Docker container with the file startup-script.py Implements that is responsible for creating embeds in Amazon OpenSearch under a new OpenSearch index called car manual It is.
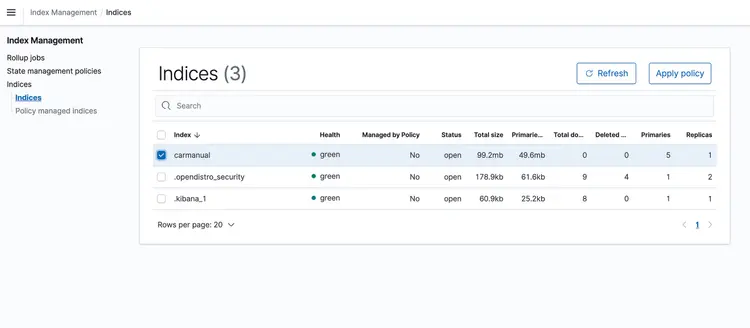
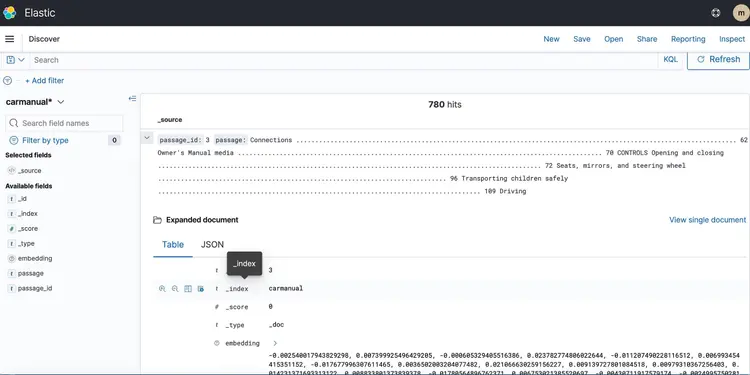
Test with a PDF sample
Once the CloudFormation stack is running, drop a PDF representing the machine manual into your S3 bucket. I downloaded a machine manual available here. After the event-based transport pipeline is finished running, the Amazon Open Search cluster should contain the following profile: car manual With the embeddings shown below.
Step 6 – Implement Real-Time Q&A API with Llm Text Support
Now that we have our text embeds in a vector database powered by Amazon Open Search, let’s move on to the next step. Here, we’ll use the capabilities of the T5 Flan XXL LLM to provide real-time answers about our car manual.
We use the embeddings stored in the vector database to provide context to LLM. This context enables LLM to effectively understand and answer questions about our car manual. To achieve this, we will use a framework called LangChain, which simplifies the coordination of the various components required for our real-time, text-aware question and answer system designed by LLM.
Embeddings stored in a vector database depict the meanings and relationships of words and allow us to perform calculations based on semantic similarities. While embeddings create vector representations of text snippets to capture meanings and relationships, T5 Flan LLM specializes in creating context-relevant answers based on context injected into requests and queries. The goal is to match user questions with text snippets by creating embeddings for the questions and then measuring their similarity to other embeddings stored in the vector database.
By representing text snippets and user queries as vectors, we can perform mathematical calculations to perform context-aware similarity searches. To measure the similarity between two data points, we use distance metrics in a multidimensional space.
The diagram below shows the real-time Q&A workflow provided by LangChain and our T5 Flan LLM.
Graphical overview of Realtime Q&A support from T5-Flan-XXL LLM
Build the API

Now that we’ve reviewed our LangChain and T5 Flask LLM workflow, let’s dive into our API code, which accepts user questions and provides context-aware answers. This real-time Q&A API is located in the RAG-langchain-questionanswer-t5-llm folder of our GitHub repository, and its core logic is in the app.py file. This Flask-based application defines a /qa route for answering questions.
When a user submits a query to the API, it uses the TEXT_EMBEDDING_MODEL_ENDPOINT_NAME environment variable and points to an Amazon SageMaker endpoint to convert the query into numeric vector representations called embeddings. These embeddings capture the semantic meaning of the text.
The API further leverages Amazon OpenSearch to perform context-aware similarity searches, enabling it to fetch relevant text snippets from the OpenSearch directory work guide based on embeddings obtained from user queries. After this step, the API calls the T5 Flan LLM endpoint, identified by the T5FLAN_XXL_ENDPOINT_NAME environment variable, which is also deployed in Amazon SageMaker. The endpoint uses the text snippets retrieved from Amazon OpenSearch as context to generate responses. These text snippets obtained from Amazon OpenSearch act as valuable context for the T5 Flan LLM endpoint, allowing it to provide meaningful responses to user queries. The API code uses LangChain to orchestrate all of these interactions.
Build and publish the Docker image for the API
After understanding the code in app.py, we proceed to build the Dockerfile from the RAG-langchain-questionanswer-t5-llm folder and push the image to Amazon ECR. We will use the AWS CLI and Docker CLI to build and push the Docker image to Amazon ECR. In all the commands below, Replace with the correct AWS account number.
Retrieve an authentication token and authenticate the Docker client to the registry in the AWS CLI.
aws ecr get-login-password --region us-east-1 | docker login --username AWS --password-stdin <AWS Account Number>.dkr.ecr.us-east-1.amazonaws.com
Build the Docker image using the following command.
docker build -t qa-container .
Once the build is complete, tag the image so we can push the image to this repository:
docker tag qa-container:latest <AWS Account Number>.dkr.ecr.us-east-1.amazonaws.com/qa-container:latest
Run the following command to push this image to the new Amazon ECR repository:
docker push <AWS Account Number>.dkr.ecr.us-east-1.amazonaws.com/qa-container:latest
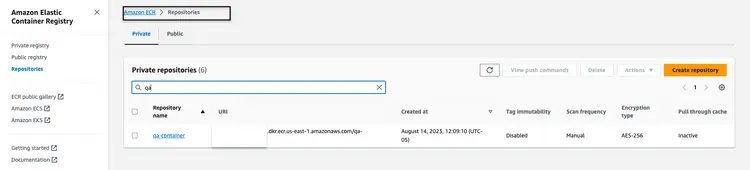
Once the Docker image is uploaded to the Amazon ECR repository, it should look like the following image:
Build a CloudFormation stack to host the API endpoint
We will use the AWS Command Line Interface (CLI) to create a CloudFormation stack for an Amazon ECS Cluster that hosts a Fargate task to expose the API. The CloudFormation template is located in the GitHub repository at Infrastructure/fargate-api-rag-llm-langchain.yaml. We need to override the parameters to match the AWS environment. Here are the key parameters to update in the aws cloudformation create-stack command:
- DemoVPC: This parameter specifies the virtual private cloud (VPC) in which your service will run.
- PublicSubnetIds: This parameter requires a list of public subnet IDs where your load balancer and tasks will be located.
- IMAGENAME: Provide the Docker image name in the Amazon Elastic Container Registry (ECR) for the qa container.
- TextEmbeddingModelEndpointName: Specify the endpoint name of the Embeddings model deployed in Amazon SageMaker in step 1.
- T5FlanXXLEndpointName: Set the T5-FLAN endpoint name deployed on Amazon SageMaker in step 2.
- VectorDatabaseEndpoint: Specify the endpoint address of the Amazon OpenSearch domain.
- VectorDatabaseUsername and VectorDatabasePassword: These parameters are for the credentials required to access the OpenSearch Cluster created in step 4.
- VectorDatabaseIndex: Set the name of the index in Amazon OpenSearch where your service data will be stored. The index name we used in this example is carmanual.
To execute the CloudFormation stack creation, after updating the parameter values, we use the following AWS CLI command:
aws cloudformation create-stack \
--stack-name ecs-questionanswer-llm \
--template-body file://fargate-api-rag-llm-langchain.yaml \
--parameters \
ParameterKey=DemoVPC,ParameterValue=vpc-123456 \
ParameterKey=PublicSubnetIds,ParameterValue=subnet-123456,subnet-789012 \
ParameterKey=Imagename,ParameterValue=123456.dkr.ecr.us-east-1.amazonaws.com/qa-container:latest \
ParameterKey=TextEmbeddingModelEndpointName,ParameterValue=jumpstart-dft-hf-textembedding-gpt-j-6b-fp16 \
ParameterKey=T5FlanXXLEndpointName,ParameterValue=jumpstart-example-huggingface-text2text-2023-08-06-16-40-45-080 \
ParameterKey=VectorDatabaseEndpoint,ParameterValue=https://search-cfnopensearch2-xxxxxxxx.us-east-1.es.amazonaws.com \
ParameterKey=VectorDatabaseUsername,ParameterValue=master \
ParameterKey=VectorDatabasePassword,ParameterValue=vectordbpassword \
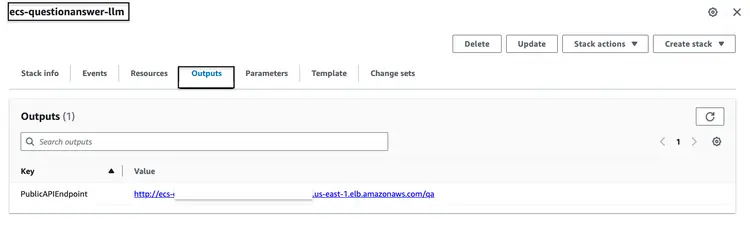
ParameterKey=VectorDatabaseIndex,ParameterValue=carmanualAfter successfully running the CloudFormation stack mentioned above, go to the AWS console and access the 'CloudFormation Outputs' tab for the ecs-questionanswer-llm stack. In this tab, we will find the necessary information including the API endpoint. Below is an example of what the output might look like:
Test the API
We can test the API endpoint via the curl command as follows:
curl -X POST -H "Content-Type: application/json" -d '{"question":"How can I clean my windshield?"}' http://quest-Publi-abc-xxxx.us-east-1.elb.amazonaws.com/qa
We will see a response like the one below.
{"response":"To clean sensors and camera lenses, use a cloth moistened with a small amount of glass detergent."}
Step 7 – Create and deploy a website with an integrated chatbot
Then we move on to the final step for our full stack pipeline, which integrates the API with the embedded chatbot in an HTML website. For this website and embedded chatbot, our source code is a Nodejs application consisting of an index.html integrated with the open source botkit.js as the chatbot. To make things easier, I have created a Dockerfile and provided it alongside the code in the homegrown_website_and_bot folder. We will use the AWS CLI and Docker CLI to build and push the Docker Image to Amazon ECR for the frontend website. In all the commands below, Replace with the correct AWS account number.
Retrieve an authentication token and authenticate the Docker client to the registry in the AWS CLI.
aws ecr get-login-password --region us-east-1 | docker login --username AWS --password-stdin <AWS Account Number>.dkr.ecr.us-east-1.amazonaws.com
Build the Docker image using the following command:
docker build -t web-chat-frontend .
Once the build is complete, tag the image so we can push the image to this repository:
docker tag web-chat-frontend:latest <AWS Account Number>.dkr.ecr.us-east-1.amazonaws.com/web-chat-frontend:latest
Run the following command to push this image to the new Amazon ECR repository:
docker push <AWS Account Number>.dkr.ecr.us-east-1.amazonaws.com/web-chat-frontend:latest
After the Docker image for the website has been pushed to the ECR repository, we create the CloudFormation stack for the front-end by running the Infrastructure\fargate-website-chatbot.yaml file. We need to override the parameters to match the AWS environment. Here are the key parameters to update in the aws cloudformation create-stack command:
- DemoVPC: This parameter specifies the virtual private cloud (VPC) where your website will be deployed.
- PublicSubnetIds: This parameter requires a list of public subnet IDs where your website load balancer and tasks will be placed.
- IMAGENAME: Enter the name of the Docker image in the Amazon Elastic Container Registry (ECR) for your website.
- QUESTURL: Specify the URL of the API endpoint deployed in step 6. Its format is http:// It is /qa.
To execute the CloudFormation stack creation, after updating the parameter values, we use the following AWS CLI command:
aws cloudformation create-stack \
--stack-name ecs-website-chatbot \
--template-body file://fargate-website-chatbot.yaml \
--parameters \
ParameterKey=DemoVPC,ParameterValue=vpc-12345 \
ParameterKey=PublicSubnetIds,ParameterValue=subnet-1,subnet-2 \
ParameterKey=Imagename,ParameterValue=123456.dkr.ecr.us-east-1.amazonaws.com/web-chat-frontend:latest \
ParameterKey=QUESTURL,ParameterValue=http://your-api-alb-dns-name/qa
Step 8 – Check out the Car Savvy AI Assistant
After successfully building the CloudFormation stack mentioned above, go to the AWS console and access the CloudFormation Outputs tab for the ecs-website-chatbot stack. In this tab, we will find the DNS name of the Application Load Balancer (ALB) associated with the front end. Below is an example of what the output might look like:
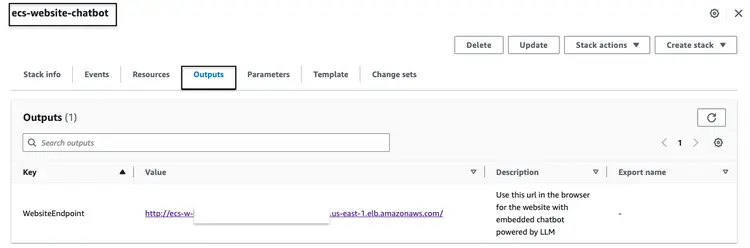
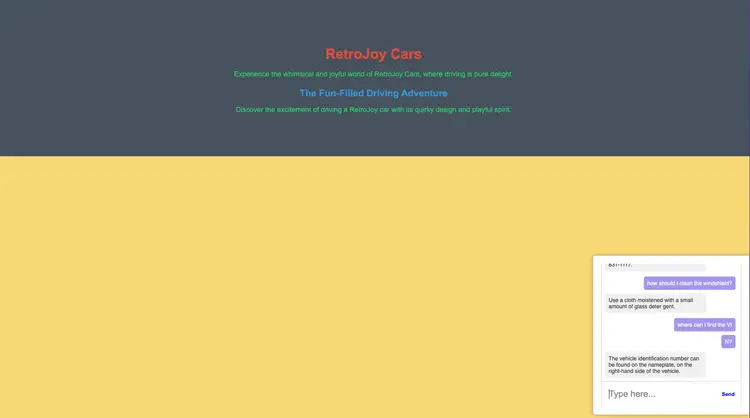
Call the endpoint URL in the browser to see how the website looks. Ask natural language questions to the embedded chatbot. Some of the questions we can ask are – “How do I clean my windshield?”, “Where can I find the VIN?”, “How do I report a safety defect?”
What next?
Hopefully the above shows you how you can build your own production-ready pipelines for LLMs and integrate the pipeline with your front-end chatbots and embedded NLP. Let me know what else you want to read about using open source technologies, analytics, machine learning, and AWS!
As you continue your learning journey, I encourage you to delve deeper into Embeddings, Vector Databases, LangChain, and several other LLMs. They are available in the Amazon SageMaker JumpStart as well as the AWS tools we used in this tutorial, such as Amazon OpenSearch, Docker Containers, Fargate. Here are some next steps to help you master these technologies:
- Amazon SageMaker: As you progress with SageMaker, become familiar with the other algorithms it offers.
- AMAZON-OPEN SEARCH: Learn about the K-NN algorithm and other distance algorithms
- Langchain: LangChain is a framework designed to simplify the creation of applications using LLM.
- Embeddings: An embedding is a numerical representation of a piece of information, e.g., text, documents, images, audio, etc.
- Amazon SageMaker JumpStart: SageMaker JumpStart offers pre-trained, open-source models for a wide range of problem types to help you get started with machine learning.
Erase
- Log in to the AWS CLI. Make sure that the AWS CLI is properly configured with the necessary permissions to perform these actions.
- Delete the PDF file from your Amazon S3 bucket by running the following command. Replace your bucket name with the actual name of your Amazon S3 bucket and adjust the path to your PDF file if needed.
aws s3 rm s3://your-bucket-name/path/to/your-pdf-file.pdf
Delete the CloudFormation stacks. Replace the stack names with the actual names of your CloudFormation stacks.
# Delete 'ecs-website-chatbot' stack
aws cloudformation delete-stack --stack-name ecs-website-chatbot
# Delete 'ecs-questionanswer-llm' stack
aws cloudformation delete-stack --stack-name ecs-questionanswer-llm
# Delete 'ecs-embeddings-vectordb' stack
aws cloudformation delete-stack --stack-name ecs-embeddings-vectordb
# Delete 'opensearch-vectordb' stack
aws cloudformation delete-stack --stack-name opensearch-vectordb# Delete SageMaker endpoint 1
aws sagemaker delete-endpoint --endpoint-name endpoint-name-1
# Delete SageMaker endpoint 2
aws sagemaker delete-endpoint --endpoint-name endpoint-name-2Result
In this tutorial, we built a full-stack Q&A chatbot using AWS technologies and open source tools. We integrated Amazon OpenSearch as a vector database, a GPT-J 6B FP16 embedding model, and used Langchain with an LLM. The chatbot extracts insights from unstructured documents.