
Introduction
This tutorial explains how to install Ollama to run language models on a server running Ubuntu or Debian. It also shows how to set up a chat interface with Open WebUI and how to use a custom language model.
Prerequisites
- A server with Ubuntu/Debian
- You need root user access or a user with sudo permissions.
- Before you begin, you need to complete some initial settings, including the firewall.
Step 1 – Install Ollama
The following steps explain how to install Ollama manually. For a quick start, you can use the installation script and continue with “Step 2 – Installing Ollama WebUI”.
To install Ollama yourself, follow these steps:
If your server has an Nvidia GPU, make sure the CUDA drivers are installed.
nvidia-smi
If you don't have the CUDA drivers installed, do so now. In this configuration, you can select your operating system and choose the installer type to see the commands you need to run with your settings.
sudo apt update
sudo apt install -y nvidia-kernel-open-545
sudo apt install -y cuda-drivers-545
Download the Ollama binary and create an Ollama user
sudo curl -L https://ollama.ai/download/ollama-linux-amd64 -o /usr/bin/ollama
sudo chmod +x /usr/bin/ollama
sudo useradd -r -s /bin/false -m -d /usr/share/ollama ollama
Create a service file. By default, you can access the Ollama API on port 11434 127.0.0.1. This means that the API is only available for localhost.
If you need external access to Ollama, you can Environment Remove and set an IP address to access the Ollama API. 0.0.0.0 Allows you to access the API via the server's public IP. If you use Environment If you are using , make sure your server firewall allows access to the port you have configured here. 11434 If you only have one server, you don't need to change the command below.
Copy and paste the entire contents of the following code block. This new file /etc/systemd/system/ollama.service Creates and inter-content EOF Adds to the new file.
sudo bash -c 'cat <<'EOF' >> /etc/systemd/system/ollama.service
[Unit]
Description=Ollama Service
After=network-online.target
[Service]
ExecStart=/usr/bin/ollama serve
User=ollama
Group=ollama
Restart=always
RestartSec=3
#Environment="OLLAMA_HOST=0.0.0.0:11434"
[Install]
WantedBy=default.target
EOF'
Reload the systemd daemon and enable the Ollama service.
sudo systemctl daemon-reload
sudo systemctl enable ollama
sudo systemctl start ollama
Use systemctl status olama to check the status. If Olama is not up and running, make sure you run systemctl start olama.
In the terminal, you can now start language models and ask questions. For example:
ollama run llama2
The next step explains how to install a web interface so you can ask your questions in a beautiful interface via a web browser.
Step 2 – Install Open WebUI
In the Olama documentation on GitHub, you can find a list of various web and terminal integrations. This example explains how to install Open WebUI.
You can install Open WebUI on the same server as Ollama, or you can install Ollama and Open WebUI on separate servers. If you install Open WebUI on a separate server, make sure that the Ollama API is exposed on your network. To double-check, /etc/systemd/system/olama.service View the server where Ollama is installed and the value OLLAMA_HOST Confirm.
The following steps explain how to install the interface:
- Manually
- With Docker
Install Open WebUI manually
Install npm and pip, clone the WebUI repository, and create a copy of the example environment file:
sudo apt update && sudo apt install npm python3-pip git -y
git clone https://github.com/ollama-webui/ollama-webui.git
cd ollama-webui
cp -RPp example.env .env
In environment. The address to connect to the Ollama API is set to default. localhost:11434 is set. If you have installed Ollama API on the same server as your Open WebUI, you can leave these settings as is. If you have installed Open WebUI on a separate server than Ollama API, environment. Edit and replace the default value with the server address where Olama is installed.
Dependencies listed in package.json Install and run the script named build Run:
npm i && npm run build
Install the required Python packages:
cd backend
sudo pip install -r requirements.txt -U
Web interface with olama-webui/backend/start.sh Start.
sh start.shIn start.sh, the port is set to 8080. This means you can access Open WebUI in http:// :8080 Access. If you have an active firewall on your server, you will need to allow the port before you can access the chat UI. To do this, you can now skip to «Step 3 – Allowing Ports to Web UI». If you do not have a firewall, which is not recommended, you can now skip to «Step 4 – Adding Models».
Install Open WebUI with Docker
For this step you need to install Docker. If you haven't installed Docker yet, you can do so now using this tutorial.
As mentioned earlier, you can choose to install Open WebUI on the same server as Ollama or install Ollama and Open WebUI on two separate servers.
Install Open WebUI on the same Ollama server
sudo docker run -d -p 3000:8080 --add-host=host.docker.internal:host-gateway -v open-webui:/app/backend/data --name open-webui --restart always ghcr.io/open-webui/open-webui:main
Install Open WebUI on a different server than Ollama
sudo docker run -d -p 3000:8080 -e OLLAMA_API_BASE_URL=http://<ip-adress>:11434/api -v open-webui:/app/backend/data --name open-webui --restart always ghcr.io/open-webui/open-webui:main
In the Docker command above, the port is set to 3000. This means that you can access the Open WebUI in http:// :3000 Access. If you have an active firewall on your server, you will need to allow the port before you can access the chat interface. This is explained in the next step.
Step 3 – Allow Port to Web UI
If you have a firewall, make sure it allows access to the Open WebUI port. If you installed it manually, you will need to open the port. 8080 TCP If you installed it with Docker, you need to allow port 3000 TCP Let me.
To check again, you can use netstat Use and see which ports are being used.
holu@<your-server>:~$ netstat -tulpn | grep LISTEN
Proto Recv-Q Send-Q Local Address Foreign Address State
tcp 0 0 127.0.0.1:11434 0.0.0.0:* LISTEN
tcp 0 0 0.0.0.0:8080 0.0.0.0:* LISTEN
There are several different firewall tools. This tutorial will configure the default firewall tool for Ubuntu. ufw If you are using another firewall, make sure it allows inbound traffic to TCP port 8080 or 3000.
Manage firewall rules ufw:
- View current firewall settings
To check if the firewall ufw is active and do you already have any rules, you can use the following:
sudo ufw status
- Allow TCP port 8080 or 3000
If the firewall is enabled, run this command to allow incoming traffic to TCP port 8080 or 3000:
sudo ufw allow proto tcp to any port 8080
- View new firewall settings
New rules should now be added. To check, go to:
sudo ufw status
Step 4 – Add Models
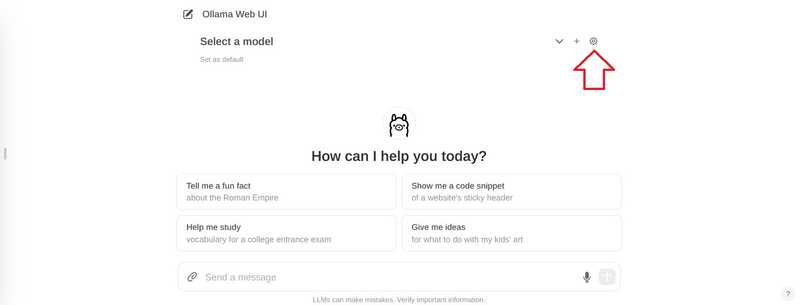
After accessing the web interface, you need to create your first account. This user will have administrative rights. To start your first chat, you need to choose a model. You can browse a list of models on the official llama website. In this example, we will add “llama2”.
In the top right corner, select the settings icon.
Go to “Models”, enter a model and select the download button.
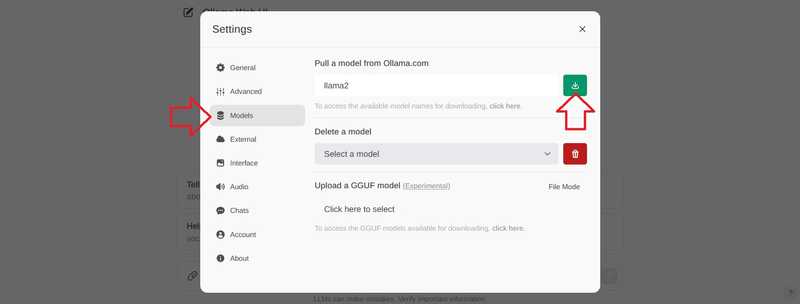
Wait for this message to appear:
Model 'llama2' has been successfully downloaded.
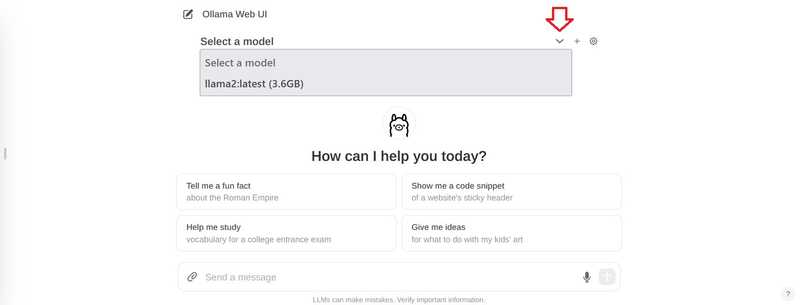
Close the settings to return to chat.
In the chat, click “Select Model” at the top and add your model.
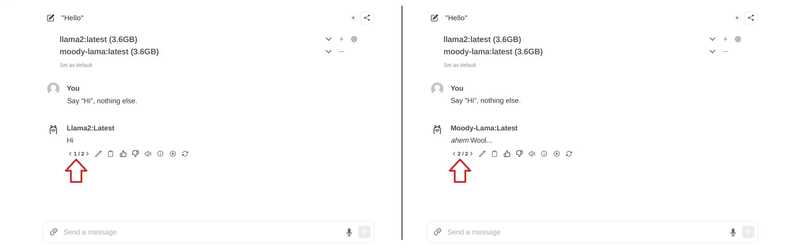
If you want to add multiple models, you can use the + sign at the top.
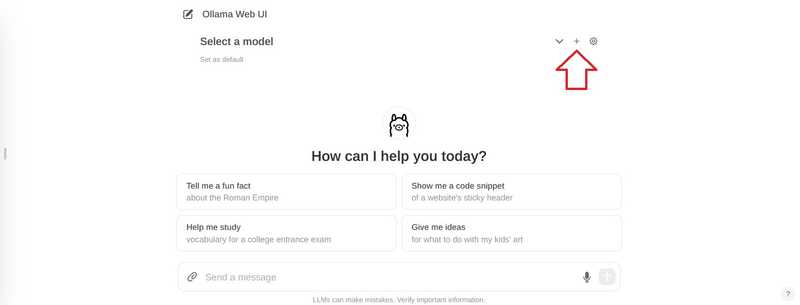
Once you have added the models you want to use, you can start asking your questions. If you have added multiple models, you can switch between the answers.

Step 5 – Add your model
If you want to add new models through the interface, you can do so via http:// :8080/modelfiles/create/ Do it. If needed. 8080 with 3000 Replace.
The following will focus on adding a new model via the terminal. First you need to connect to the server that has olama installed. From the list world Use to list the models that are available so far.
- Create a model file
You can find the requirements for a model file in the Olama documentation on GitHub. On the first line of the model file FROM You can specify which model you want to use. In this example, we will modify the existing llama2 model. If you want to add a completely new model, you need to specify the path to the model file (for example FROM ./my-model.gguf).
nano new-model
Save this content:
FROM llama2
# The higher the number, the more creative are the answers
PARAMETER temperature 1
# If set to "0", the model will not consider any previous context or conversation history when generating responses. Each input is treated independently.
# If you set a high number such as "4096", the model will consider previous context or conversation history when generating responses. "4096" is the number of tokens that will be considered.
PARAMETER num_ctx 4096
# Set what "personality" the chat assistant should have in the responses. You can set "who" the chat assistant should respond as and in which style.
SYSTEM You are a moody lama that only talks about its own fluffy wool.
Create a model from the model file
ollama create moody-lama -f ./new-model
- Check if the new model is available.
Use the olama command to list all models. Moody-lama should also be listed.
ollama list
- Use your model in WebUI
When you return to the web interface, the model should now be in the model selection list. If it's not showing yet, you may need to do a quick refresh.
Result
In this tutorial, you learned how to host an AI chat on your own server and how to add your own models.