How to install cPanel/WHM on Ubuntu 20.04
Installing cPanel on Ubuntu provides a lot of features. As an administrator, using this web hosting control panel will help you simplify the process of hosting a website for the end user of the website. cPanel & WHM, being a test software, are not ready to be used in a production environment before they are finalized. Also, installing cPanel on Ubuntu 20.04 requires some prerequisites which are included in this guide. In this article, you will learn how to install cPanel/WHM on Ubuntu 20.04.
It only works on Linux systems. So, if you have concerns about the complexities of a Linux VPS but need to host your own website, application, database, bots, or email accounts, a cPanel VPS alternative is a good idea. Let’s go through this to review everything you need to know about this popular software solution for servers.
What is cPanel?
cPanel is an easy-to-use, scalable, and developer-friendly web hosting control panel that offers a graphical user interface. Using this interface helps you make all the important settings through the web-based interface of two programs, cPanel and WHM (Web Host Manager). cPanel is great for managing servers or configuring web hosting packages. It comes with a 15-day free license, but after that, each cPanel and WHM server requires its own license.
So, if you don't already have a license for cPanel and WHM, get one for your server's IP address. To find the best plan, visit the cPanel store and purchase one.
When should you choose cPanel and WHM?
Both cPanel and WHM are powerful tools for managing servers and hosting accounts. Beginners find cPanel to be an ideal control panel solution. However, WHM is more commonly used for managing dedicated servers or VPS hosting services. It is not available with standard web hosting services, but it is great for managing reseller services, cPanel accounts, and server settings.
As an administrator, you can create cPanel accounts for clients, monitor and secure your server, and transfer and backup data with a few clicks. On the other hand, when you need to manage your server and configure web hosting accounts, you can consider starting with cPanel. It also allows you to check the status of your website and perform troubleshooting tasks on your website. It also offers a wide range of features for users, such as website and domain creation, setting up and managing email networks, and storing web files.
cPanel Features
The cPanel website claims to have a rich feature set and excellent customer support, cPanel’s automated and customizable platform allows customers to focus on growing their business. So, let’s see what features cPanel has as a type of control panel used to perform tasks on your hosting server and website:
- User-friendly interface
- Reliable support
- Easily configure
- Automatic software installation
- Security settings
- Monitor and protect servers and sites in minutes
- Very compatible
- Publish a website
- Log files
- Set up databases
And more.
WHM Features
The WHM platform can satisfy developers, solo designers, small businesses, or even a team of 20. Now, let’s review the features of WHM web hosting management features.
- User management
- Server monitoring
- Resetting cPanel accounts
- Backup and move
- Modify DNS Zone Records
- Add domains to the server
- Configure name servers
- Perform system and control panel maintenance.
And more.
Prerequisites for installing cPanel and WHM on Ubuntu 20.04
To successfully complete the installation process, you need to consider some prerequisites before that. First, you need to have Ubuntu 20.04 up and running. To place an order or need any advice, start a chat with our online experts.
Secondly, keep in mind that your server should not have any other software installed. If I put it in words, a new server is required.
In order for your server to be compatible to perform the installation process, the following prerequisites must be met.
Your server should have a non-root user with sudo permissions and a basic firewall.
Perl must be installed.
- A hostname with a fully qualified registered domain name.
- SELinux must be disabled (if installed).
- Processor: Minimum 1.1 GHz and maximum 2 GHz
- At least 1 GB of RAM
- Minimum 20 GB and maximum 40 GB of disk space
- FQDN
- 64-bit architecture
- Static IP address
For more information, check the main website to check Ubuntu's system requirements.
Is the system packed? Let's conquer the peak
Step by step to install cPanel and WHM on Ubuntu 20.04
After providing all the server system requirements, follow the steps in this article to complete the installation successfully.
Step 1
To update your system packages to the latest version and rebuild the system cache, use the following command:
sudo apt update
sudo apt upgradeگام 2
همانطور که اشاره کردیم، FDQN و یک نام دامنه کاملا واجد شرایط مورد نیاز است. در این مرحله باید نام دامنه ای را که قصد استفاده از آن را دارید تنظیم کنید. دستور زیر را برای بررسی نوع نام میزبان فعلی خود اجرا کنید:
hostnameاکنون، فایل را ویرایش کنید تا آن را روی یک نام میزبان کاملا واجد شرایط تنظیم کنید. در این مقاله، فرض می کنیم که demo.operavps.com است.
nano /etc/hostnameسپس، می توانید نام میزبان قدیمی را حذف کرده و نام جدید را اضافه کنید. برای ذخیره و خروج از فایل، Ctrl + O را فشار دهید، کلید Enter را فشار دهید و Ctrl + X را برای خروج فشار دهید.
برای باز کردن فایل etc/hosts/، اجرا کنید:
nano /etc/hostsدستوری مانند زیر را اجرا کنید اما آدرس IP را با آدرس سرور خود و همچنین نام دامنه تغییر دهید.
your IP yourserver.domain.com yourserverچیزی مثل:
**.**.**.*** demo.operavps.com demoبرای ذخیره و خروج از فایل، Ctrl + O را فشار دهید، کلید Enter و سپس Ctrl + X را فشار دهید تا خارج شوید.
اکنون می توانید سرور را راه اندازی مجدد کنید. بنابراین، تایپ کنید:
rebootدر این لحظه، باید از دستور زیر برای تأیید تنظیم نام میزبان استفاده کنید.
hostnameگام 3
خیلی نزدیک به اتمام نصب. برای ایجاد یک جلسه پوسته، می توانید از ابزار Linux Screen استفاده کنید. به فعال ماندن پس از قطع شدن شبکه کمک می کند. اجرا کن:
screen
اگر صفحه نمایش نصب نشده است، از دستور زیر برای نصب آن استفاده کنید.
apt install screenو در نهایت برای نصب cPanel دستور زیر را اجرا کنید:
cd /home && curl -o latest -L https://securedownloads.cpanel.net/latest && sh latestخروجی نمونه به شکل زیر خواهد بود:
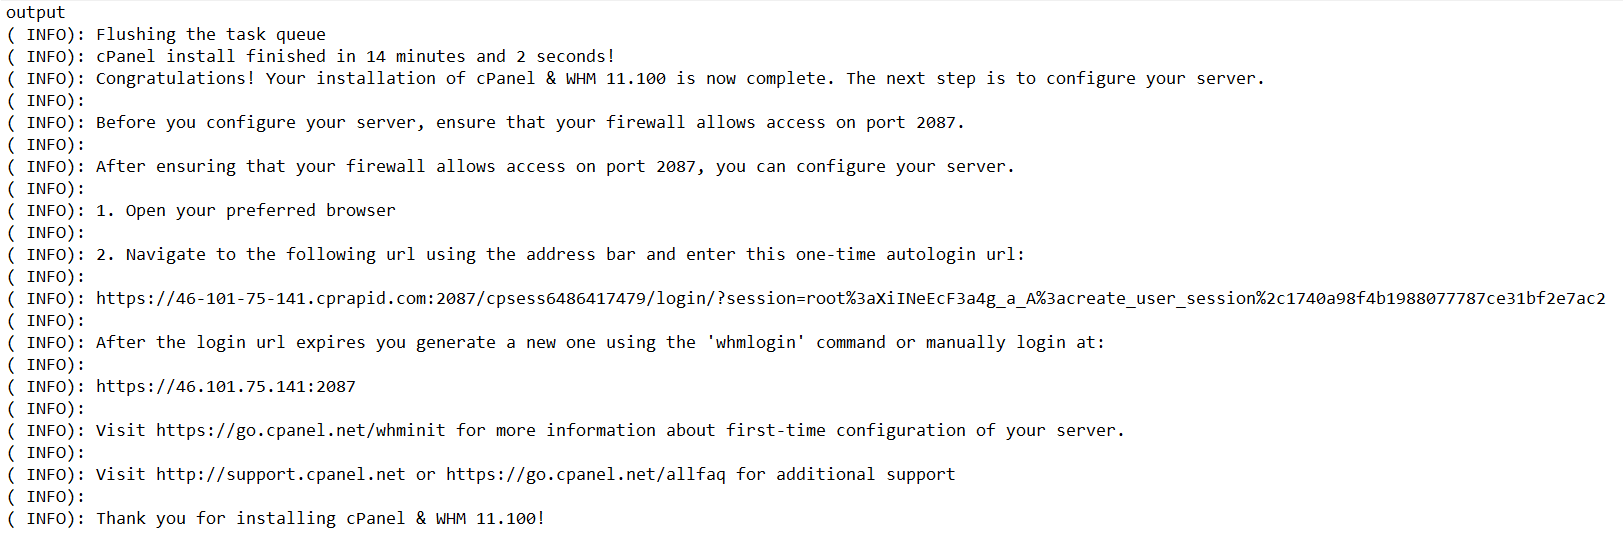
ممکن است چند دقیقه طول بکشد تا نصب تمام شود زیرا وابستگی های زیادی از جمله MariaDB برای مدیریت پایگاه داده نصب می کند. ترمینال را نبندید. پس از انجام آن، پیام را دریافت خواهید کرد.
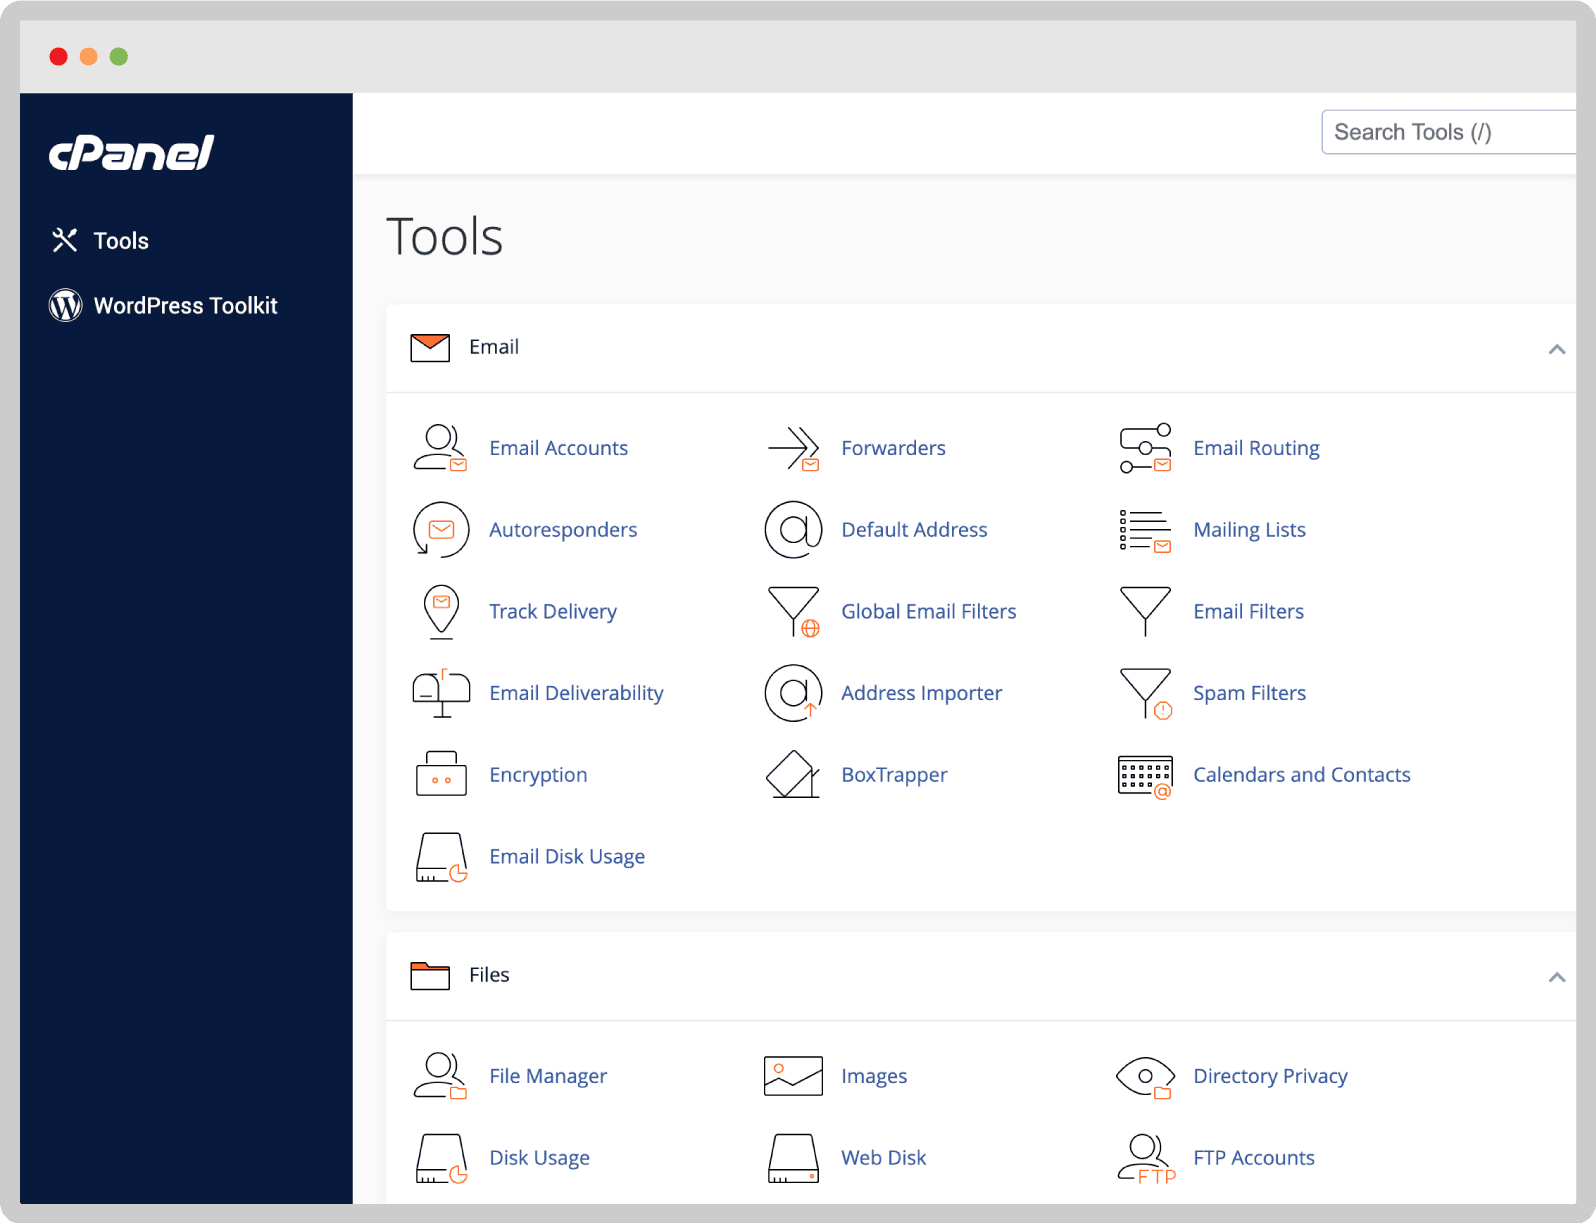
نحوه راه اندازی cPanel/WHM در اوبونتو 20.04
برای دسترسی به رابط وب cPanel/WHM، مرورگر مورد علاقه خود را باز کنید و https://<your_IP_address>:2087
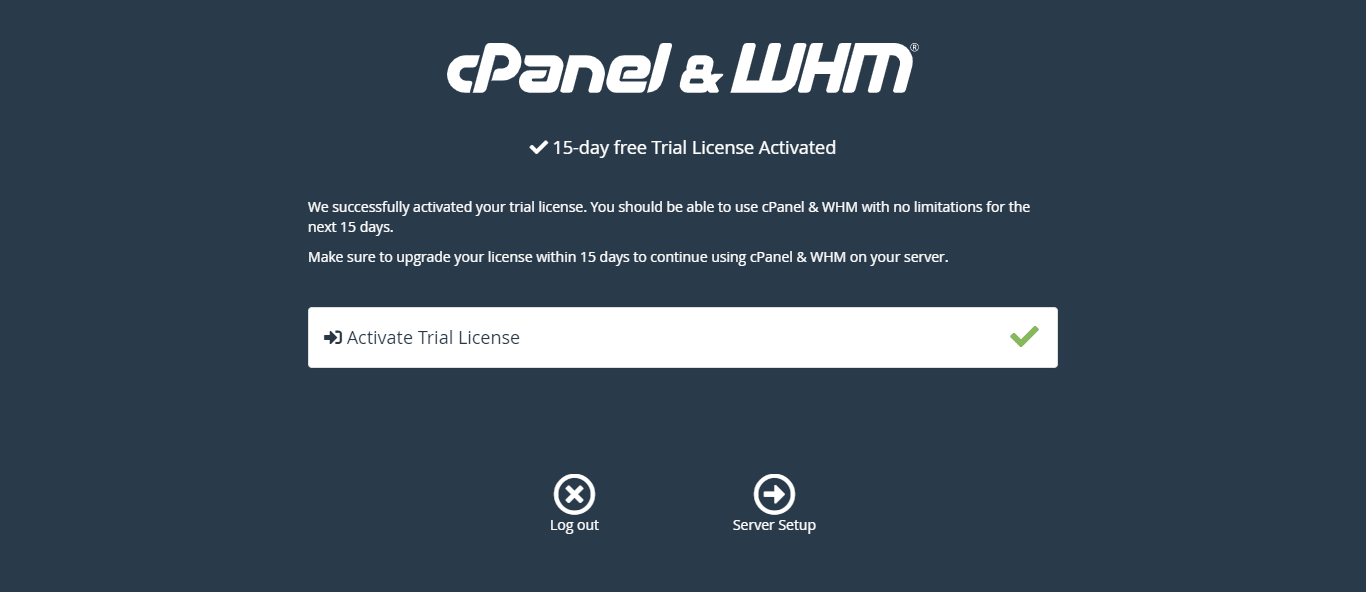
ممکن است از شما خواسته شود یک حساب کاربری ایجاد کنید و کد تأیید ارسال شده به ایمیل خود را وارد کنید. همانطور که می دانید مجوز آزمایشی 15 روزه فعال می شود. و سپس، می توانید وارد WHM شوید.
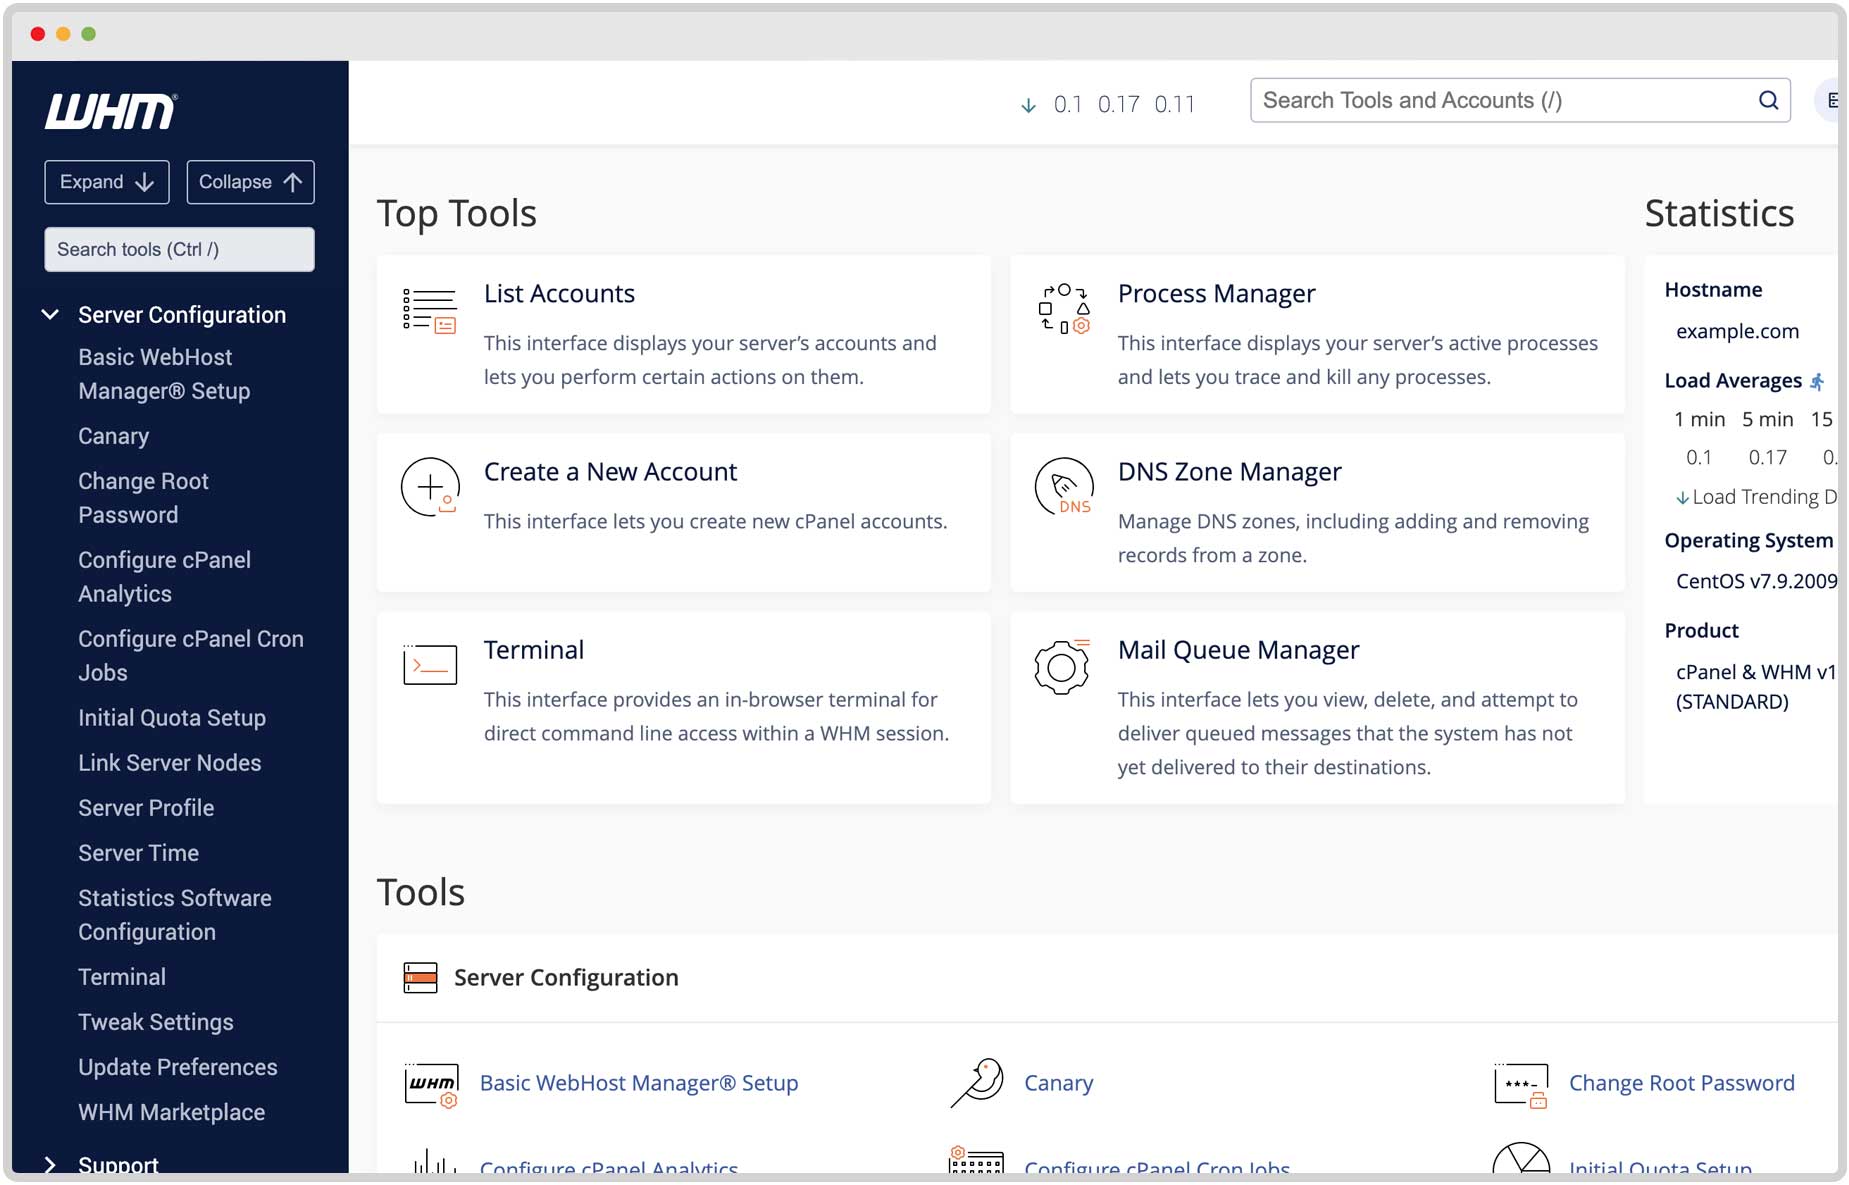
با استفاده از کاربر ریشه اوبونتو وارد WHM شوید
برای ورود به WHM باید صفحه ورود را مشاهده کنید تا اطلاعات مورد نیاز را وارد کنید. root را به عنوان نام کاربری و رمز عبور تنظیم شده برای آن را در سرور اوبونتو 20.04 وارد کنید. (با اجرای passwdcommand ایجاد شده است)

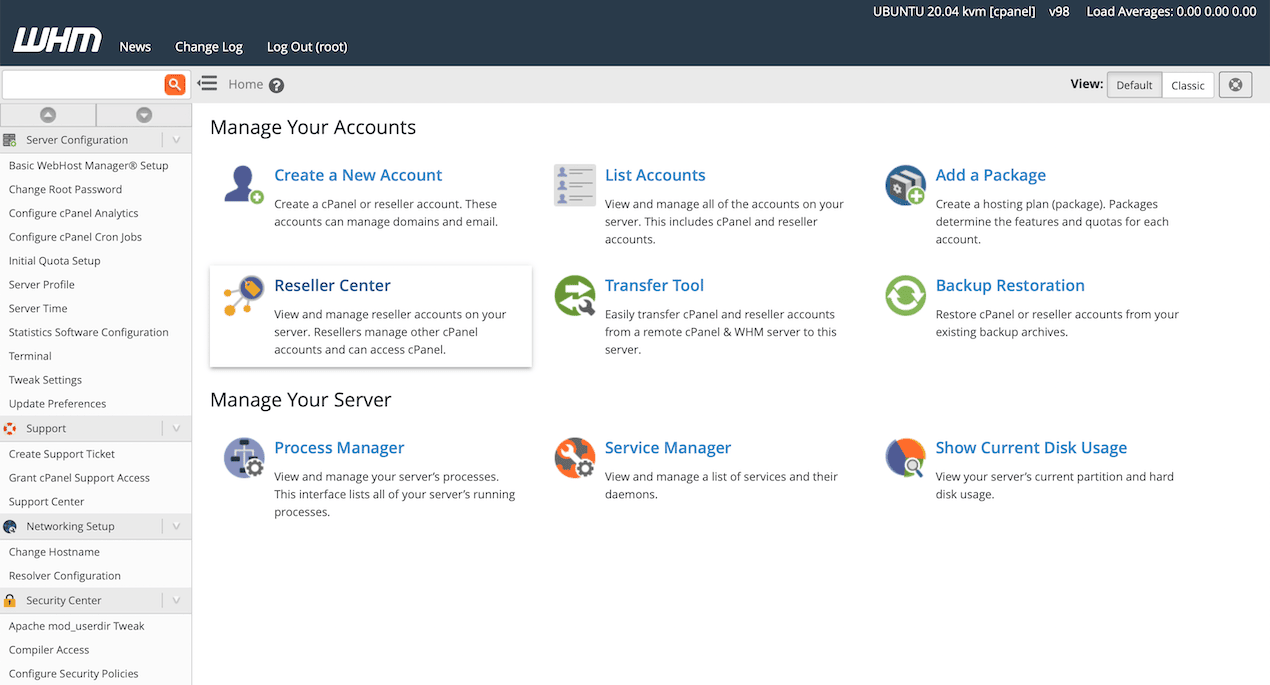
وقتی وارد WHM خود شدید و آدرس ایمیل خود را ارائه دهید، روی Agree to All کلیک کنید. سپس، هنگامی که از ویزارد درخواست می کند مجوز آزمایشی برای بدست آوردن آن ایجاد کند، از طریق جادوگر بروید.
این تمام چیزی است که باید در مورد نصب cPanel و WHM در اوبونتو 20.04 بدانید. فقط پیکربندی را ذخیره کنید تا به صفحه اصلی WHM منتقل شود.
نتیجه
در این مقاله نحوه نصب cPanel و WHM را در اوبونتو 20.04 یاد گرفتید. برای داشتن نصب آسان، تمام مراحل مورد نیاز این راهنما را رعایت کنید. توسعه دهندگان و فناوری اطلاعات، کسب و کارهای کوچک تا متوسط، آژانس های دیجیتال و ارائه دهندگان هاست مشتریان سی پنل و طرفداران بزرگ آن هستند. برخی دیگر از کنترل پنل های میزبانی وب منبع باز وجود دارند که جایگزین های خوبی برای سی پنل هستند مانند نسخه رایگان CyberPanel، Ajenti، Zpanel، نسخه Virtualmin GPL، Froxlor، ISPconfig و aapanel.